Using Input Variables and Outputs in Terraform.
All programming languages can introduce dynamism in their processing model using variables. Variables are passed to the programming language and dependent on the business rule/technical outcomes expected, influence the eventual result of our technical operations.
Terraform is no different. It can accept input variables and makes our Terraform configuration re-usable.
Table of Contents
Declaring Input Variables
An input variable is a messanger that takes our message to Terraforms engine.
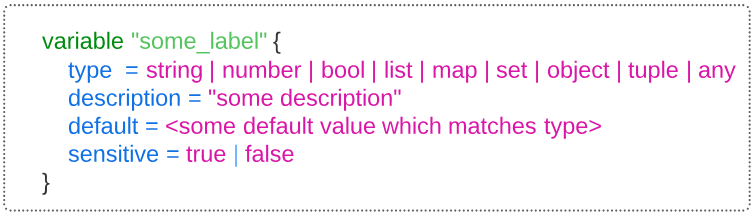
As an example, let's declare a variable for setting our AWS region.
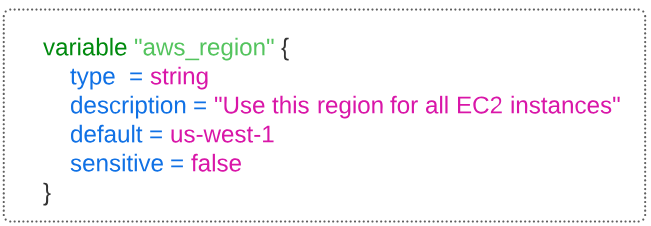
- The region to use will be set to us-west-1 and if at run time no other region value is passed, Terraform will use this default.
- Since the region we place our infrastructure is not necessarily a secret (unless of course you are using Terraform for CIA), setting sensitive to false makes sense.
Demo: Configuration Updates via Input Variables
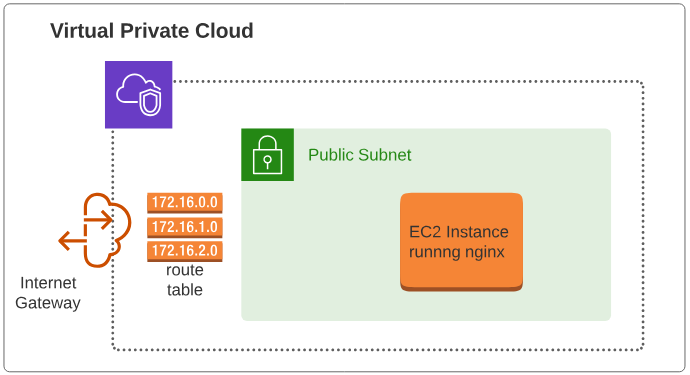
In a previous article, we configured a web server, using Terraform, on AWS.
In that article, we were driving towards the establishment of an infrastructure resembling Figure 3 below.
When setting up this infrastructure, we had used hard coded values for a number of keys.
We will modify the approach and use input variables to introduce some level of dynamicity in our IaC tasks.
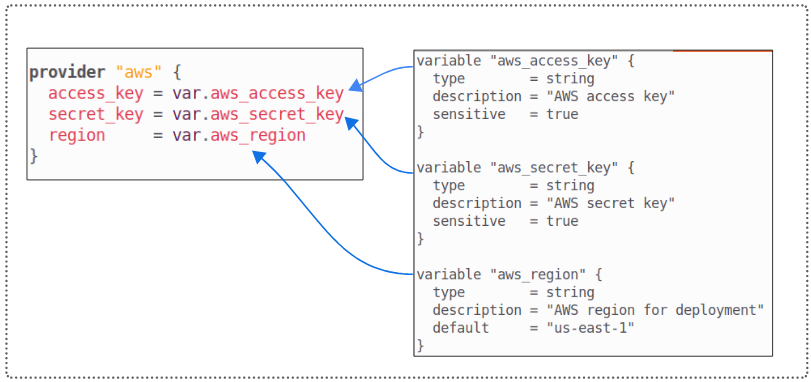
Step 1: Examine the main.tf file to identify potential input variables use.
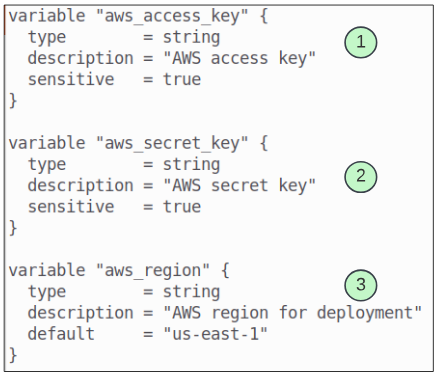
The main.tf file has many hard coded values and theoretically, all of them are acceptable candidates for being set by input variables. However, we will only focus on the provider block (with access key, secret key and region).
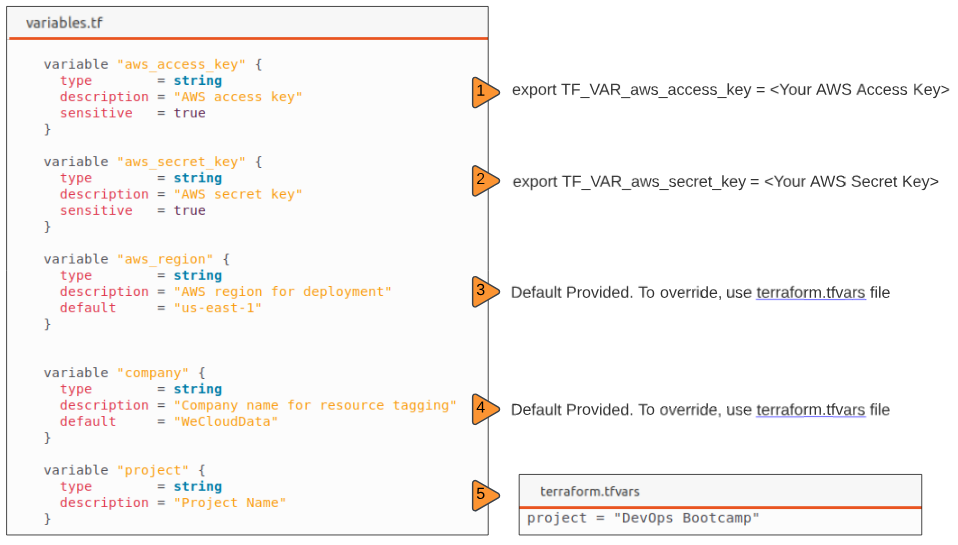
Step 2: Create a file and name it variables.tf.
The contents of the variables.tf are shown below.
Step 3: Reference the variables inside main.tf.
Introducing Local Variables
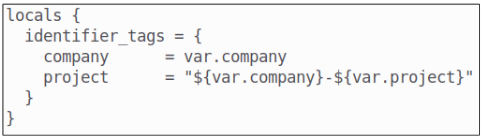
In addition to input variables, Terraform also supports local variables. A local variable assigns a name to an expression, so you can use the name multiple times within a module instead of repeating the expression. For example, in the variables.tf file, we have aws_access_key and aws_region. If we were to create an expression, using the powers of interpolation, as shown below
${var.aws_access_key}-${var.aws_region}
the output would be
AKIAREDXVKS2M7BWONOZ-us-east-1
*of course, you will NEVER use your access key for any thing that has to be publicly displayed. We did it here for the sake of illustrating a point.
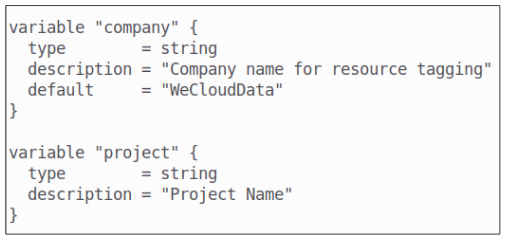
Step 4: Add 2 more variables to the variables.tf file.
Add 2 more variables to the variables.tf file. The use case we are shooting for is to create a label that we can use as a tag on our resources.
Step 5: Create a locals.tf file.
This type of financial due diligence is part of FinOps.
If you want to get articles related to FinOps, subscribe to this blog.
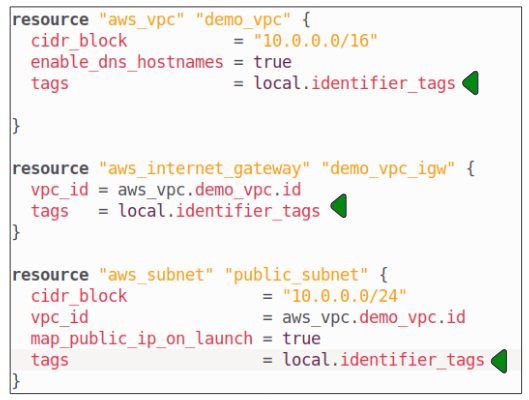
Step 6: Include contents of the locals.tf file inside the main.tf configuration file.
Introducing Outputs
Output values make information about your infrastructure available on the command line, and can expose information for other Terraform configurations to use.
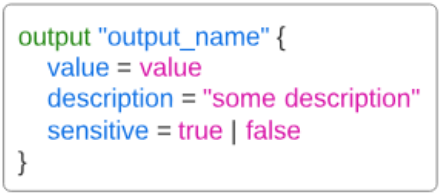
Step 7: Add a file outputs.tf.
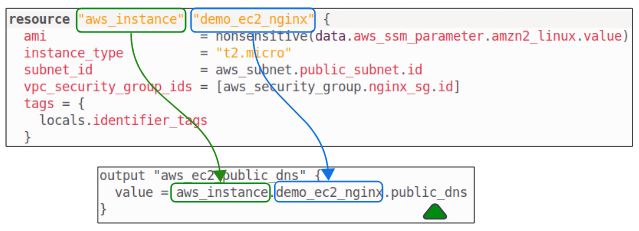
Lets assume we want to display the public DNS name of the EC2 instance we are trying to set up for this demo.
We will need to add an output to the outputs.tf file. In this file, we will set up an output variable to get the DNS of the EC2 instance.
Introducing fmt and validate.
So far, we've looked at variables, outputs and configuration files. For those who are python-ista and/or delve deep into JavaScript, using linters and formatters is second nature. Terraform does not disappoint here as well. Using fmt and validate, all files ending in Terraform's native file extensions (.tf, .tfvars) can be linted for syntax discrepencies.
Step 8: Lint (and fix) Terrform file's format.
Introduce an obvious format error in the main.tf file.
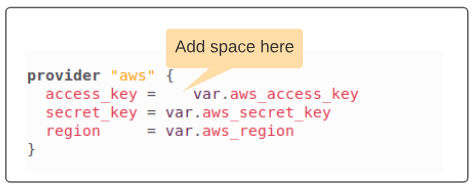
Type
$ terraform check -fmt
to invoke Terraform's linter.

Since we have an unexpected space in main.tf file, check -fmt will list the files name on the console.
We can auto-magically remove this linting error by removing the -check switch
$ terraform fmt

Step 9: Fix syntax errors using validate.
With fmt -check, Terraform will check stylistic coherence of the code. Using validate, however, will cause Terraform to check syntax errors (like missing variable names being referenced, or using the wrong declaration and definition of variable types).
Let's introduce an error in main.tf to put our theory to the test.

Type
$ terraform validate
to start the validation of main.tf.
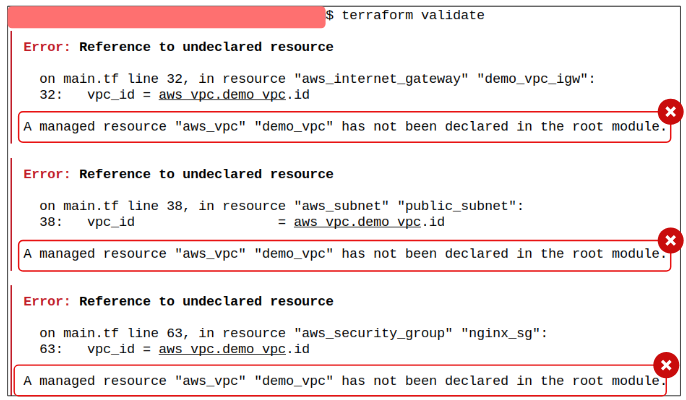
Unlike fmt -check, invalid syntax needs to be manually fixed.
Add the c we removed from demo_vpc, save the file and run the validate command again.

Supplying Variable Values.
So far in our demo, we looked at declaring variables, local variables, outputs and formatting/validation. Some of the variables declared have default values but there are still others for which a value has to be provided.
Theoretically, there are 6 ways of supplying variable values to Terraform:
- As default values
- Through the use of a -var flag
- Using the -var-file flag through which a file with variable values can be passed to Terraform engine
- Through terraform.tfvars or terraform.tfvars.json files
- Through .auto.tfvars or .auto.tfvars.json files
- Using environmental variables saved with the prefix TF_VAR_
These options can be combined of course.
Q. What if I accidentally set different values for the same variable when combining some of the 6 ways?
The order of precedence in this case is:
TF_VAR_ ==> terraform.tfvars/terraform.tfvar.json ==> .auto.tfvars/.auto.tfvars.json ==> -var-file flag ==> -var flag
The last entry in this list will be used for assigning a value to a variable.
Step 10: Supply variable values for Terraform to use when provisioning.
Setting TF_VAR_aws_access_key and TF_VAR_aws_secret_key.

$env: TF_VAR_aws_access_key="key"
$env: TF_VAR_aws_secret_key="secret"
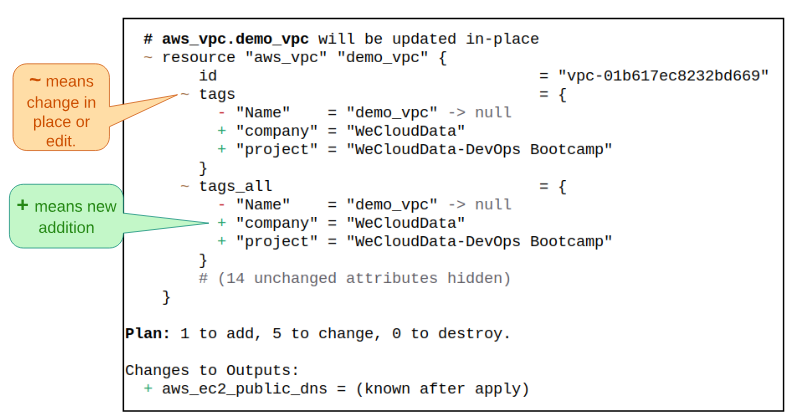
Step 11: Rerun terraform plan.
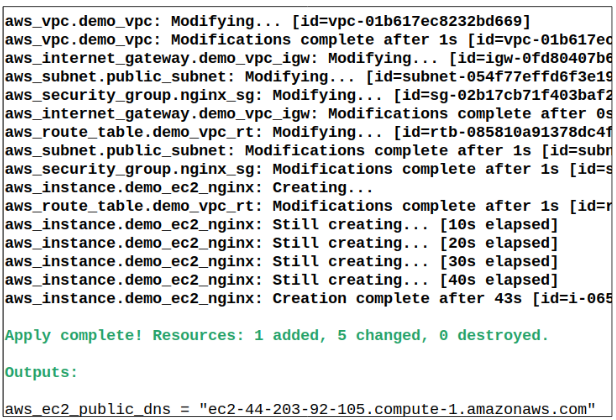
Step 12: Rerun terraform apply.
I write to remember and if in the process, I can help someone learn about Containers, Orchestration (Docker Compose, Kubernetes), GitOps, DevSecOps, VR/AR, Architecture, and Data Management, that is just icing on the cake.