K8s Storage: Static Storage Provisioning.
Pods come and Pods go. While that is ok and expected, it does raise a serious question about the fate of the data that is generated during the Pods compute activities. Does the data disappear along with the Pod? If it does, isn't that inconvenient? It is in response to these questions that the fine folks working on K8s introduced Persistent Volumes (PV) and Persistent Volume Claims (PVC) objects: to create a storage space for data that is needed by or generated from Pods.
Table of Contents
- The need for persistent storage in K8s
- Storage Objects in K8s
- K8s Volume Types
- PersistentVolumeClaims (PVC) and PersistentVolumes(PV)
- Static Storage vs Dynamic Storage
- Demo: Static Storage Provisioning using NFS Server
Why should we care about persistent storage in a K8s cluster?
Pods run containers, and by virtue of their nature, containers, much like an average Canadian's paycheck, are ephemeral (i.e. they last for a brief amount of time).
If there is any intention of saving the data generated as a by-product of compute running inside these containaers, we, as K8s engineers, need to provide some kind of data storing capabilities. It is because of this reason therefore that understanding persistent storage inside a K8s cluster is important.
Storage Objects in K8s
The core storage 'device' used by K8s is the Volume.
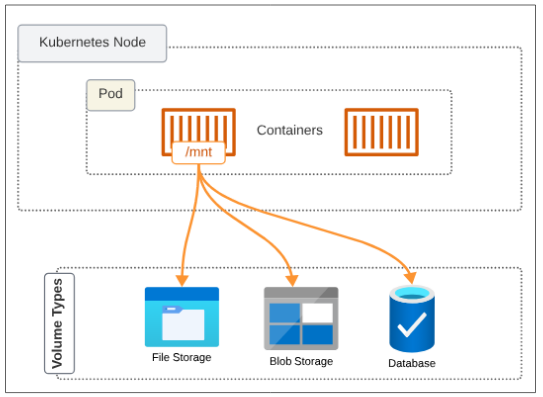
Inside each ephemeral container, we can mount a Volume (fancy word for storage space inside a container) into a mount path (which is some folder inside the container). Everything that happens in the container can be saved in the mount path folder and the attached Volumes will pick that data up and keep for themselves. Therefore, once the container is gone, the data it produced is still around. When the next container is launched, to replace the one that was lost, it will again connect the mount path folder to the Volume and data persistence will be achieved.
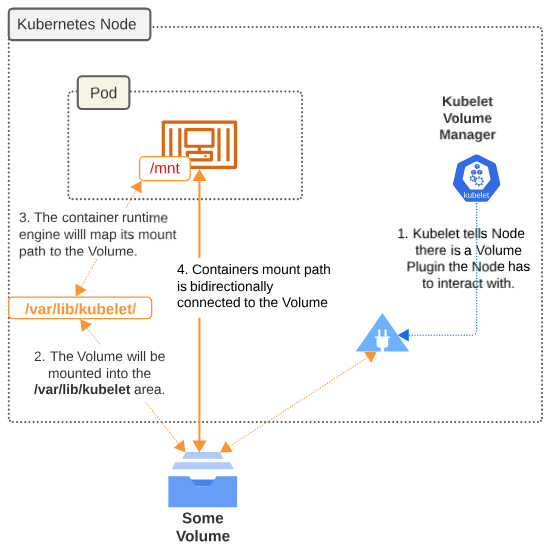
Volume Plugins are pieces of code that make the mounting of the Volume into the containers mount path easy. There are many native and external/third party Volume plugins.
Each Volume type (File Storage vs Block Storage vs Cloud Distributed Storage) have their own Volume Plugins. Volume Plugins are pieces of codes that will make a Node aware of the existence of a Volume. Once the Node is aware of this Volume, the containers runtime will bind with this Volume as a mount.
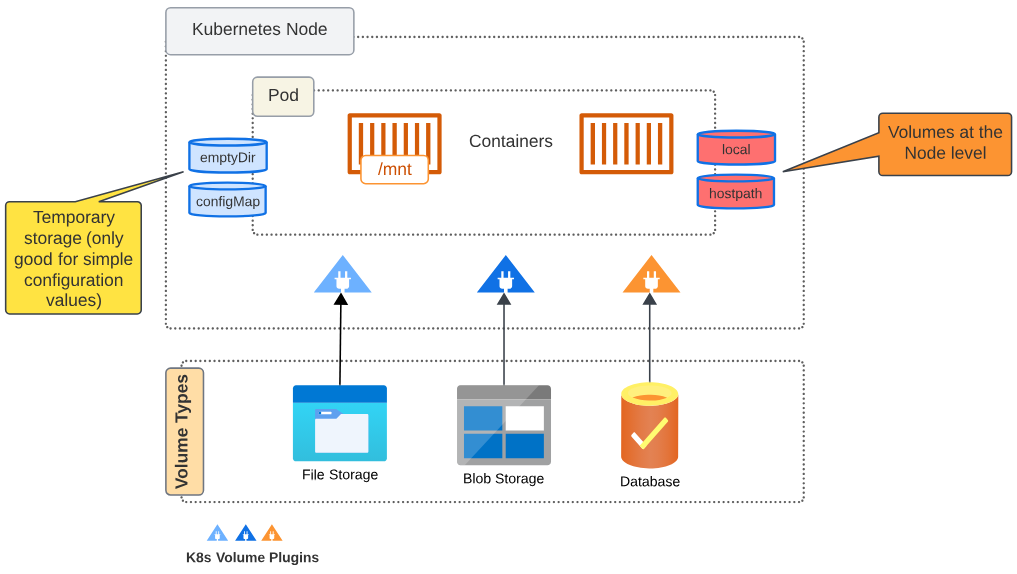
K8s Volume Types
For short term ephemeral storage and sharing data between containers in a Pod
- emptyDir: For Caching and temporary files
- ConfigMap and Secrets: Configurtion data, sensitive information (though not recommended).
For persistent data storage (e.g. for stateful applications)
- Persistent Remote Storage: NFS, GCE, AWS EBS etc
For local caching at Node (e.g. when required for startup or intermediate compute steps)
- Local
- HostPath
PersistentVolumeClaims (PVC) and PersistentVolumes (PV)
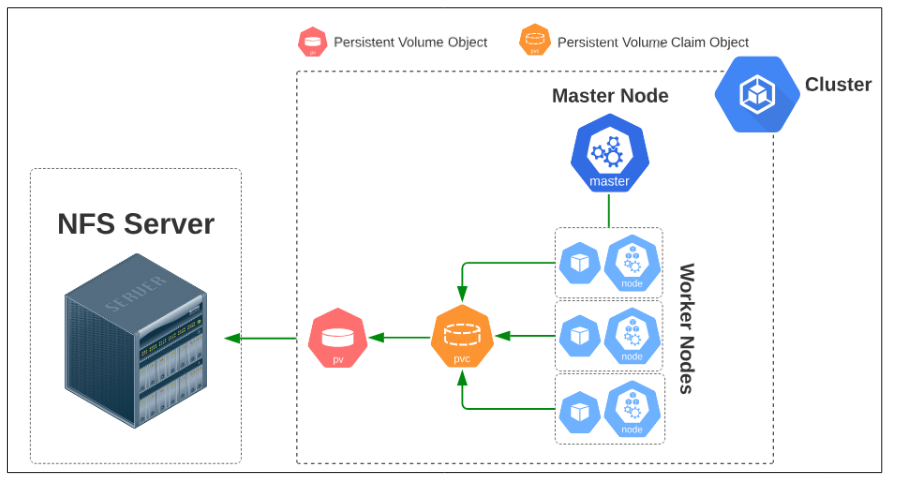
Persistent Volumes are a representation of the actual storage medium (where data is saved) while a Persistent Volume Claim is the object that tells the Kube-API server that a Pod(s) has a request for a certain type of storage (i.e. it should have X GB of space, should be in the cloud or a local file server etc). The Pods do not DIRECTLY connect to a PV, rather both these K8s objects (the Pod and PV) are linked together through the PVC, which acts as a sort of intermediary.
The relationship between a Pod, its PVC and a PV will become clear as we proceed on with the demos.
Difference between Static and Dynamic Persistent Storage
There are two ways to provision storage for a pod in Kubernetes: Statically and Dynamically.
Static storage is typically used when we have a use-case where pre-populated data is needed. In this case, someone (like a K8s admin) will make the necessary manifests to configure the storages. Dynamic storage is used when, as users of the cluster, we don't know what our future storage needs will be, and therefore, any demand for storage is completed JIT and on-demand.
Demo: Static Storage Provisioning using NFS File Storage Server
Type of storage provisioning: Static.
NFS File Storage Servers may not be used in production scenarios as widely as they are in demo'ing K8s storage capabilities. We don't intend to break this tradition.
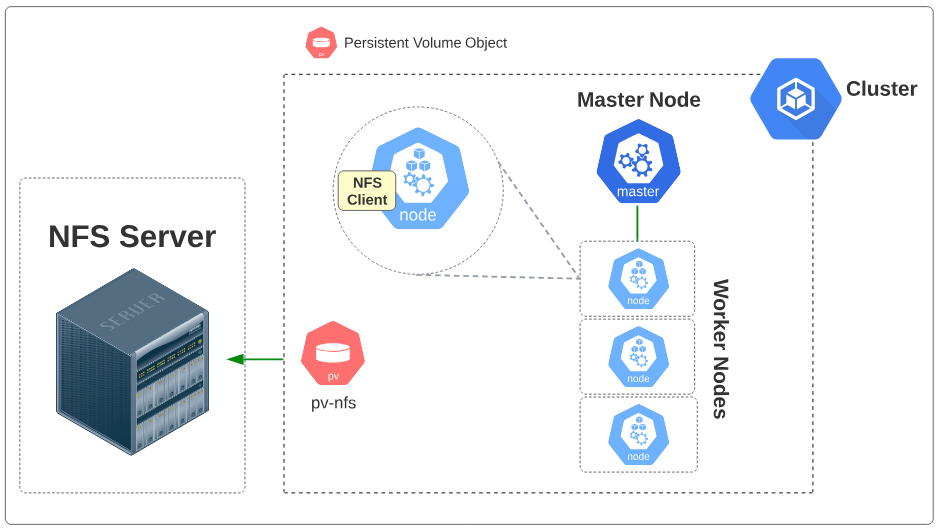
The conceptual layout for this storage style is provided below in Figure 1.
Steps:
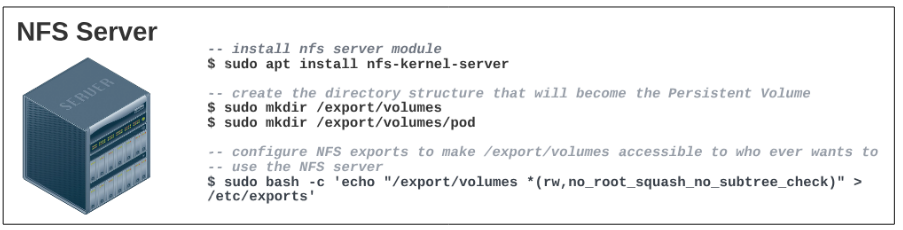
#1: We have to set up an NFS server.
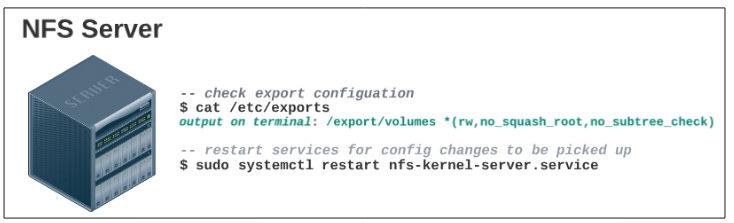
Confirm the export configuration was saved.
$ sudo apt install nfs-kernel-server
$ sudo mkdir /export/volumes
$ sudo mkdir /export/volumes/pod
$ sudo bash -c 'echo "/export/volumes *(rw,no_root_squash,no_subtree_check)" > /etc/exports'
$ cat /etc/exports
$ sudo systemctl restart nfs-kernel-server.service
#2: Save a simple HTML page in the NFS Server.
While still logged in to the NFS Server, add a simple HTML file which will be used later in our demo.
Copy the following commands and execute them in a terminal inside the NFS Server:
- $ sudo bash -c 'echo "This HTML file is on the NFS Server" > /export/volumes/pod/nfs.html'
#3: Install an NFS client on each node in your cluster.
The only way our Pods can make use of the NFS server is if the node they are hosted on can connect to it and for this reason, each node in our cluster requires an NFS Server Client.
For this demo, we will manually go into each of the 4 nodes in our cluster and install the NFS Server client but for those feeling adventurous, using Ansible to this exact same thing may be worth a shot.
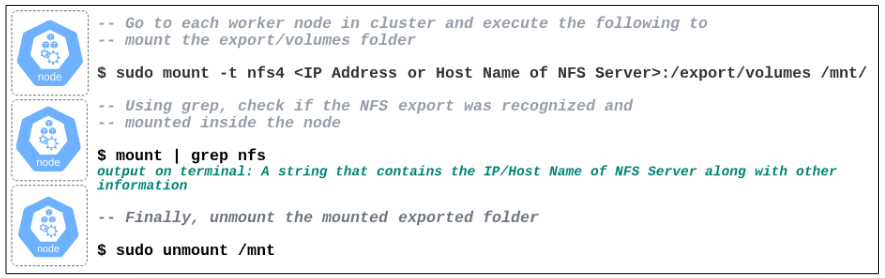
$ sudo mount -t nfs4 <IP/Host Name of NFS Server>:/export/volumes /mnt/
$ mount | grep nfs
$ sudo unmount /mnt
#4: Statically provision a Persistent Volume object.
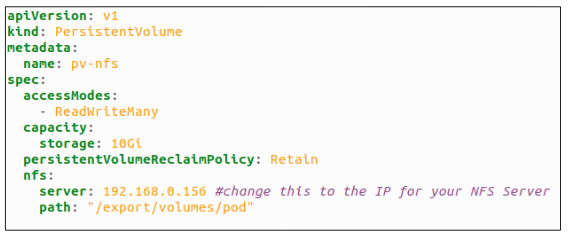
Using kubectl apply -f demo-nfs-pv.yaml, create the PV object inside the cluster.

The columns from left to right and the description of their content is provided below:
- NAME: pv-nfs
- CAPACITY: 10G
- ACCESS MODES: RWX (Read, Write Many Times)
- RECLAIM POLICY: Retain
- STATUS: Available (since this PV has not yet been claimed by any Persistent Volume Claim)
- AGE: 9s
Visually, the state of the cluster with this PV looks as shown in Figure 7 below.
#5: Create a Persistent Volume Claim for the Pods.
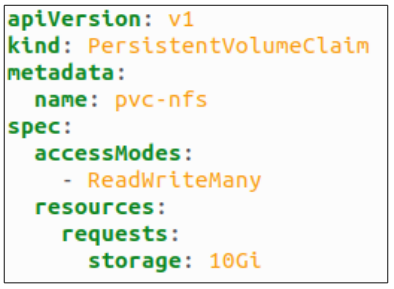
Using kubectl apply -f demo-pvc-nfs.yaml, a PVC is created and also attached to the PV that was made in Step 4.

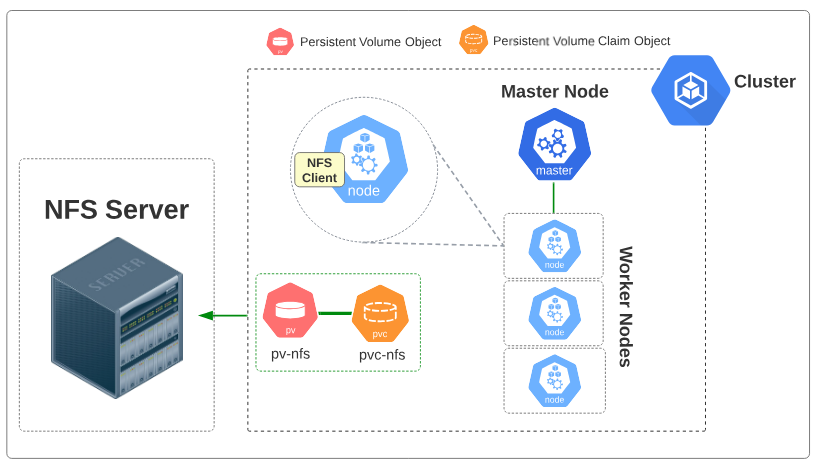
Visually, the state of the cluster with this PV looks as shown in Figure 10 below.
#6: Create a Pod with a PVC.
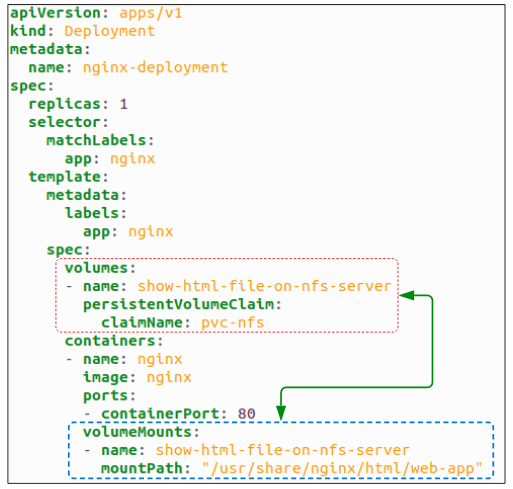
Deploy the manifest using kubectl apply -f nginx-deployment.yaml.
Visually, the state of the cluster with the Pod added resembles Figure 12.
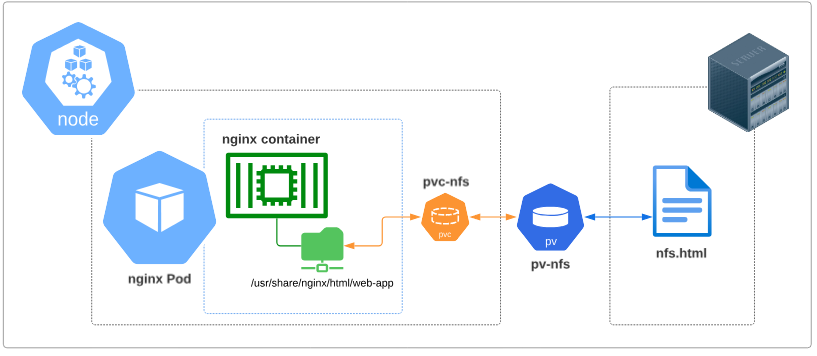
At this point in our demo,
- We see that the folder inside the container is indirectly (through pvc-nfs and pv-nfs) connected to the NFS File Server
- We can assume that the HTML file on the NFS Server can be accessed through the Pod we launched
Let's put our money where our assumptions are and access the Pod through a browser:
- Get the ClusterIP for the Service that was deployed as part of nginx-deployment.
- Type curl http://<ClusterIP>/web-app/nfs.html in the terminal. The string "This HTML file is on the NFS Server" will be printed right underneath the curl command

We can also peek into the nginx container in our Pod and confirm that there is a "copy" of the nfs.html file in the web-app folder.

One final thing to be aware of.
In Figure 12, notice pvc-nfs is not inside the boundaries of the Pod but rather shown at the node level. This is by design.
What happens is that when a PVC is made, its information is saved in the Kube-API server and also mounted into the node. As and when new Pods come up, the kubelet will already have this mount in the node, and simply attach the Pod to it.
To confirm if this is true, we could check the list of mounts for the node the Pod is (will be) deployed on.
- Use kubectl get pods -o wide to find out the node the Pod is deployed on:

- SSH into the node / login into the node and search for a mount which has the string nfs as a part of its name:

All this was great but how is this going to persist data generated in our Pods?
Let's delete the Pod we have. Visually, the state of the cluster when we do that will be that shown in Figure 17.
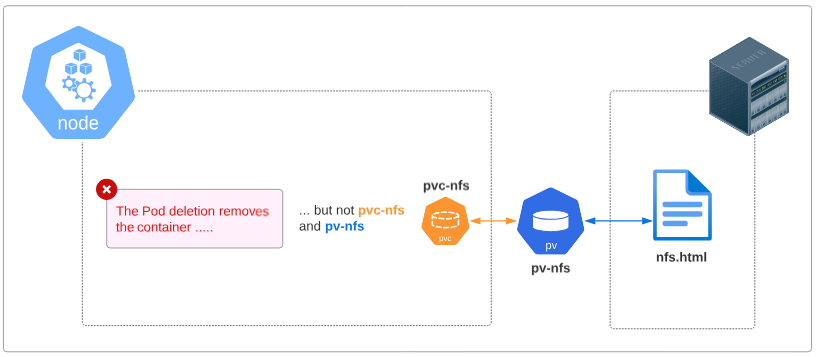
The Deployment that generated the first Pod will kick in again and spin up a new one to replace the one we deleted and since the Pod specs already have a reference to pvc-nfs, the connection between the underlying nginx container will be RECREATED.
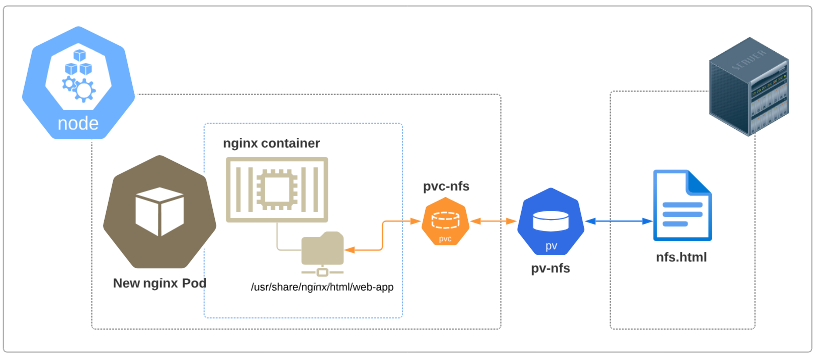
This, therefore, is the persistence mechanism that PV and PVC allows. Irrespective of Pods getting destroyed and recreated, any data that has to be saved for their functioning is saved in the NFS Server and will be there till the NFS Server itself is, somehow, deleted.
I write to remember and if in the process, I can help someone learn about Containers, Orchestration (Docker Compose, Kubernetes), GitOps, DevSecOps, VR/AR, Architecture, and Data Management, that is just icing on the cake.