K8s Security: Adding users with limited rights.
The default user kubernetes-admin is allowed a rather free hand inside the cluster. It has a lot of rights and in the unfortunate event that this users credentials fall into the wrong hands, the cluster can become exposed to malicious intents. It is, therefore, a good practice to set up dedicated users with limited permissions for specific roles. For example, a developer may be allowed to CRUD Pods and Secrets in select namespaces while a QA analyst may only be allowed to issue GET requests for the same Pods.
Adding users with limited rights.
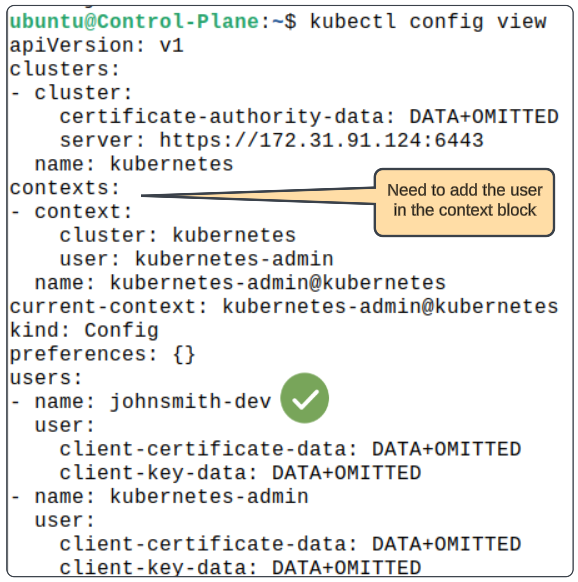
A quick reminder is necessary here. The list of users and their rights are saved in the kubeconfig file.
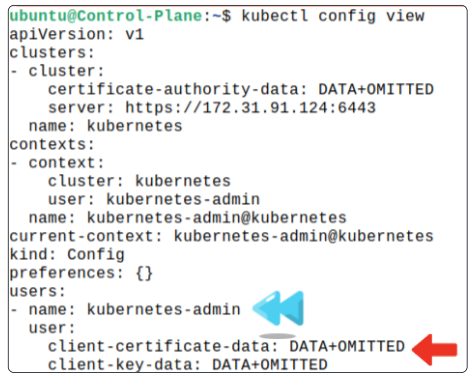
As shown, the only user in the kubeconfig is kubernetes-admin (and it has a client-certificate-data and a client-key-data entry).
Any additional user(s) we add will need their own client-certificate-data and client-key-data. The way to do that is by completing the steps listed below:
- Create a private key. This key will eventually be set as the value for the client-key-data field.
- Create a Certificate Signing Request using OpenSSL.
- Use OpenSSL generated .csr files content for generating a CertificateSigningRequest.
- Approve the CSR. This generates a certificate file that will be used for the client-certificate-data field.
- Extract the .status.certificate field value from the approved CSR for assigning to the users client-certificate-data field.
- Create a Role and a RoleBinding.
- Finally add the user to kubeconfig file in the users and contexts sections.
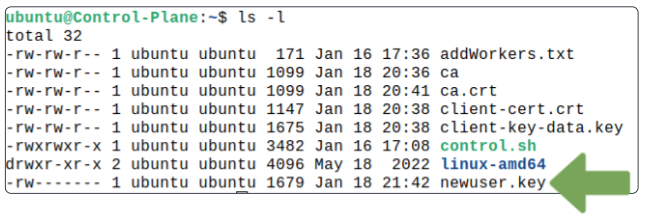
Create a private key.
Create a private key using the openssl executable and save it in a file with .key extension.
$ openssl genrsa -out newuser.key 2048
Confirm the newuser.key file has been generated.
Create a Certificate Signing Request using OpenSSL.
*Note: This Certificate Signing Request is being generated inside OpenSSL and will be used in the CertificateSigningRequest object that is native to Kubernetes at a later stage. The same name for an output in both OpenSSL and Kubernetes can and has confused many people. I hope, now after this clarification, you are not one of them.
Now create a Certificate Signing Request (for which the key generated above will be required).
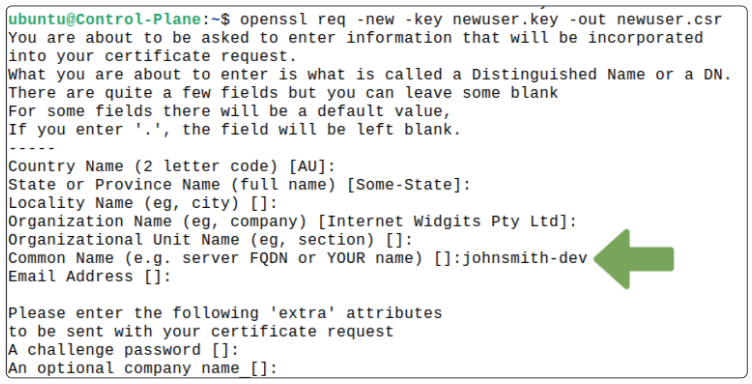
For Common Name, enter the name to assign to the new user. In this article, we will assume the user is johnsmith-dev.
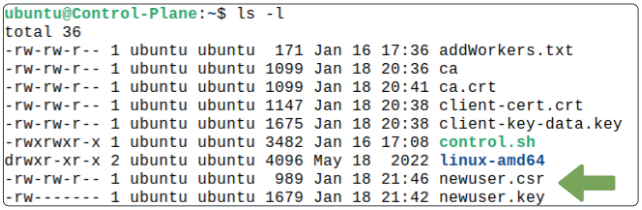
Confirm the newuser.csr file has been generated.
Use OpenSSL generated .csr files content for generating a CertificateSigningRequest.
The .csr file's contents will be enveloped inside a CertificateSigningRequest manifest and sent to Kube-API for signing.
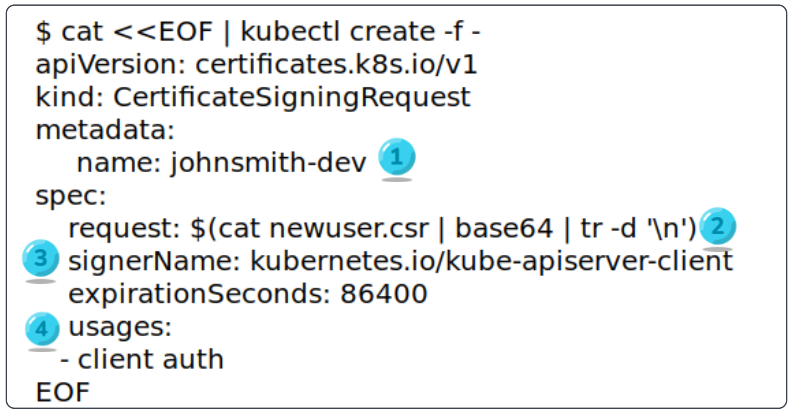
- The Kubernetes specific CSR object will be known as johnsmith-dev.
- The OpenSSSL generated .csr files content are being appended as a request.
- The signer is the Kubernetes API that will be used for approving the CSR.
- For usages, use client auth.
Confirm the CSR (belonging to Kubernetes) has been sent to the Kube-API server.
$ kubectl get csr

The request has not been approved yet and is in a Pending condition.
Approve the CSR.
The approval is done by using kubectl certificate approve.
$ kubectl certificate approve johnsmith-dev
Confirm status for the CSR has changed from Pending to Approved.

The approved CSR has a certificate hash inside it which needs to be extracted for assigning to the client-certificate-data field.
Extract the .status.certificate value from the CSR.
The command to complete this step is
$ kubectl get csr johnsmith-dev -o jsonpath={.status.certificate} | base64 -d > johnsmith-dev.crt
Creating a Role and a RoleBinding.
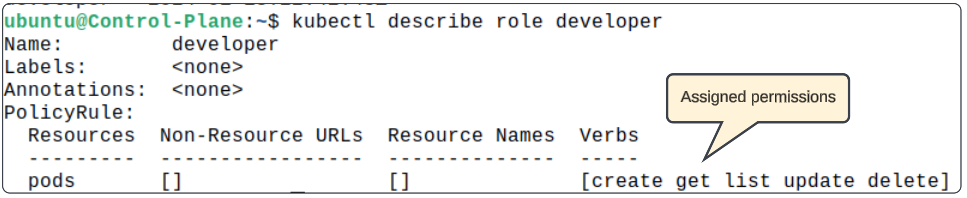
It’s time to assign RBAC permissions. We will create a Role and a RoleBinding for John Smith. Since we are assuming he is a developer, we only allow him to get, update and delete Pods, with no additional permissions for any thing else.
To create the Role,
$ kubectl create role developer --verb=create --verb=get --verb=list \
--verb=update --verb=delete --resource=pods
As per the above, the Role will be called developer and will have create, list, update and delete rights on Pods.
Confirm the details of the Role created using
$ kubectl describe role developer
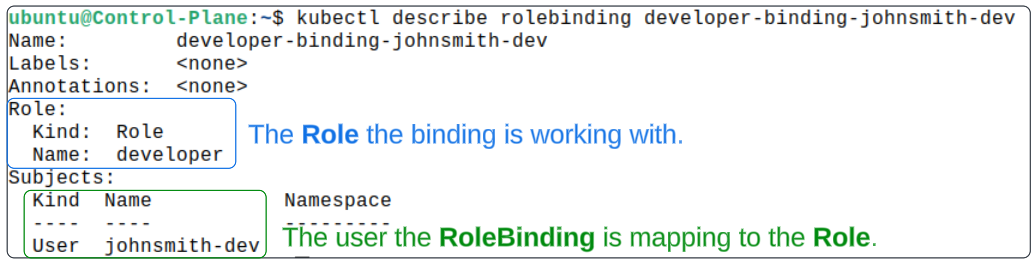
The Role on its own has no value unless its linked to some user. For this linking, Kubernetes provides a RoleBinding object and one can be created imperatively using
kubectl create rolebinding developer-binding-johnsmith-dev \
--role=developer \
 --user=johnsmith-dev
Confirm the RoleBinding has been created.
Adding the user to the kubeconfig file.
By this point in the process, we have the core ingredients (client-certificate-data, client-key-data and a role) needed to add a new user to the cluster. We can add the user with:
kubectl config set-credentials johnsmith-dev \
--client-key=newuser.key \
--client-certificate=johnsmith-dev.crt \
--embed-certs=true
We can confirm the /.kube/config file has been updated to add a new user:
$ kubectl config set-context johnsmith-dev
--cluster=kubernetes \
--user=johnsmith-dev
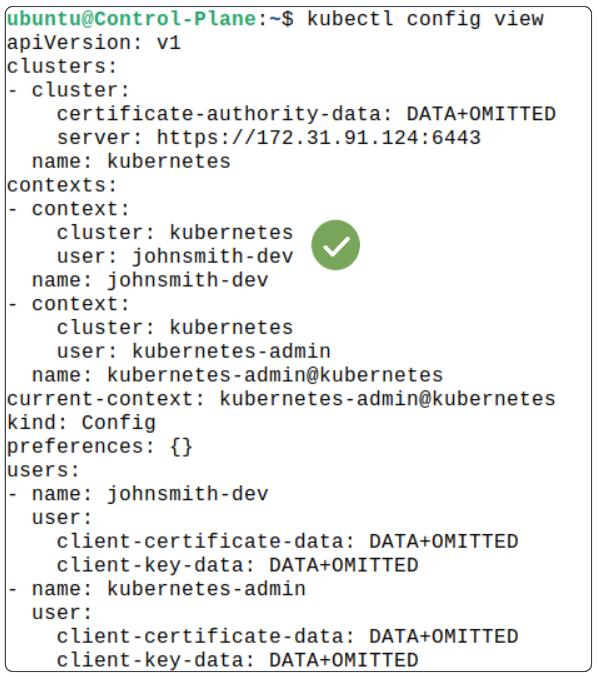
Listing the contents of the /.kube/config file again shows a new context has been added.
Testing the new user and their permissions.
Change the active context to the one named "johnsmith-dev".
$ kubectl config use-context johnsmith-dev
Try listing all the Pods.

Since johnsmith-dev is allowed to list Pods, there is no error message displayed.
However if the same user tries to get deployments or other not-allowed resources, the terminal will display an error message.

As expected, Kube-API server did not allow johnsmith-dev to list any Deployments because the Role this user is bound to only allows listing Pods.
I write to remember and if in the process, I can help someone learn about Containers, Orchestration (Docker Compose, Kubernetes), GitOps, DevSecOps, VR/AR, Architecture, and Data Management, that is just icing on the cake.