K8s Security: Admission Controllers.
In a previous article on Kube-API Server, we learnt about authentication and authorization of traffic making its way to the Kube-API Server. The one aspect of the request processing activity that was not addressed in this article was the role Admission Controllers play in modifying, validating and/or rejecting this traffic.
So what is an Admission Controller?
Before we talk about Admission Controllers in depth, lets back track a bit and re-examine how a request to Kube-API Server is dealt with.
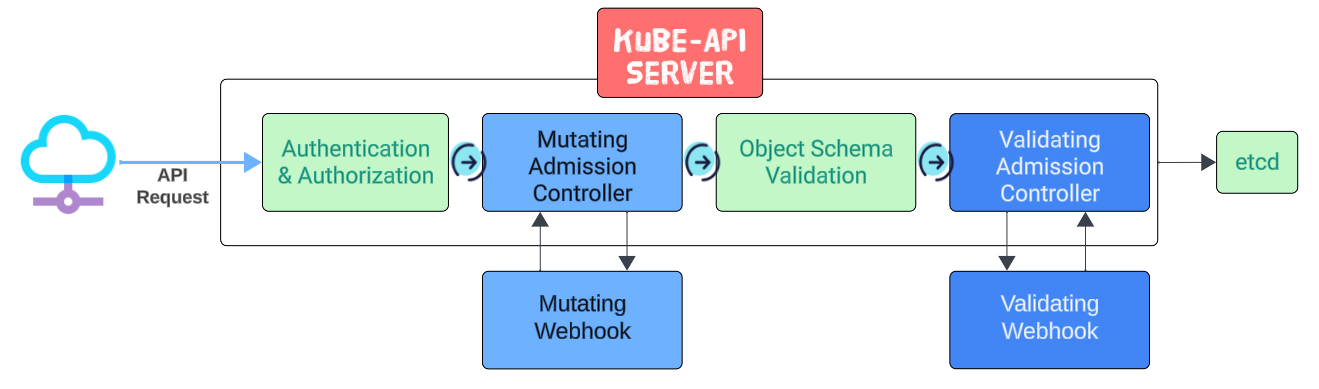
The request reaches the server, is authenticated and authorized and is then sent to the various Admission Controllers for custom checks/validations.
- Mutating Admission Controllers may, as their name suggests, change/mutate the request.
- Can modify the object being admitted
- Is called before calling the Object Schema Validation
- This is to ensure the object is validated right after it has been mutated
- Object Schema Validation checks if the YAML structure sent to the server is well-formed and contains the necessary data. For example, no manifest can be processed if the apiVersion or Kind attribute is missing, and the schema validation will (a) validate the syntax and (b) if errors are found, will generate a message for the client.
- Finally, just before the request and its embedded ask is persisted into the etcd database, the Validating Admission Controllers will do a last minute check to determine if the request can be sent through.
- Enforce policies by accepting/rejecting the requests
- Allows user-defined custom policies for validations
This article will discuss built-in Admission Controllers.
Therefore, simply put, an Admission Controller is ...
... a piece of code that intercepts requests to the Kubernetes API server prior to persistence of the object, but after the request is authenticated and authorized. Admission controllers may be validating, mutating, or both. Mutating controllers may modify objects related to the requests they admit; validating controllers may not.
Default and Non-Default Admission Controllers
Kubernetes, when installed, will on its own activate a number of controllers (and therefore, such controllers are considered Default). Alternatively, controllers that have to be explicitly turned on are considered Non-Default.
Default Admission Controllers
- For generating certificates:
- CertificateApproval, CertificateSigning, CertificateSubject
- When Ingress Class or Storage Class is not specified in a manifest:
- DefaultIngressClass
- DefaultStorageClass
- For Pod scheduling: DefaultTolerationSeconds
- For enforcing resource constraints:
- LimitRanger, ResourceQuota
- For security:
- PodSecurity, ValidatingAdmissionPolicy
- Dynamic Controllers:
- MutatingAdmissionWebHook, ValidatingAdmissionWebHook
Non-Default Admission Controllers
These Admisson Controllers need to be turned on.
For this, we have to go inside to the /etc/kubernetes/manifest folder and open the kube-apiserver.yaml manifest.
Scroll down and look for the flags that are outlined in the image below.
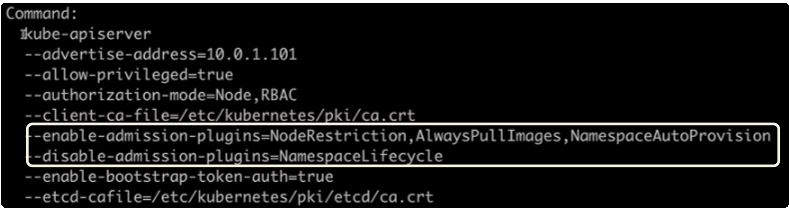
In our example, the following Non-Default Admission Controllers were turned on: NodeRestriction, AlwaysPullImages, NamespaceAutoProvision.
The NamespaceLifecycle Admission Controller has been turned off.
Demo: Enabling a Mutating Admission Controller
Let's assume you are a brand new K8s user and are trying to learn about simple tasks like running a Pod.
You decide the use the following manifest for your Pod:

The manifest shows that we want to run a Pod (named nginx-pod) in the namespace westeros with an nginx container.
Prior to executing on the manifest, you list available namespaces.
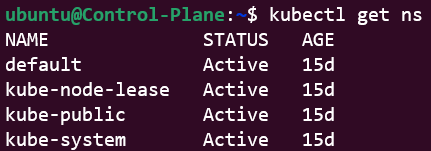
As is obvious, there is no namespace called westeros in the list.
However, being a new convert to K8s, you don't know that, in the absence of the westeros namespace, your manifest will not be executed upon (as is shown in the image below):

There are 2 ways to overcome missing namespace like errors in K8s:
- Create a namespace called westeros and then re-run the create command.
- Enable an Admission Controller that, when trying to do something in namespaces that have not been created, will first create the namespace and then continue on with the Pod.
We will use the second approach for our demo.
Kubernetes provides a Non-Default Admission Controller called NamespaceAutoProvision. To enable it, we have to once again navigate all the way to our kube-apiserver manifest and edit its content as shown below:

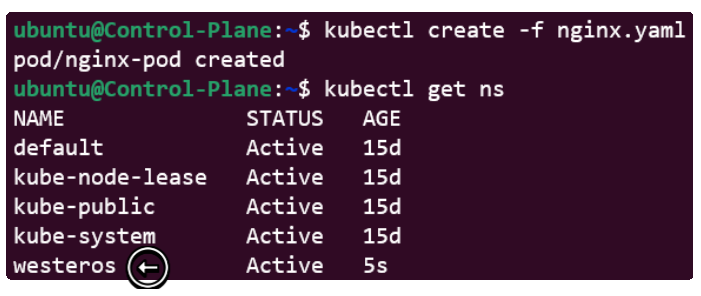
Save the file and run the kubectl create -f nginx.yaml command again.
Wait for a few seconds and try again !
The image below confirms that even though we did not explicitly create the westeros namespace, the simple enabling of the NamespaceAutoProvision Admission Controller was enough to overcome the error.
Demo: Configuring a Mutating & Validating Admission Controller
Assume you are, by now, a seasoned K8s user. You understand the basic nuances of the platform and are usually everyone's go-to person if they have any questions about the cluster.
One of the latest asks is to limit resource usage (like CPU and RAM). Management wants a solution that applies cluster wide and rejects invalid manifests, even before the request hits the Kube-API Server. The appropriate approach is to configure an Admission Controller which checks resource demands (as documented in a manifest) and short circuits the resources lifecycle, in case the manifest asks for more than what is mandated or possible.
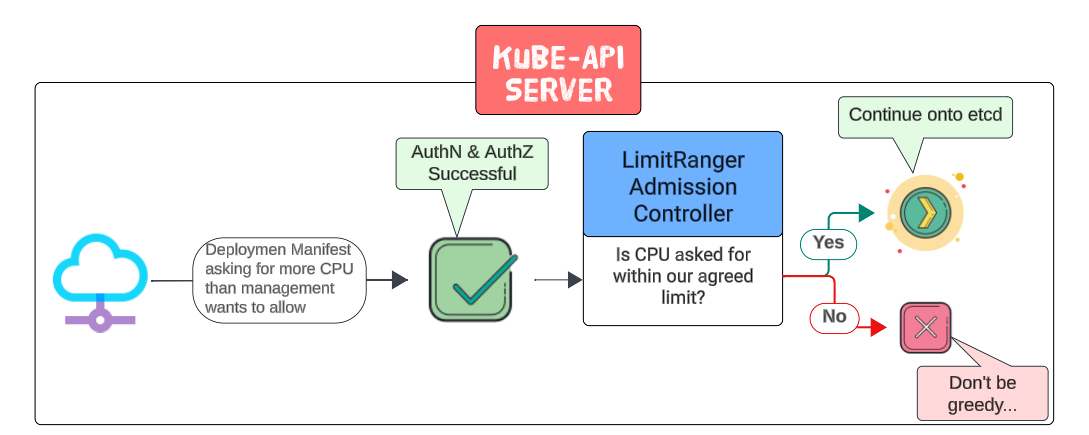
The image above shows the visual flow of events:
- A manifest with resource request set to greater limits than is allowed is sent to the Kube-API Server.
- The first step of AuthN & AuthZ is successful.
- At the second step, the LimitRanger Admission Controller will look through the manifest, in particular the resources (and their levels) being asked for.
- If it finds that the resource limits being asked for is less than what is deemed acceptable, the Admission Controller will let the manifest go on to the next steps else an error is sent back to the client indicating the problem in the manifest.
In this demo, we have to complete 3 steps:
- 2 that set up the demo and
- the last one for testing our work.

#1: Enable the LimitRanger Admission Controller in the kube-apiserver.yaml manifest
By now, we know that Admission Controllers are enabled/disabled in the kube-apiserver.yaml manifest.
Navigating to the file and loading it in an editor, we see that the LimitRanger Admission Controller is noted for the --disable-admission-plugins attribute.
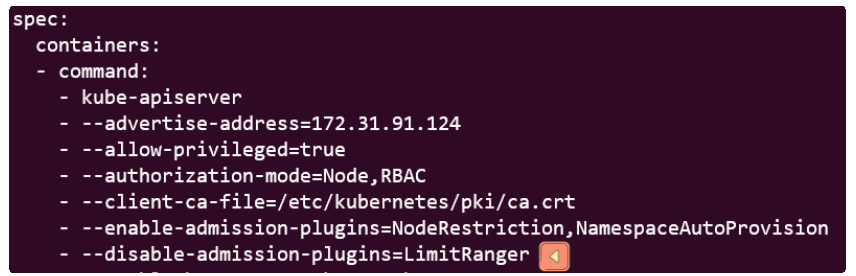
Since LimitRanger is a Default Admission Controller, just removing its name from the --disable-admission-plugins attribute will suffice for enabling it.
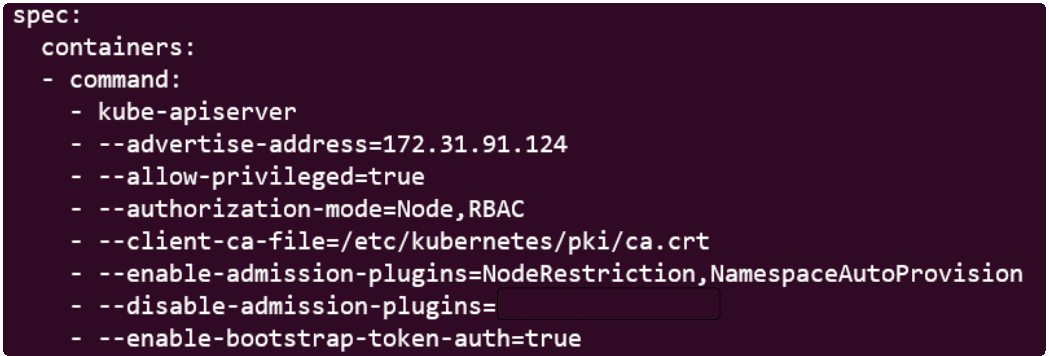
Close the file and let the kube-apiserver Pod restart.
#2: Create a LimitRange Object
Because a manifest generates the object that a Controller controls !
Think back to Deployments, for instance. For each Deployment, we create a manifest that lays out the specifics for the Pod replicas and then, using our trusty kubectl create command, we engage the Kube-API Server. It is at this point that Deployment Controllers that are waiting for a Deployment command get into high gear, generate the Pods and finally persist the cluster state changes in etcd.
Therefore, for any Controller to actually do something, they need to be provided with a manifest. The same rule of thumb applies to the Admission Controller for our demo.
A LimitRanger Admission Controller watches over (controls) a LimitRange object, a manifest for which is provided below:
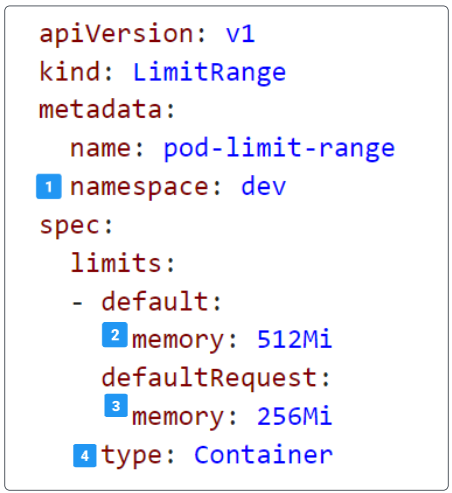
- 1: The namespace scope for the LimitRange object
- Any Pod that does not provide any resource needs in its manifest and is generated in the dev namespace will have the limits defined in the pod-limit-range applied to it.
- 2: The default memory allocated to the container(s) that will run inside the Pod
- When a Pod, using this LimitRange object is generated, the cluster will take out a memory chunk of 512Mi and allocate all of it for use by the container (running inside the Pod).
- 3: The amount of memory that a container running inside this Pod can use out of the 512Mi that was carved out for this Pod.
- 4: The thing that gets impacted by the LimitRange object (which is going to be a container, of course).
Executing the kubectl create -f pod-limitrange.yaml file generate the LimitRange object.
The namespace in the manifest is dev and unless you went ahead and created it on your own, the namespace is not present in our cluster.
Had we not enabled the NamespaceAutoProvision Admission Controller earlier, we would have been presented with an error telling us about the missing namespace but since we did not disable NamespaceAutoProvision in kube-apiserver.yaml file, the missing namespace was automagically created for us.
Once the object is created, use
kubectl describe limitrange pod-limit-range -n dev
to print its metadata to the terminal.

As we can see, the pod-limit-range object instructs:
- The OS to block 512Mi of memory for all Pods
- The OS to only let 256Mi of memory be useable for the Pod (leaving 256Mi for other needs)
#3: Create 3 Pods, with different specs, to test the LimitRanger Admission Controller.
The first Pod we create will be called the nginx-pod.
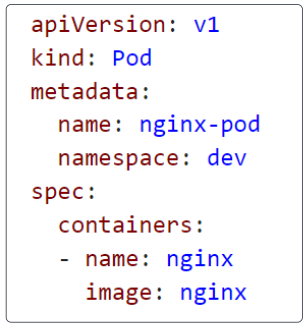
Notice this Pod spec does not mention any resource limits at all.
Generate the Pod using
kubectl create -f nginx-pod.yaml
Confirm the metadata of the Pod using
kubectl describe pod nginx-pod -n dev
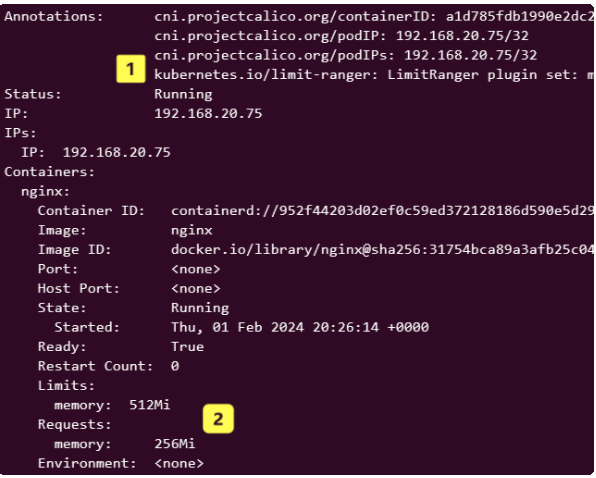
Notice (1) that an annotation highlighthing the enable of LimitRanger Admission Controller is inscribed and (2) even though the Pod spec had NOT made any demands, it was still given a default limit for memory and request.
Let's run another Pod. This Pod is requesting a memory allocation of 128Mi but does not provide any upper limit.
The manifest for this Pod is shown below:
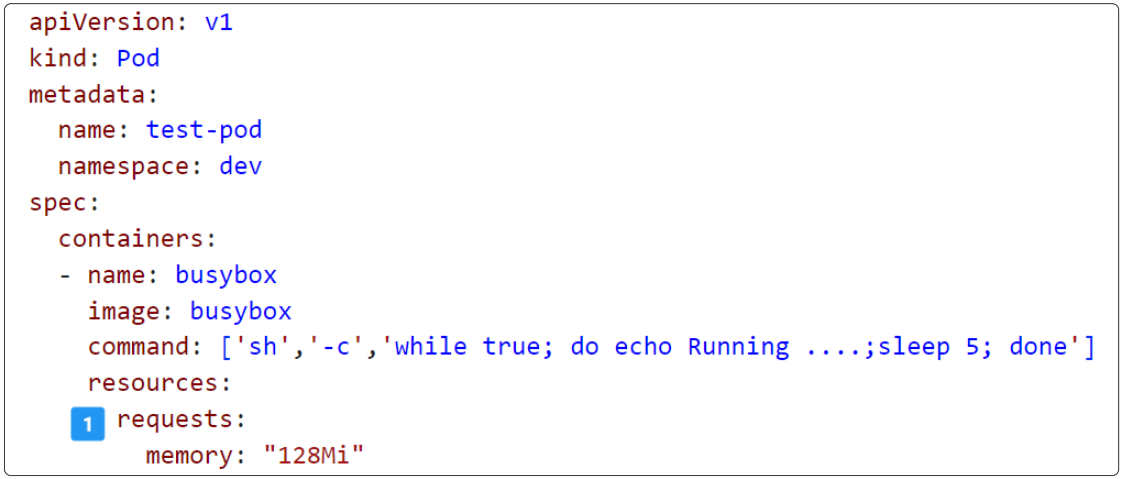
Notice this manifest is only asking for 128Mi for memory with no upper limit.
Execute the command to generate this Pod by using
kubectl create -f test.yaml
Print the metadata of the resulting Pod on the terminal to check what sort of mutations were applied on it by the LimitRanger Admission Controller.

Even though our manifest did not indicate its preference for a limit, it still was given one, courtesy our friends the LimitRanger Admission Controller and the LimitRange object.
Our final example will have us use a Pod manifest asking for more memory than is allowed in the LimitRange object.
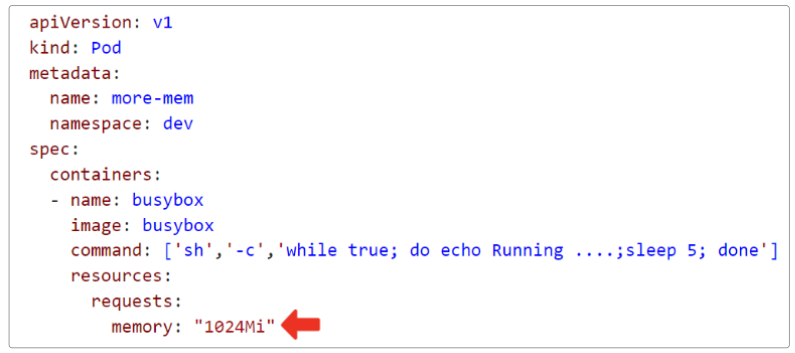
The requested memory is higher (1024Mi) than what is allowed (512Mi).
Generate the Pod using
kubectl create -f more-mem.yaml
and confirm its details using
kubectl describe pod more-mem -n dev

I write to remember and if in the process, I can help someone learn about Containers, Orchestration (Docker Compose, Kubernetes), GitOps, DevSecOps, VR/AR, Architecture, and Data Management, that is just icing on the cake.