K8s Security: Encrypting API Traffic.
The kube-API server is an integral part of a K8s cluster. EVERY command issued using kubectl is sent to the kube-API server first before the intent behind those commands is executed against k8s objects like pods, services, deployments, etc.
The traffic exchanged between the kube-API server and other k8s components (or workloads) needs to be encrypted. If a malicious intrusion is made into this traffic, the cluster becomes insecure and user data could easily be siphoned away.
For the purpose of encrypting k8s cluster traffic, TLS certificates are utilized.
What are TLS Certificates?
Merriam-Webster defines the word 'certificates' as
a document evidencing ownership or debt.
For our context, we use certificates to show evidence that the identity we are presenting is truly ours and not someone who is not allowed to interact with the k8s cluster. Certificates ensure trust between 2 communicating parties. Using certificates, an entity is able to confirm its authenticity (and good intentions?) with the others it wants to exchange data.
TLS Certificates are created using symmetric or asymmetric cryptography.
Difference between Symmetric vs Asymmetric
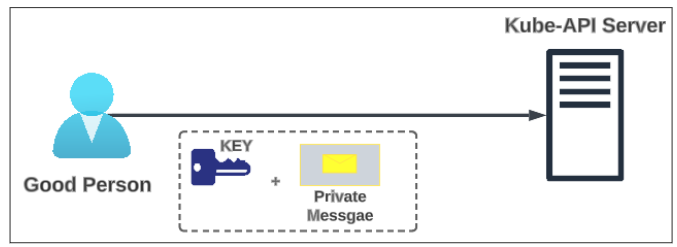
In Symmetric encryption, the same secret key is used for encrypting and decrypting the messages being sent back and forth. In Figure 1 below, the Good Person encrypts their private message with a cryptographic key. The data is sent through to the server ALONG with the key. At the server's end, once the key and data are received, they will be used to decrypt the private message. Though fundamentally simple, this approach is not very effective.
But why is it ineffective?
The assumption in Figure 1 is that there are ONLY 2 participants in this message exchange ... but such oversimplifications are far from true in the online wild world. We should always assume there is someone watching or at least attempting to watch (and steal) our data. The approach in Figure 1 completely breaks down if we think about the presence of an unknown sleuth, listening to our online digital message passing.
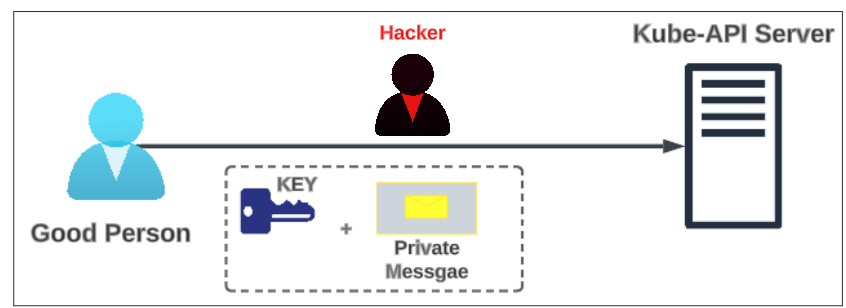
The Hacker can easily extract both the key and the message, as they are in transit to the server, and all our efforts to be safe online go down the tube.
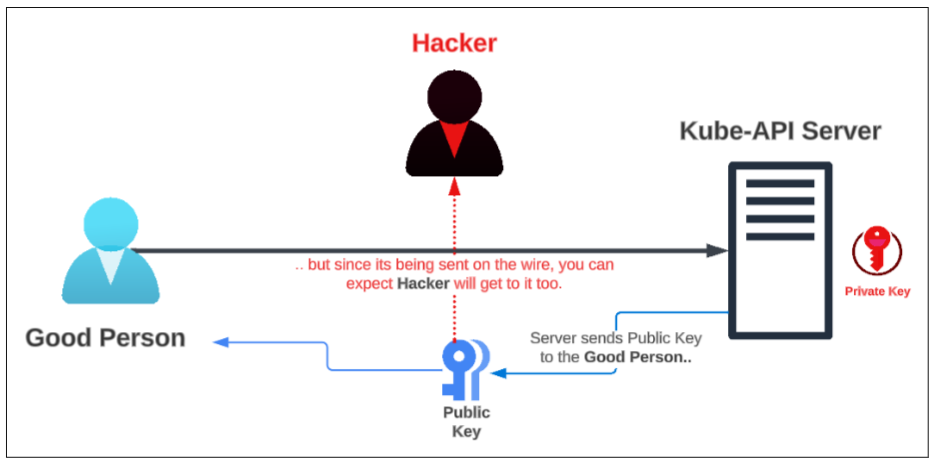
To counter this seemingly obvious weakness in the symmetric crypto world, we typically use an asymmetric cryptographic mechanism. For our article, we will focus on the asymmetric cryptographic keys that are generated at the server. This approach generates 2 server keys as opposed to just one:
- 1 of the keys is private and is not shared with ANYONE including the Good Person. The server will hold on to it and since it is not sent over the internet, Hacker will have a harder time getting to it
- The other key is a public key which is sent over the internet to the Good Person and since it's on the internet, can be easily stolen by the Hacker.
Both keys are required to decrypt the messages being exchanged between Good Person and the server.
Once the Good Person gets the Public Key from the server, they will use it to encrypt their own key (yes, Good Person will still make their own key using the Public Key sent to him/her/they).
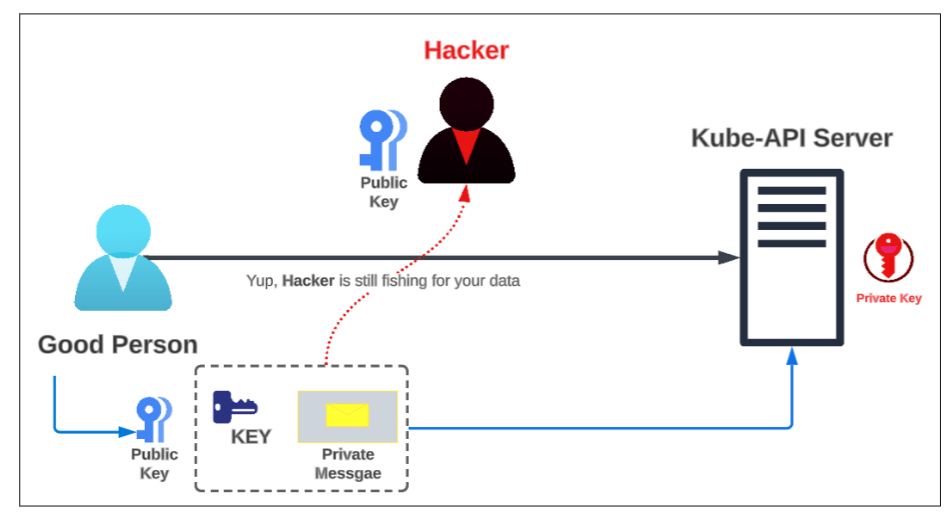
The Hacker, true to their nature, will pick up this doubly-encrypted message from Good Person to the server but since they don't have the Private Key, there is nothing they can do to crack open the traffic and steal your information.
But didn't I read somewhere that Hacker can impersonate the server and convince me to accept their Public-Private key as the 'REAL' ones?
Yes. It is entirely possible that a Hacker can convince us they are the real server and that we should accept their Public Key to encrypt our messages and send it to them.
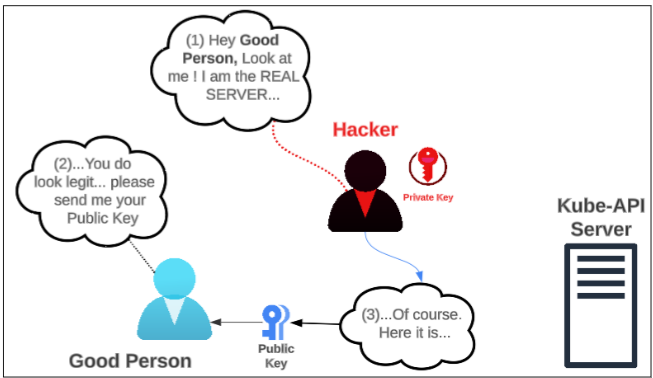
Once the key exchange depicted in Figure 4 is completed, your messages and private data are no longer safe.
How does someone like me (a Good Person) make sure I am not being IP-Spoofed?
To eliminate (or at least reduce) IP Spoofing, real servers use what is called a Certificate Authority. This authority (also called CA for short) is usually a third-party entity (like Verisign. DigiCert etc) that sell a CERTIFICATION (stamp of authentication that the real server is actually THE real server). This STAMP OF AUTHENTICATION is sent from the server to the Good Person when they first start to speak with each other. This so-called STAMP OF AUTHENTICATION includes a lot more information about the server that is generating the Public-Private key pair (such as location, name, company details, etc).
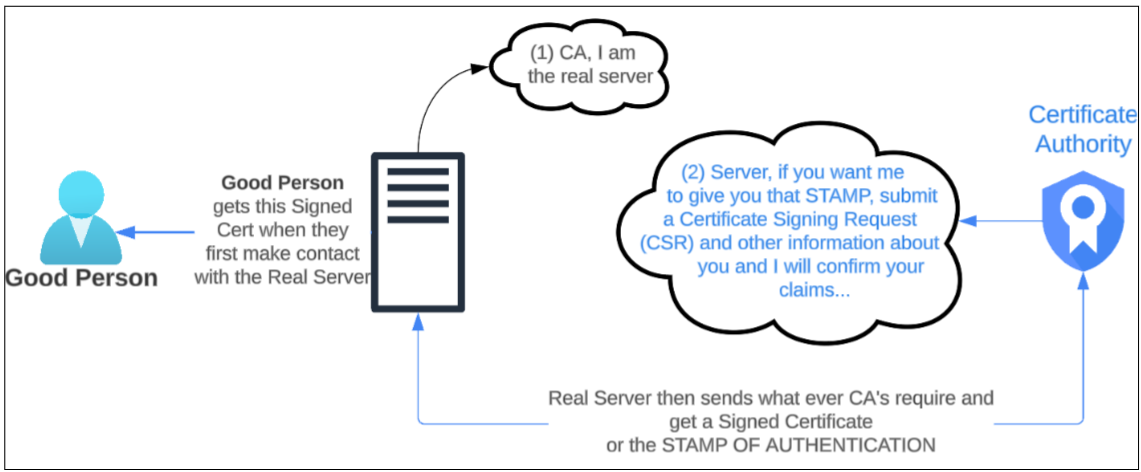
Hacker will not be able to get the CA to give it a Signed Certificate since Hacker will try to impersonate a real server but with the wrong information on location and other facts, the CA will know it's being played and consequently not grant the Hacker anything.
In Private Networks, generating a CA Certificate using an internal Certificate Authority can be used to establish trust between servers and employees.
In summary, the flow of establishing client-server authentication using asymmetric cryptography and Certificate Authorities follows the sequence below:
1. Set up or buy Certificate Signing (CA) services.
2. Send a Certificate Signing Request (CSR) to the CA.
3. Receive the Signed Certificate (or STAMP) from the CA.
4. Save this Signed Cert in the client's Trusted Root Certificates list.
TLS Certificates used in a k8s Cluster.
A cluster is a combination of objects that are either a client, a server or both.
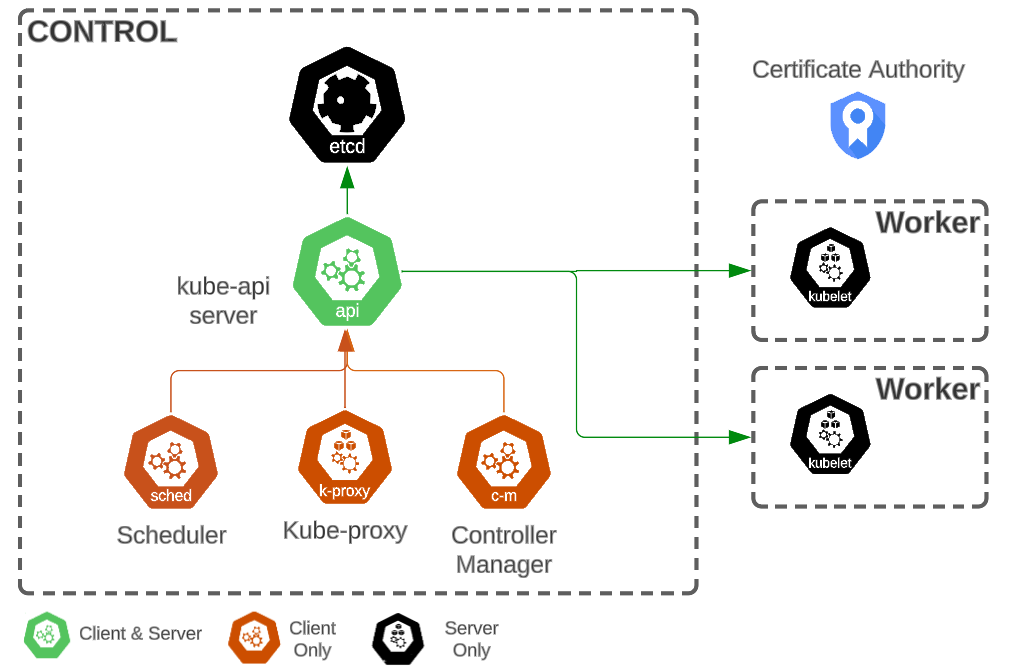
The kube-API server is the only k8s component that acts as both a server (for Scheduler, kube-proxy, and Controller Manager) and client (for kubelets on individual worker nodes and etcd).
| Servers | Client | Keys |
|---|---|---|
| CA | Entire cluster | ca.crt and ca.key |
| etcd | kube-API server | etcd.key and etcd.crt are sent by etcd (the server) apiserver.crt and apiserver.key are sent by kube-api (the client) to etcd *In some cases, you may also consider making a special apiserver-etcd.crt and apiserver-etcd.key for etcd only. |
| kubelet | kube-API server | kubelet.crt and kubelet.key are sent to the kube-api server In response, kube-api server also sends the apiserver.crt and apiserver.key to the kubelets. *In some cases, you may also consider making a special apiserver-kubelet.crt and apiserver-kubelet.key for etcd only. |
| kube-api server | scheduler | scheduler sends the scheduler.crt and .key and receives apiserver.crt and .key from kube-api server. |
| kube-api server | kube-proxy | kube-proxy sends the kube-proxy.crt and .key and receives apiserver.crt and .key from kube-api server. |
| kube-api server | kube-controller | kube-controller sends the kube-controller.crt and .key and receives apiserver.crt and .key from kube-api server. |
| kube-api server | External to cluster users | kube-api server will send the apiserver.crt and .key and expect an admin.crt and admin.key to be provided in exchange. |
How do we generate these certificates being used in the cluster?
The steps to generate certificates is fairly straight forward with minor modifications for some cluster components:
- Generate a private key
- Create a Certificate Signing Request (CSR)
- Send the CSR to a Certificate Authority
- Receive the Certificate (.crt) and Private Key (.key)
Step 1: Generate a private key

name of component depends upon the component (of course). It is also advisable to look in the /etc/kubernetes/pki folder on the nodes to confirm the name to use.
Default names for a components private key are:
- For Certificate Authority, ca.
- For kube-API server when its 'serving' information to scheduler, kube-proxy and kube-controller, use apiserver.
- For kube-API server when its a client to the etcd and kubelets, use apiserver or apiserver-etcd-client and apiserver-kubelet-client.
- For scheduler, kube-proxy and kube-controller, use their component names.
- For external client users of the cluster, the name admin is typically used.
Step 2: Create a Certificate Signing Request

The name of component should be the same as that used for the Private Key generation. Traditionally, naming the CSR the same as the Private Key makes finding them easier.
For the description, there are some minor component-scope nuances that should be noted. Typically the description is used to provide the name of the component for which the CSR is being generated:
- For the CA CSR, use "/CN=192.168.0.100".
- For scheduler, kube-proxy, kube-controller, etcd, use "/CN=system:<name of component>". For example, if we had to generate a CSR for the scheduler, we would set the description to "/CN=system:kube-scheduler".

- For kubelet, the description used is "/CN=system:node:<name of host node>"
- For kube-api server, the approach is different than the one taken for the other k8s components. As mentioned earlier, the use of the description section is to register the exact name that the component uses in the cluster (like kube-scheduler or etcd). In the case of the kube-api server, it is known by many names. Kube-api server is also known as (referred to) Kubernetes, kubernetes.default, kubernetes.default.svc, kubernetes.default.svc.cluster.local and it's IP address. Fitting all these names inside the description is tricky yet if any one is missing, it won't be made a part of the final certificate that is generated at the end of the CSR flow and therefore if the missed name is ever used to refer to the kube-API server, the authentication will be failed.
So how does one then generate a certificate for kube-API in such a way that all its possible names are included?
We will first generate the key as done earlier. Then we create an openssl config file that contains all the names kube-API server is referred by.
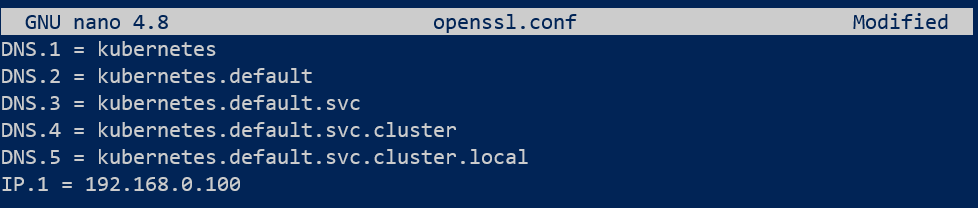
When executing the actual CSR request, the openssl.config file is passed as a parameter:

Step 3: Finally send the CSR and the Private Key to a Certificate Authority.

Ok. I think I get the idea behind the .key to .csr to .crt generation. What I don't understand is how will the components and the cluster know about these keys?
We will now see how all these cryptographic safe guards are configued for use in the encryption of traffic between cluster components.
The first thing that one needs to realize is the fact that since these are all Self Signed Certificates and need to be added to the Trusted Root Certificates inventory on each server and client. Without this copy, the server and client components will not be able to authenticate ca.crt and ca.key
Configuring kube-api server with newly generated .key's and .crt's
kube-api server configuration is stored in the kube-apiserver.yaml file which is usually in the /etc/kubernetes/manifests folder.
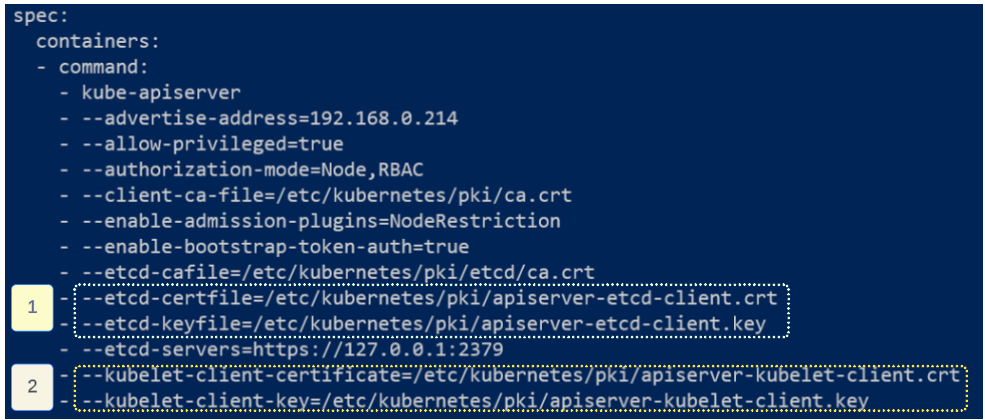
As and when the keys and certificates are changed, they should be placed in the folders outlined in Figure 13.
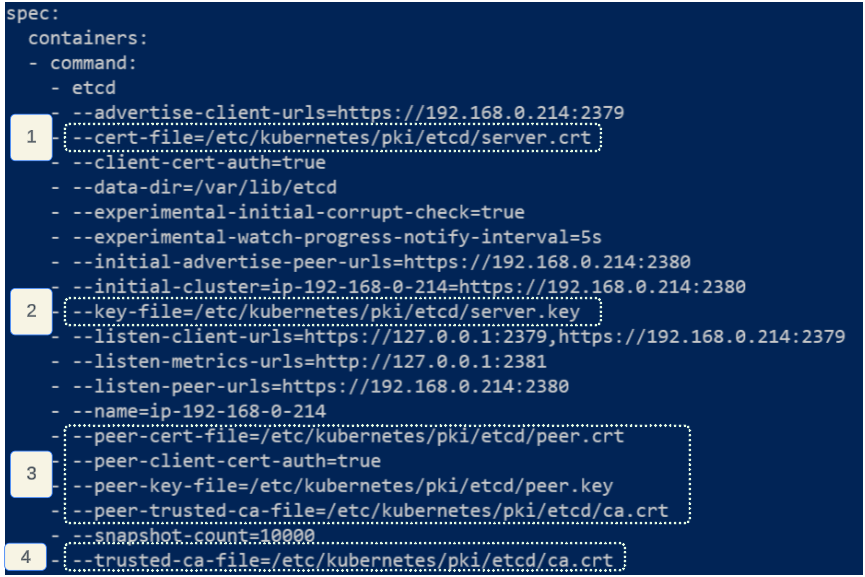
Configuring etcd with newly generated .key and .crt files
The etcd manifest is also in the /etc/kubernetes/manifests folder.
What about users of the cluster who are not part of the 'kube-something' family?
The approach used for adding new users with their own pair of key and certificates follows the same process as described earlier:
- A key and base-64 encoded CSR is generated using openssl command for a user.
- The user shares that CSR and the key with the cluster admin.
- The cluster admin creates a CertificateSigningRequest manifest in kubernetes.
- The manifest for CertificateSigningRequest can be applied using kubectl.
- The CertificateSigningRequest is approved.
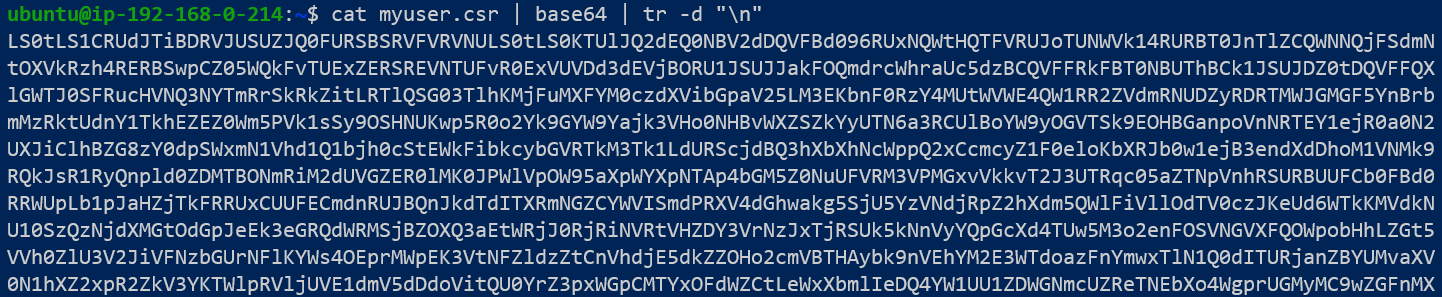
Step 1: Generate a new key and a base-64 encoded CSR for the new user, using openssl.


Encode the CSR using base-64 encoding:
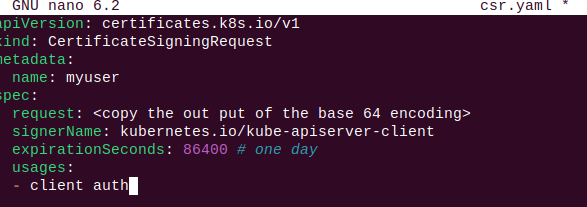
Step 3: The cluster admin creates a CertificateSigningRequest manifest in Kubernetes.
Step 4: Use kubectl apply to the manifest.

Notice the CONDITION column shows the CSR to be in a Pending state. To change the state of the CSR from Pending to Approved, an explicit approval command for the CSR needs to be issued.
Step 5: The CertificateSigningRequest is approved.

- All k8s components require a Private Key, a Certificate from a Certificate Authority, and a CertificateSigningRequest object to get a valid authentication certificate.
I write to remember and if in the process, I can help someone learn about Containers, Orchestration (Docker Compose, Kubernetes), GitOps, DevSecOps, VR/AR, Architecture, and Data Management, that is just icing on the cake.