K8s Scheduling: Node Cordoning and Manual Scheduling.
Paraphrasing Websters definition of the word, cordoning implies:
forming a protective or restrictive cordon or boundary, thereby making the thing being cordoned-off unaccessible.
Table of Contents
- Node Cordoning: An Explanation
- Demo: Node Cordoning
- Manual Scheduling of Pods
- Demo: Manual Scheduling
- Demo: An Interesting Observation
Node Cordoning: An Explanation
Within the context of a Node, cordoning means making it inaccessible to Pods.
Node Cordoning marks a Node as unschedulable. This prevents new Pods from being scheduled to that Node, all the time making sure that existing Pods are NOT touched. Node Cordoning is a typical prepatory step before a Node is rebooted (for reasons such as maintenance).
Demo: Node Cordoning
Assume we have a 4 Node cluster: 1 Control Plane Node and 3 Worker Nodes.
| Node Type | IP |
| Control Plane | 192.168.0.214 |
| Worker Node 1 | 192.168.0.96 |
| Worker Node 2 | 192.168.0.205 |
| Worker Node 3 | 192.168.0.186 |
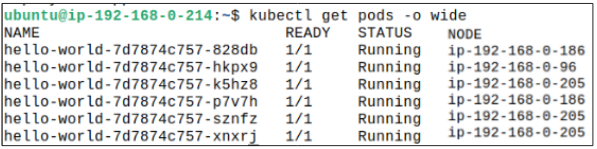
Step 1: Deploy a simple hello-world application with 3 replicas.
Once the Deployment is complete, check the distribution of Pods across the 3 Nodes.

At this point, assume, you, as the K8s engineer, are informed about wanting to reboot the Node with 'ip-192-168-0-96' in a few hours. This is all fine but you remember there are going to be replicas launched for hello-world later (because the demand for reading the statement Hello World is insatiable).
The first thing you do is cordon off the Node.
Step 2: Cordon-off Node 'ip-192-168-0-96'.
Cordoning off a Node is as simple as typing:
kubectl cordon <node name> OR kubectl cordon ip-192-168-0-96
Step 3: Confirm if the existing hello-world Pod on the cordoned-off Node is still ok.

Step 4: Scale up the Deployment to 6 replicas.
The time to scale up replicas is here and is done using kubectl scale deployment hello-world --replicas=6.
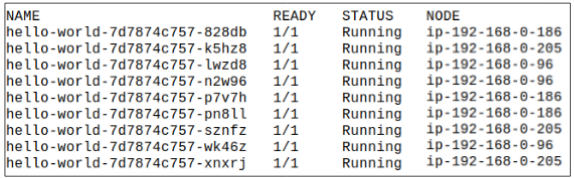
As per what we know about the kube-schedulers modus operandi, each Node should get at least 2 Pods. We can check if this is true by listing where Pods are scheduled:
Notice that the Node ending in 96 has just one Pod while the other 2 have more than one each (205 has three Pods and 186 has just one).
This, of course, happened because we cordoned-off the Node ending in 96.
Step 5: Drain Pods from Node ip-192-168-0-96.
Pods can be drained using kubectl drain <name of Node>.
However, when attempting to drain the Node, the following error message will be shown:

The error shows that Node draining will not be possible BECAUSE of the DaemonSet Pods in the kube-system namespace (that are usually started during K8s installation).
This is an important point: if the Pods in kube-system were deleted, the Node will lose ability to network with the rest of the cluster and might become a zombie, which, as all fans of Walking Dead know, is not a good thing.
Step 6: Retry draining Pods from Node ip-192-168-0-96 but with a special flag.
Attempt to drain the Pods one more time but add a --ignore-daemonset switch:
kubectl drain <node name> --ignore-daemonsets

Step 7: Check Pod placement again.

Step 8: Uncordon the Node cordoned-off.
kubectl uncordon ip-192-168-0-96 will remove the no-access condition on the Node.
Now the Node is yet again back in the fray and open to accepting Pods HOWEVER, that will not happen automatically UNLESS there is some action on the part of the client (i.e. users). An action could be scaling up hello-world to more replicas OR a new Deployment being done.
Step 9: Check Pod placement one last time.
Manual Scheduling of Pods
As detailed in another article (here), the kube-scheduler is the component that has the responsibility of scheduling Pods on Nodes. During the first step of the scheduling process, kube-scheduler will look for all Pods that do not have a nodeName (name of a Node in the cluster) in their object definition. Once such Pods are found, kube-scheduler will find the best Node to place them in.
However, if we specify the nodeName in our Pod specs, the kube-scheduler does not attempt to find a suitable Node for the Pod. Rather, it will attempt to place the Pod on the Node mentioned in the nodeName attribute.
Demo: Manual Scheduling of Pod
*Advisable to clear all previous Deployments or Pods from the cluster.
With manual scheduling, as stated earlier, we can provide the name of the Node we want the Pod to be in.
The manifest for this demo is shown below:

Step 1: Deploy the Pod.
Deployment can be completed using kubectl create -f pod.yaml.
Step 2: Check Pod placement.

What really happened?
kube-scheduler didn't have to do any filtering and sorting to find the best Node for this Pod. The specs already made it crystal clear the Pod was interested in -186 and the kube-scheduler did not stand in the Pods way.
Demo: An Interesting Observation
What would happen if we cordoned-off 186 and then attempted to place the Pod from previous demo on it?
Step 1: Remove the Pod from 186.
Remove the Pod that was deployed on 186 in the last demo. Since the Pod was not created as part of a Deployment, it does not have any controllers looking out for it, and therefore, the Pod will not be recreated.
kubectl delete pod <name of pod>
Step 2: Cordon-off ip-192-168-0-186.
kubectl cordon ip-192-168-0-186
Step 3: Create the Pod again using kubectl create -f pod.yaml.
Since 186 has been cordoned-off and the Pod spec is specifically asking for it, we should expect that the Pod will not get placed on the Node.... but....

Even though the Node is cordoned-off, the Pod spec is demanding to be placed on 186 and kube-scheduler will override the cordoning-off to give the Pod its desire.
Step 4: Drain the Node using kubectl drain ip-192-168-0-186 --ignore-daemonsets.
An error message is shown, a snippet of which is shown below:

Basically, k8s is trying to protect us from making what it considers is a mistake. The error message clearly states 'there is no controller for this Pod and if you delete the Pod, I won't know how to bring it back up again'.
In our demo, of course, its a moot point that there is no controller but in a real production scenario, one could be making a mistake trying to drain a Node with an un-controlled Pod on it.
All we can say at this point is 'thank you k8s' and then use the --force switch to brute force the Pods deletion.
I write to remember and if in the process, I can help someone learn about Containers, Orchestration (Docker Compose, Kubernetes), GitOps, DevSecOps, VR/AR, Architecture, and Data Management, that is just icing on the cake.