K8s Scheduling: Control Pod Scheduling With Node Selectors.
In the first article in this series, a lot of focus was on how Pod scheduling really works, the flow of events and the impact of Resource Requests (such as CPU limits).
With this article, we will take on the persona of a cluster admin and discuss ways by which we can influence the Nodes where Pods are deployed.
Table of Contents
Mechanisms to influence Pod deployment
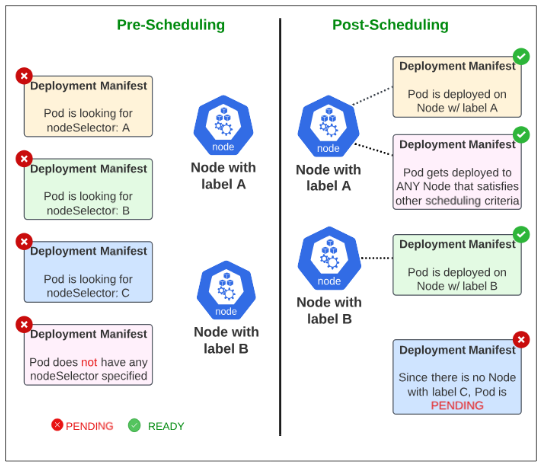
K8s has at least 5 different ways of controlling where Pods get scheduled:
- Node Selectors
- Affinity and Anti-Affinity
- Taints and Tolerations
- Node Cordoning
- Manual Scheduling
Each mechanism on its own, or in conjunction with Pod specs, is extremely effective in controlling where and when a Node gets a Pod deployed on it.
Node Selectors
A Node Selector is a label that is applied to Nodes and the kube-scheduler will make sure that any Pod which has specifically asked to be matched to that Node Selector, gets deployed on the Node.
As K8s admin, we may want to deploy a Pod with ML models on a particularly powerful server (Node) using Node Selectors. Other use cases may be instances when a cluster has distributed Nodes in different jurisdictions, each with their own laws, and we have to be cautious about which kind of workload is active in which region.
Demo: Using Node Selectors for Pod Placement
Assume we have a 4 Node cluster: 1 Control Plane Node and 3 Worker Nodes.
| Node Type | IP |
| Control Plane | 192.168.0.214 |
| Worker Node 1 | 192.168.0.96 |
| Worker Node 2 | 192.168.0.205 |
| Worker Node 3 | 192.168.0.186 |
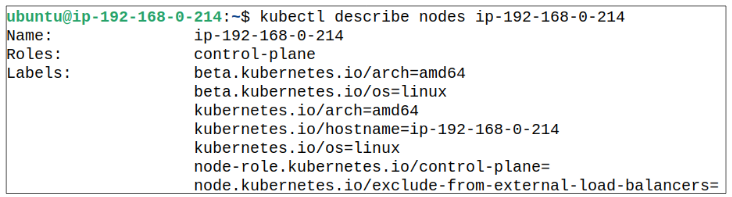
If we were to investigate the labels already applied to the Nodes, their list would look similar to what is shown below in Figure 2. These labels were applied by K8s when it was being installed on the Node(s):
Barring the Control Plane, let's add a nodeSelector/label to Worker Node 1, 2 and 3.
Step 1: Add a label to each Worker Node.
Labels are applied to Nodes using the following: kubectl label nodes <node name> <label>.
In the case of this demo, all 3 Worker Nodes will be applied a label, as shown below:
- For Worker Node 1, apply label "node= WN1"
- For Worker Node 2, apply label "node= WN2"
- For Worker Node 3, apply label "node= WN3"
Step 2: Confirm the new labels have been applied.
Using kubectl get nodes --show-labels, get a list of all the labels on each of your Worker Nodes.
Step 3: Create a manifest where a Pod specifically asks to be deployed to Worker Node 2.

Step 4: Once the deployment is successful, confirm the Node where Pods were placed.

I write to remember and if in the process, I can help someone learn about Containers, Orchestration (Docker Compose, Kubernetes), GitOps, DevSecOps, VR/AR, Architecture, and Data Management, that is just icing on the cake.