K8s Networking: Configuration and Managing Applications on K8s using Services.
Note: Kubernetes and k8s have been used interchangeably throughout and refer to the same thing.
Services, in some sense, bring permanence to a clusters interaction with its users. Remember, containers and pods are considered ephemeral which means they last for a very small amount of time (much like fashions and the fads that are hot today but will definitely be gone to the trash bin of history tomorrow).
From the point of view of a typical user of a cluster (for example, the paying customer buying something on Amazon Prime), a pods ephemeral nature can turn into a nightmare user scenario. If he/she/they/other pronouns have to keep learning a new pod IP address to be able to order from Amazon, we can bet on their loyalties changing to Ali Baba or ebay.
Understanding services in a k8s cluster.
- They provide a persistent set of Endpoint access. Pods come and go but Services ensure that this does not impact the end users. A Service Endpoint that allowed users access to 'Functionality A' on 4 pods will continue to provide users the ability to use 'Functionality A' even if the 2 of the 4 underlying pods die and new ones are spun up.
- They ensure network abstraction of the pods in a cluster, by providing persistent virtual IP and DNS support. In fact, one can say, this abstraction is what allows Services to completely mask the frivolity of a pods behavior.
- They are responsible for load balancing traffic coming to the cluster.
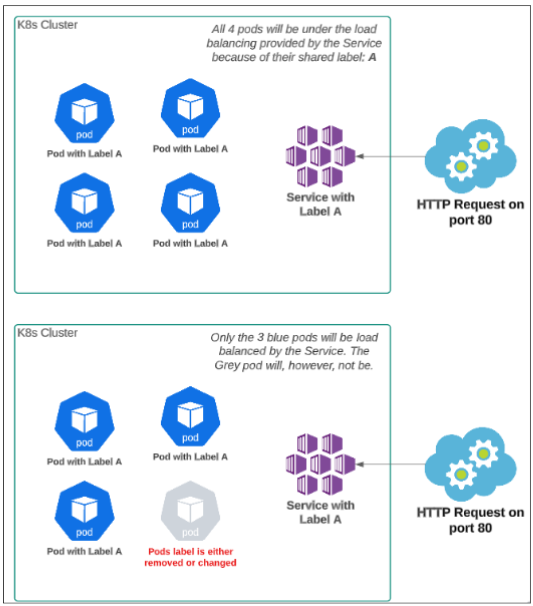
- They use labels and selectors to determine the pods that are under their membership. A controller monitors which pods satisfy a selector, and creates and registers a Service Endpoint for those pods (a Service Endpoint is a combination of pod IP and application port for application running inside the pod). Each Endpoint gets added to the Services inventory and the Service can spread the traffic across these Endpoints.
- Services are implemented, on each Node, by the kube-proxy using Linux's iptables capability.
On a tangent: What are IP Tables in Linux?
iptables is a command-line firewall utility that uses policy chains to allow or block traffic. When a connection tries to establish itself on your system, iptables looks for a rule in its list to match it to. If it doesn’t find one, it resorts to the default action.(Taken from https://www.howtogeek.com/177621/the-beginners-guide-to-iptables-the-linux-firewall/)
As soon as a new pod (which has a labeled relationship with a Service) is created, kube-proxy will make a note of its IP address and Port, and enter it into the Nodes IP Table. Similarly, any pod IP address and port combination that is no longer valid will also be removed.
A brief sidetrack: Labels, Pods and Services.
Service Types in Kubernetes.
ClusterIP, NodePort and LoadBalancer are slightly different Service types but are all directly or indirectly concerned with allowing application access inside the cluster.
Apart from the three names mentioned above, there are other Services as well but for this article, our focus will primarily be on ClusterIP, NodePort and LoadBalancer.
We will be focusing on ClusterIP and NodePort in this article.
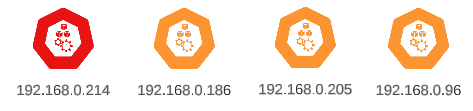
*Note: The nodes being used in our examples are listed below.
ClusterIP
ClusterIP allows intra-cluster communication between pods. It cannot be used for exposing application pods to the outside world.
Let's create a deployment (hello-world-clusterip-example) to demo ClusterIP behaviour:
$ kubectl create deployment hello-world-clusterip-example --image=gcr.io/google-samples/hello-app:2.0.
We can run kubectl get deploy,pods to confirm our deployment did indeed create 1 replicaset (as expected).

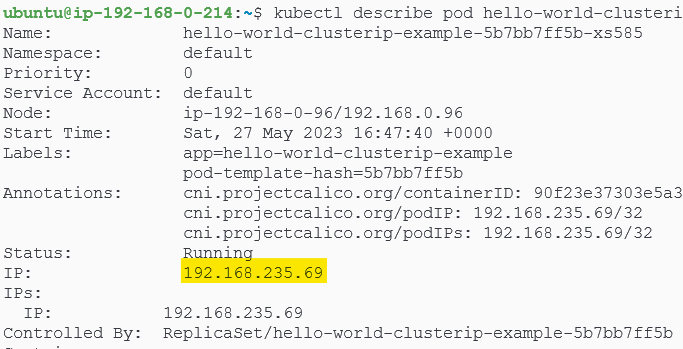
We can also use kubectl to find out which node the pod landed on.

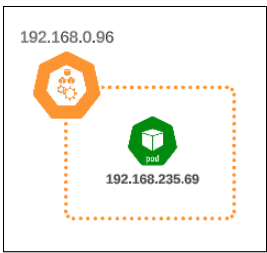
With the deployment successfully completed, we will now expose the pod, associated with this deployment through a ClusterIP Service. Before doing that, lets get the IP of the pod also:
$ kubectl get pods -o wide
Let's expose the pod via a ClusterIP Service:
kubectl expose deployment hello-world-clusterip-example --port=80 --target-port=8080 --type=ClusterIP
Before proceeding, we should confirm the state of our cluster:

So what really happened when we exposed the deployment through the ClusterIP service?
Let's decipher the 'expose' command by translating its intent. Essentially, you are asking kubectl to..
"..wrap a ClusterIP Service around the pod that was created as part of the hello-world-clusterip-example deployment. The Service will be listening to all traffic at port 80 and will pass on everything it gets over to port 8080 on the pod".
Visually, the state of the cluster should resemble something like what is shown in Figure 6.
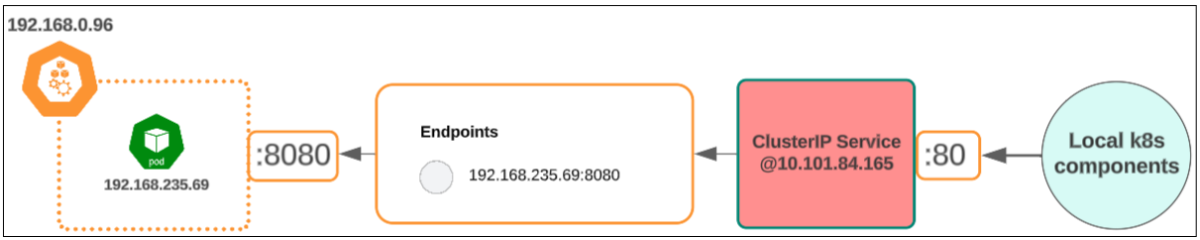
As soon as the Service was created for the deployment named "hello-world-clusterip-example", an Endpoint was mapped to the service. This Endpoint represents the only pod that was deployed as part of the deployment.
We can confirm the Service is working by using the curl command and passing the Service's IP to it:

The curl command called the ClusterIP service and since the ClusterIP Service is acting like a gateway to the pod running @192.168.235.69, it passes on the request to it (the pod).
In Figure 7 above, we accessed the pod using the ClusterIP Service BUT if needed, we can access the pod WITHOUT having to go through the Service IP. In such a case, you can simply use
$ curl <pods real ip>:<port> and bypass the Service.
Such direct access to pods is usually done when we need to understand the behavior of a particular pod. For example, if we want to troubleshoot a pods behaviour and going through the ClusterIP could 'load balance' us to another pod (which we are not trying to troubleshoot).
What happens to a ClusterIP Service if the underlying deployment has multiple replicas?
First, lets scale the pods in deployment "hello-world-clusterip-example" from 1 to 5:
$ kubectl scale deployment hello-world-clusterip-example --replicas=5
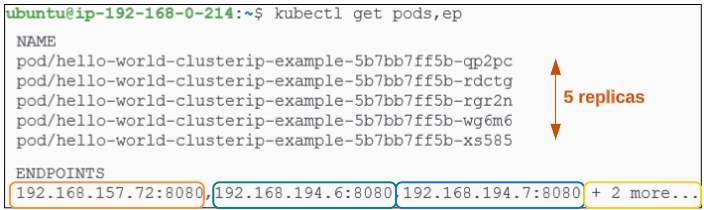
There are 5 replicas (as expected) and there are 5 Endpoints as well where each Endpoint is associated with a running pod. Each of these Endpoints will get mapped to the ClusterIP Service, and depending upon traffic and load, the Service will now have the opportunity to load balance traffic across the Endpoints.
Visually, the state of the cluster should resemble something like below:
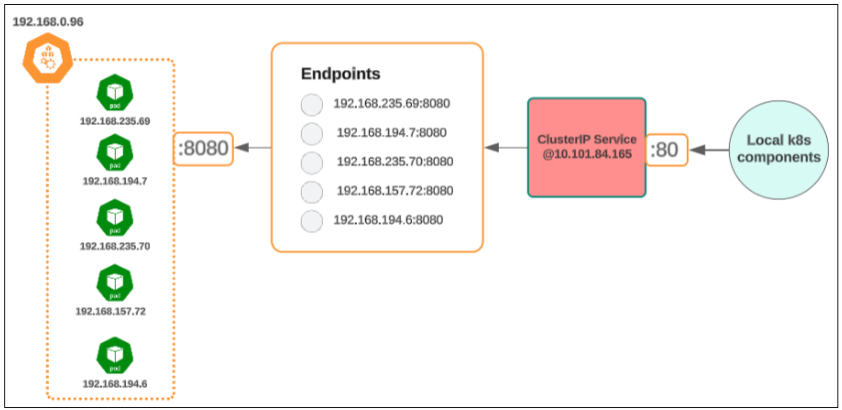
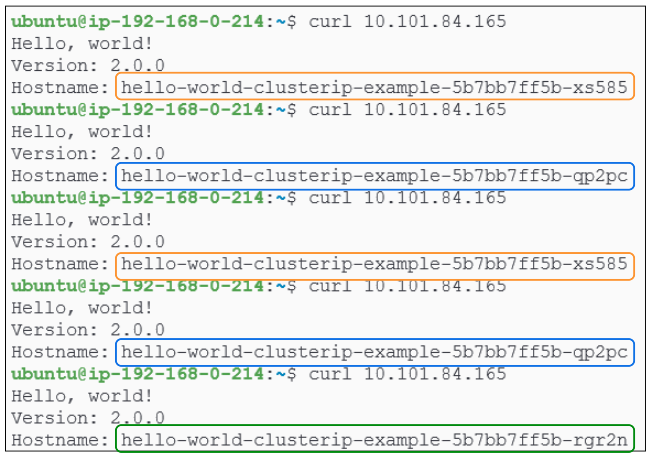
To visually confirm the ClusterIP Service's load balancing, curl its IP address a few times. You should witness different pod names being displayed on the terminal each time, which confirms that the ClusterIP Service is indeed load balancing traffic across the various pods:
But how does the ClusterIP Service know that any pod that is added as part of the hello-world-clusterip-example deployment should be added to the Service's list of valid Endpoints?
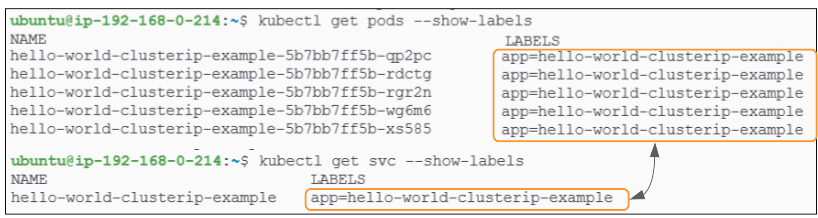
Simple answer: through the labels on the pods.
Every time a pod is created due to the deployment hello-world-clusterip-example, it gets a label app=hello-world-clusterip-example. The Service, since it was created for the same deployment, will also get this label applied to it. It is this sameness of labels that tells the Service that a pod relies on it for networking.
Does this mean that if the app=hello-world-clusterip-example label was removed from a pod, it would no longer be recognized by the ClusterIP Service and therefore not be load balanced?
We can test this hypothesis easily.
Select one of the running pods. For this example, I will select the 2nd pod in from Figure 9 (i.e. hello-world-clusterip-example-5b7bb7ff5b-rdctg).
We can change the label for this pod using kubectl label <pod-name> <the label key>-
$ kubectl label pod hello-world-clusterip-example-5b7bb7ff5b-rdctg app-
Checking for pods will show us a total of 6 pods:
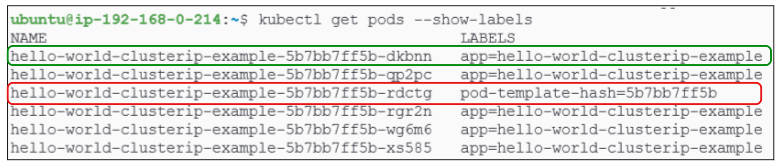
When the app=hello-world-clusterip-example label was removed from the selected pod (i.e hello-world-clusterip-example-5b7bb7ff5b-rdctg), kubernetes realized there was one pod less than what was asked for when we scaled the deployment. Keeping true to its core function of orchestrating workloads, k8s spun up a new pod (hello-world-clusterip-example-5b7bb7ff5b-dkbnn) to bring the actual state of the deployment at par with its expected state. This new pod is then registered with the service while the old one is removed.
We can confirm this by running kubectl get endpoints <name of endpoints> before and after the unlabeling:
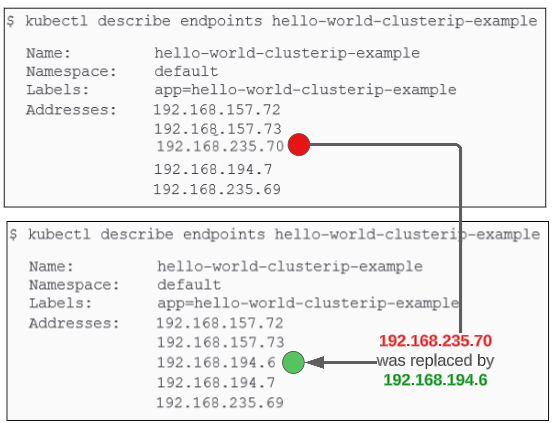
Objects that have the same labels on them are assumed to be related. Since the pods and the one CluserIP Service in our example all have the app=hello-world-clusterip-example label, they are considered part of the same family and the pods and associated endpoint are added to the service's list of 'load balance-able' targets.
NodePort
Before we proceed on with discussion of NodePort, delete the deployment and ClusterIP Service used so far.
Assuming no changes were made to the names used for the deployment, the delete command shown in Figure 12 below will delete the deployment and the pods, along with the ClusterIP service:

Confirm the deletions were indeed successful by checking for the existence of ANY k8s object that has the label "app=hello-world-clusterip-example".

Create a new deployment imperatively following the commands provided below:
kubectl create deployment hello-world-nodeport-example
--image=gcr.io/google-samples/hello-app:2.0
Follow the above with an expose command to generate and wrap a NodePort service around the deployment we just made.
kubectl expose deployment hello-world-nodeport-example
--port=80 --target-port=8080 --type NodePort

We can do a deeper dive into the NodePort service and its metadata.

Notice there is an IP address (@10.104.26.170) under the Cluster-IP column, even though we DID NOT EXPLICITLY create a ClusterIP Service. So why does it appear as part of the NodePort Service metadata?
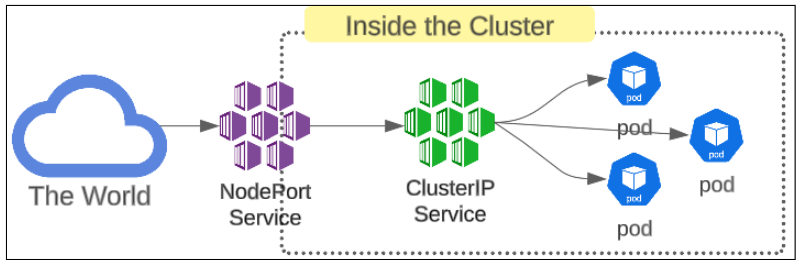
NodePort Services are back-ended by a ClusterIP service.
A NodePort service, simply put, is k8s way of opening its pods to the outside world, beyond the cluster.
When a NodePort service gets a traffic, it will pass it onto the ClusterIP service behind it since it is the ClusterIP services job to managed INTRA CLUSTER communication.
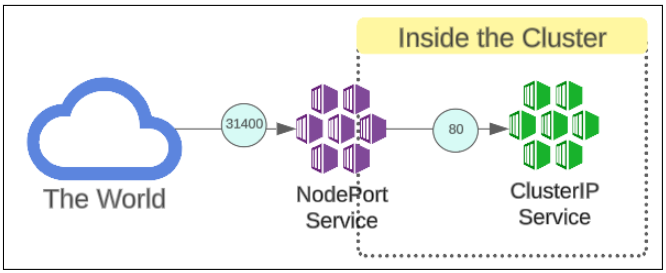
NodePort Services have ports that get mapped onto ClusterIP ports.
In Figure 14, notice the mapping of port 80 to port 31400.
31400 is for the NodePort service and when we send any traffic to this port, it gets redirected to the ClusterIP Services port 80.
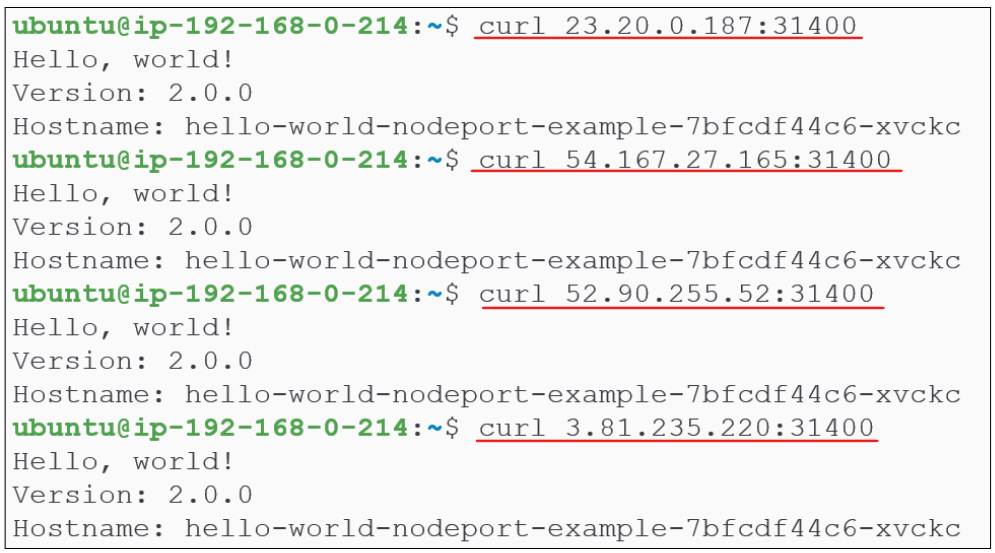
We can confirm the NodePort is working by using:
$ curl public ip of node: NodePort port
The public IPs for the 4 nodes in our demo are:
- 3.81.235.220
- 52.90.255.52
- 54.167.27.165
- 23.20.0.817
The NodePort port as shown in Figure 14 is 31400.
Irrespective of which node we send the traffic to, we will always get a response from the cluster. This is yet another example of load-balancing being applied to our cluster. This deployment had one replica set only and the pod is on the node named ip-192-168-0-96.

- Services provide a kind of consistency in the ephemeral world of pods.
- ClusterIP is the backbone of all other services in a k8s cluster.
- NodePort is a wrapper on top of the ClusterIP Service.
- ClusterIP is only focused on managing traffic inside the cluster (from pod to pod, node to node).
- NodePort is the k8s clusters interface to the outside world, and is responsible for accepting traffic from the internet and pass it onto pods inside the cluster.
I write to remember and if in the process, I can help someone learn about Containers, Orchestration (Docker Compose, Kubernetes), GitOps, DevSecOps, VR/AR, Architecture, and Data Management, that is just icing on the cake.