K8s Networking: Cluster DNS and DNS Client Configurations.
In k8s, DNS is provided as a cluster service. As part of the default installation of k8s, 2 pods for the DNS functionality are launched (for purposes of robustness and load balancing). Pods are required to use this internal cluster DNS for their networking needs. There are multiple options available for k8s internal DNS but we will focus on CoreDNS, the out of the box service we get when we install k8s. CoreDNS is a lean implementation of the Layer 7 DNS Protocol and uses plugins for providing a full-features DNS service. This makes customizing it for specific needs very easy.
In the DNS service, DNS records are created for objects in the cluster. For example, Services will get either A records (for IPv4) or Quad A ('AAAA') records (for IPv6) added to the DNS. Namespaces have DNS subdomains created for them.
There should be no doubt that the DNS functionality is CORE to Service Discovery inside a cluster. As resources and services are created, they are added to the DNS service and can then be referred to by the pods. This referral is done as a Service Discovery, using DNS names, facilitated by (no prizes for guessing) the DNS service.
On a tangent
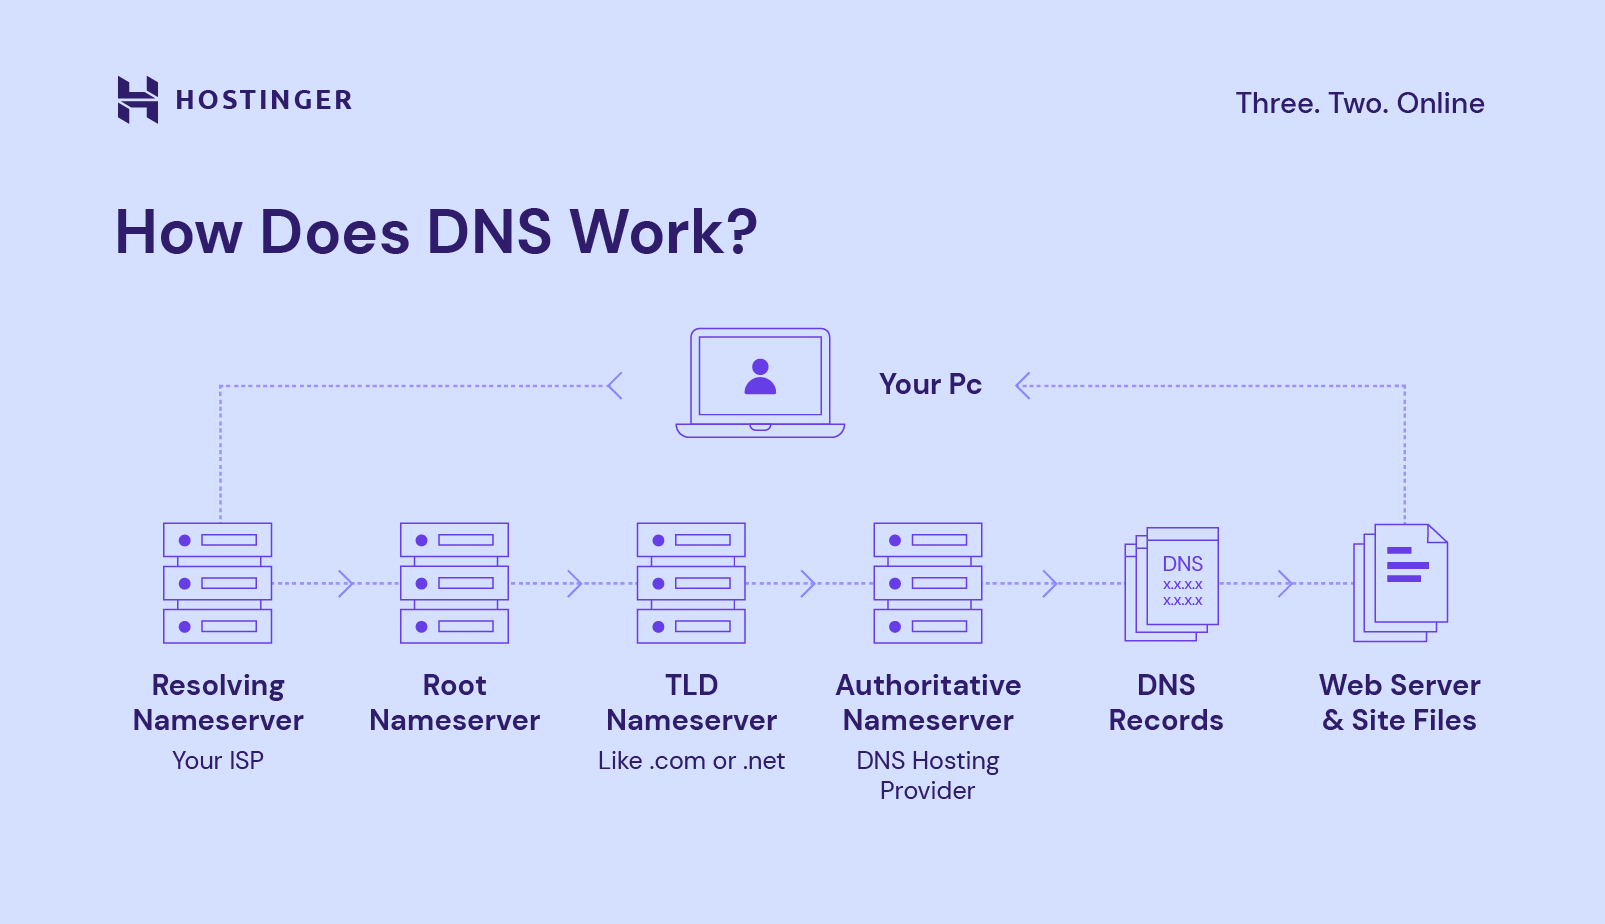
The image below is a succinct flow of bits and bytes as we try to load our favorite web site in our browser.
An investigation into the Cluster DNS Service.
The pods and services that make the CoreDNS Service work are installed, out of the box, in the kube-system namespace. We can confirm that by getting a list of all services and pods running in this namespace:
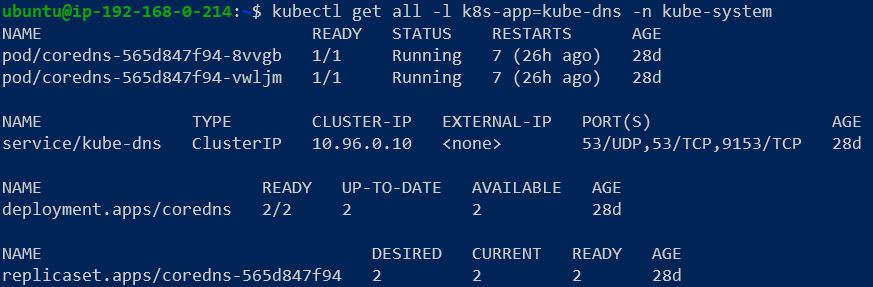
The service is of type ClusterIP (because it will only be accessible to cluster objects internally) and has an IP address of 10.96.0.10.
In addition, we see 2 pods deployed, for scaling and load balancing purposes.
Finally, we also see the deployment that installed both the service and the pods.
A peek inside one of the CoreDNS pods.
Using kubectl describe, print a pod's metadata on the terminal:

Scrolling through the output, we should focus on three specific sections of the metadata: Container, Mounts and Volume to understand how a pod is set up to use CoreDNS.
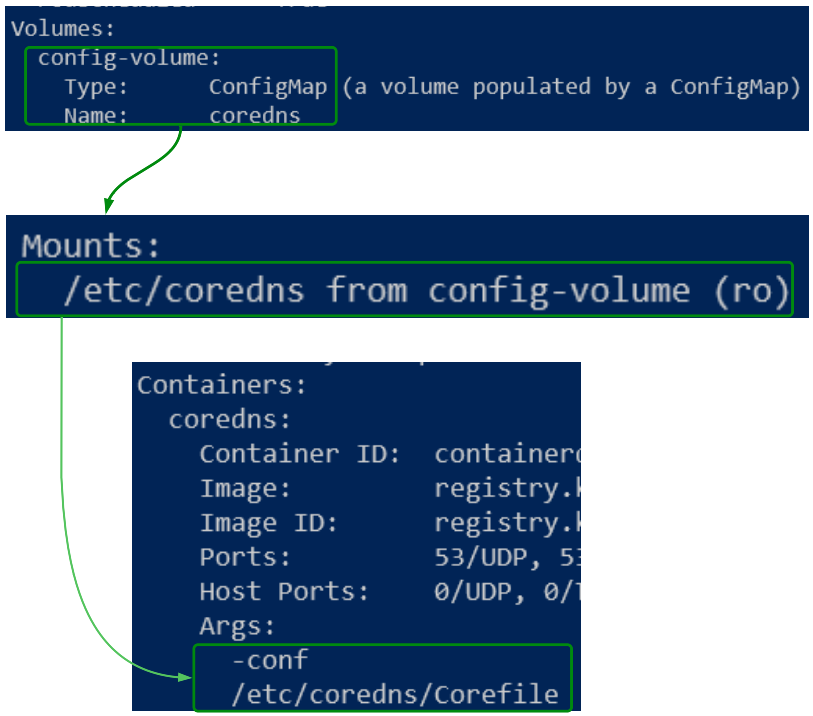
As seen in Figure 3, a ConfigMap object (called coredns) is saved as a Volume, mounted in the /etc/coredns folder and finally passed as an argument to the CoreDNS container. This seperation of configuration values and how they are consumed makes it easy for us to change the contents of coredns, and simply reload them into the container (something we will see later).
What does this coredns ConfigMap look like?
Using the handy kubectl describe command, we can view the contents of coredns (the ConfigMap).
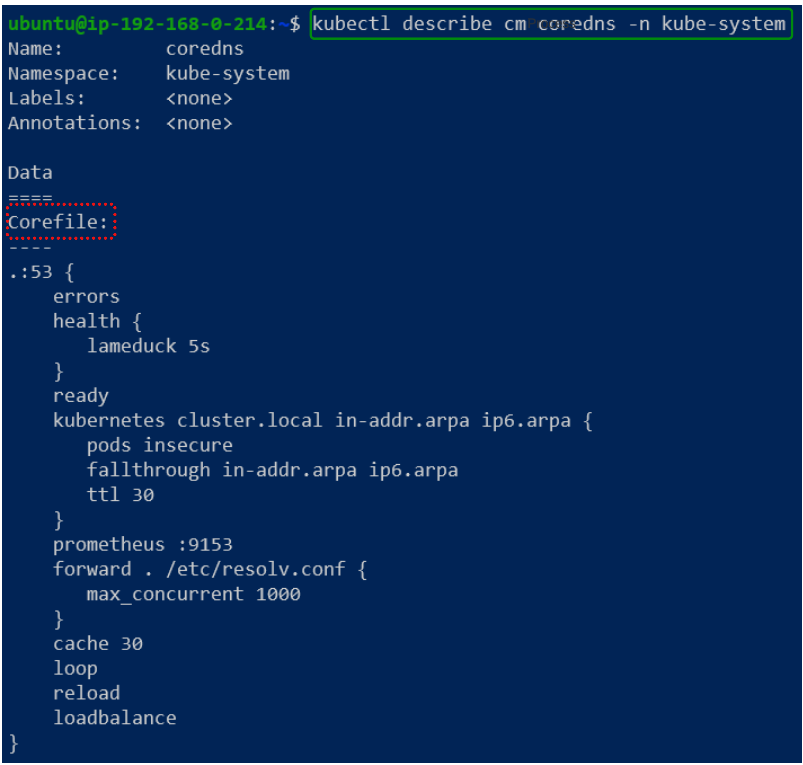
The contents of the Corefile is a series of plugins which have been chained together to provide the basic out of the box DNS capabilities.
We will only discuss some of the more important plugins in this article.
- errors: This plugin is responsible for printing errors on stdout.
- kubernetes: This plugin implements Kubernetes DNS-Based Service Discovery Specification and allows CoreDNS to be used as a replacement for kube-dns in a k8s cluster.
- cluster.local: The kubernetes plugin declaration is followed by the name of zones to be used for name resolution. Cluster.local is the default domain name used for DNS resolution within the cluster. For example, a service will have a DNS name in the format <service-name>.<namespace the services is in>.svc.cluster.local while the DNS name for a Pod has the format of <pod-ip-address-with-hypens>.<namespace>.pod.cluster.local.
- prometheus: Metrics of CoreDNS are available at http://localhost:9153/metrics in the Prometheus format (also known as OpenMetrics).
- forward: Tells coredns where to forward queries that are not within the k8s cluster domain. In this case, such queries are to be forwarded to /etc/resolv.conf.
A bit more about forward.
The plugin forward will direct request for ANY domain to the /etc/resolv.conf file of the node on which the pod is deployed (the '.' right after forward is a catch all for any domain being queried).
The /etc/resolv.conf file on each node has the entries needed to resolve a query and forward it to the right pod or service.
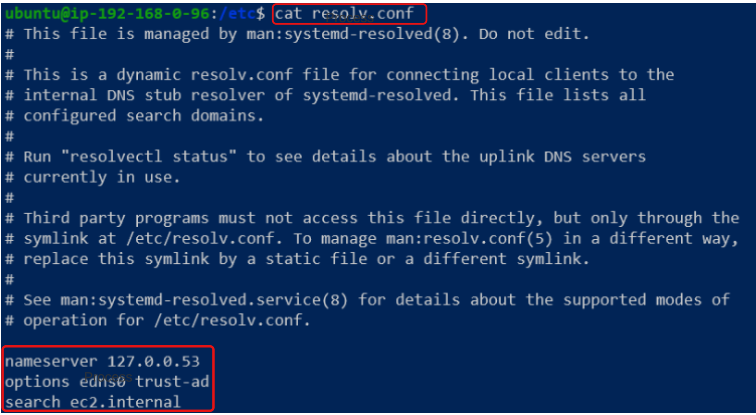
The /etc/resolv.conf file is called a forwarder and this one is an out of the box inclusion for our nodes, and k8s defaults to this forwarder. However, if needed, we can direct queries to a custom forwarder by making a simple change in the coredns ConfigMap.
Configure CoreDNS to use custom forwarder.
Since the coredns ConfigMap is the source for CoreDNS configuration, it makes sense to edit this ConfigMap for custom forwarding of DNS queries.
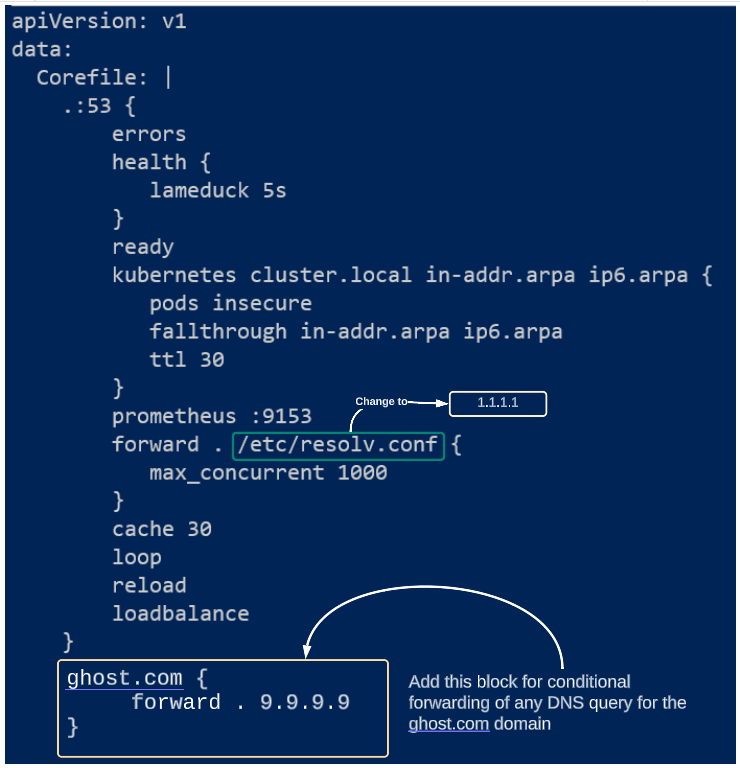
To do so, we will need to make a change in the coredns ConfigMap. Start this by first generating the YAML file representing the default coredns ConfigMap as shown in Figure 6 below:

Change the text /etc/resolv.conf to 1.1.1.1 and add a new server block for conditional forwarding of DNS queries to 9.9.9.9 as shown in Figure 7 below:
Save the changes to defaultCoreDNSCM.yaml and apply it (as shown in Figure 8 below):

The changes to the configuration takes a minute or two to get applied to the pods.
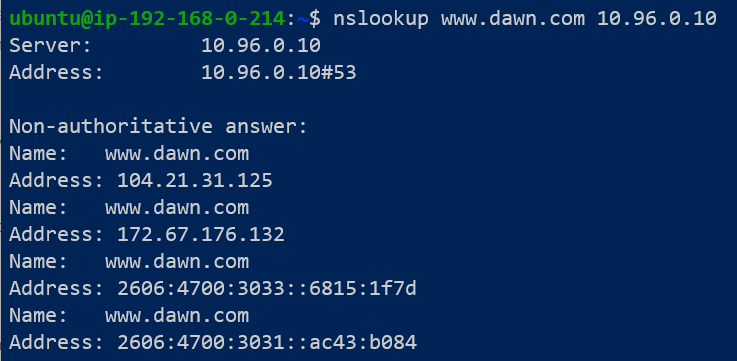
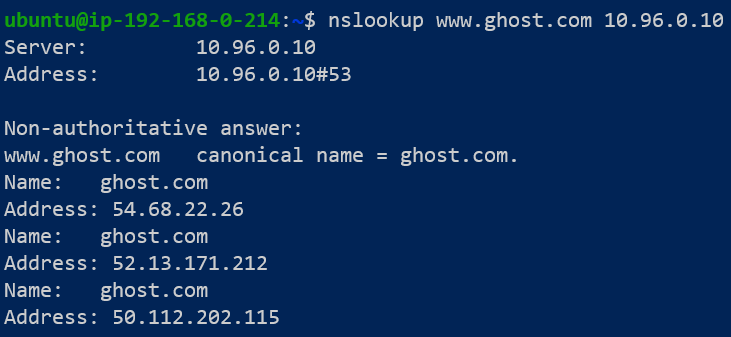
To test the modified ConfigMap and the CoreDNS Server, we can use the nslookup application in Linux:
Configureing Pod DNS Configuration.
The previous section was all about making changes to CoreDNS Service's configuration at the global cluster level i.e. the changes apply to all the pods in the cluster. However, we may have conditions where the global cluster level change needs to be overriden at the pod level. In such cases, the ANY pod that has an overriding DNS configuration will IGNORE CoreDNS.
As an example, let's assume there is some reason due to which we want some to-be-deployed pods to bypass the default CoreDNS rule of forwarding DNS queries to the nodes /etc/resolv.conf forwarder. However, we may have many other existing pods which do not need to bypass the default CoreDNS configuration.
For the to-be-deployed pods, we can add the dnsPolicy attribute in their specifications.
Let's quickly examine the contents of the override_dns_pod_level.yaml file.
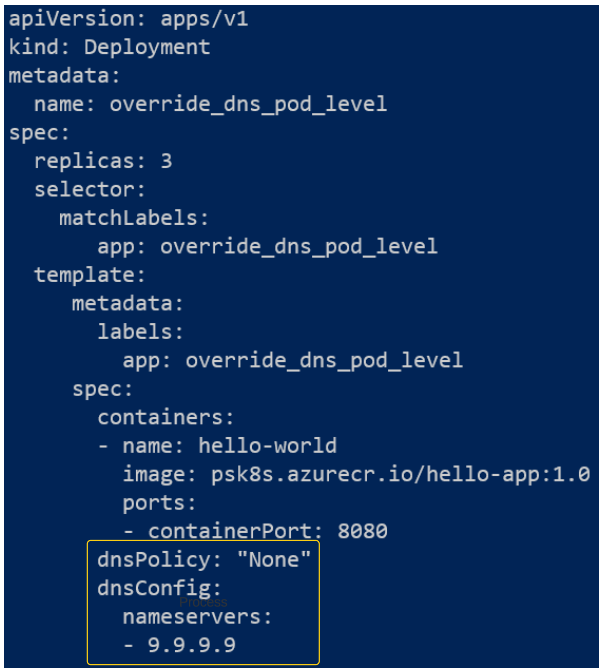
The outlined section indicates that the pods that are deployed as part of this manifest will have their DNS queries passed onto the DNS Server at 9.9.9.9.

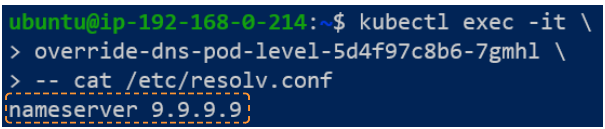
To confirm our custom DNS policy for the pods in this deployment were actually implemented, we can check the /etc/resolv.conf file inside the pod.

Selecting the first pod in the list above (in Figure 13), we can get a glimpse of the content of its /etc/resolv.conf file:
$ kubectl delete -f override_global_coredns_config.yaml.
Pod and Service DNS Records.
By this point, we have:
- Investigated the default CoreDNS configuration values
- Modified the default CoreDNS configuration values and also tested a domain-specific custom forwarder and
- Applied a pod-level DNS query rule using the dnsPolicy attribute.
Before closing out this article, we will do one last thing and that is view the actual DNS A records for pods and services, saved in CoreDNS Service.
First, lets complete a simple deployment consisting of 3 replicas and one service.

To get the DNS A record for the pods and the service just deployed, we have use nslookup again.
nslookup expects, at least 2 parameters to be passed to it (as shown in Figure 16 below):

Following the structure of the FQDN provided above, we can check the DNS A record of any one of the pods if we have the following data:
- The IP of one of the pods with the '.' replaced by a '-'
- The namespace the pod is deployed in
- The word 'pod' in place of type-of-k8s-object
- The word 'cluster.local'
We can get both 1 & 2 from the list above by using kubectl get pods -all-namespaces --selector=app=hello-world -o wide:

The FQDN for the first pod will be:
192-168-235-77.default.pod.cluster.local
We can also get the IP of the ClusterIP Service in kube-system namespace:

Finally, we can use nslookup to get the IP address of the pod:

Services also have a DNS A record in CoreDNS which can be confirmed using the same type of steps as those taken for a pod with some minor difference.
- Difference # 1: For pods, the FQDN begins with their IP address while for services, the FQDN begins with the name of the service. In our case, the name of the service deployed with the pods is 'hello-world'.
- Difference # 2: The term pod is replaced by the term svc.

- CoreDNS is the default DNS Service for k8s.
- We can configure DNS rules and forwarders by editing the coredns ConfigMap in kube-system namespace.
- We can also override DNS Service locations at the pod level by setting the dnsPolicy attribute to "None".
I write to remember and if in the process, I can help someone learn about Containers, Orchestration (Docker Compose, Kubernetes), GitOps, DevSecOps, VR/AR, Architecture, and Data Management, that is just icing on the cake.