K8s Deployment: Deploying and Maintaining Applications with DaemonSets.
Deployments and ReplicaSets are essential for creating redundant Pods and Services across a K8s cluster. The orchestration of Pods, ensuring they are all healthy and running the expected number of replicas, is a big capability of both Deployments and ReplicaSets. However, there may be a reason for running only a single Pod on each Node (e.g. as a logging agent, or as an installer of dependencies of Nodes).
Table of Content
- What is a DaemonSet?
- DaemonSet Pod Scheduling
- Demo: DaemonSet Pods on all Nodes in a cluster
- Demo: DaemonSet Pods on a subset of Nodes in a cluster
What is a DaemonSet?
A DaemonSet ensures that a copy of a Pod is running across a set of nodes in a Kubernetes cluster. DaemonSets are used to deploy system daemons such as log collectors and monitoring agents, which typically must run on every node.
DaemonSets and ReplicaSets have a lot of similarites and therefore, it is expected that some may be unsure when to use which. As a rule of thumb, use ReplicaSets when your application is completely decoupled from the Node and can run multiple copies of a Pod on it, without any special considerations. DaemonSets, on the other hand, are used when only a single copy of an application must run on ALL or a subset of the Nodes in a cluster.
An example of a DaemonSet in our cluster is the kube-proxy Pod for network services. Each Node requires at least ONE copy of the kube-proxy Pod, without which it is unable to network with the other Nodes in the cluster.
Other examples where DaemonSets are typically used is for log collecting, metric servers, resource monitoring agents and storage.
DaemonSet Pod Scheduling
A DaemonSet Pod will be deployed to each Node in a cluster, and this will be coordinated by the DaemonSet controller. The default scheduler is responsible for doing this. As more Nodes get added to the cluster, they will each get a DaemonSet Pod.
Hear over to this page to read articles about the various aspects of Pod scheduling.
Demo: DaemonSet Pod Scheduling on all Nodes
Assume we have a 4 Node cluster: 1 Control Plane Node and 3 Worker Nodes.
| Node Type | IP |
| Control Plane | 192.168.0.214 |
| Worker Node 1 | 192.168.0.96 |
| Worker Node 2 | 192.168.0.205 |
| Worker Node 3 | 192.168.0.186 |
Before we go on with our demo, we will confirm the existence of DaemonSets on all our Nodes. We can type the following at the terminal:
kubectl get daemonsets --namespace kube-system kube-proxy
and get the following as a result:

Step 1: Make the manifest for a DaemonSet Pod.
The manifest we will be using for our demo is shown:
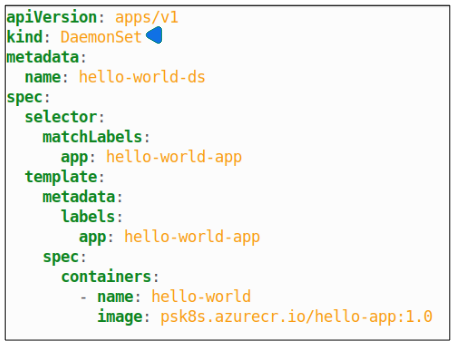
The manifest tells K8s to:
- Create a DaemonSet Pod
- Name it hello-world-ds
- Label the Pod hello-world-app
- Run the hello-world container in it
Deploying this manifest will follow the same set of commands as for all other Deployments:
kubectl create -f DaemonSet.yaml
and will result in each Node getting one DaemonSet Pod:

Step 2: Use kubectl describe to view the DaemonSets metadata.
Using
kubectl describe daemonset hello-world-ds
we can see the metadata for the DaemonSet deployed

Demo: DaemonSet Pods on a subset of Nodes in a cluster
Labels and Node Selectors are such a wonderful feature in K8s. We can use them to include or exclude Nodes from a Deployment for performing things like, say, inspecting a Nodes health. Similarily, we can use Node Selectors to also determine where a DaemonSet Pod may or may not be deployed.
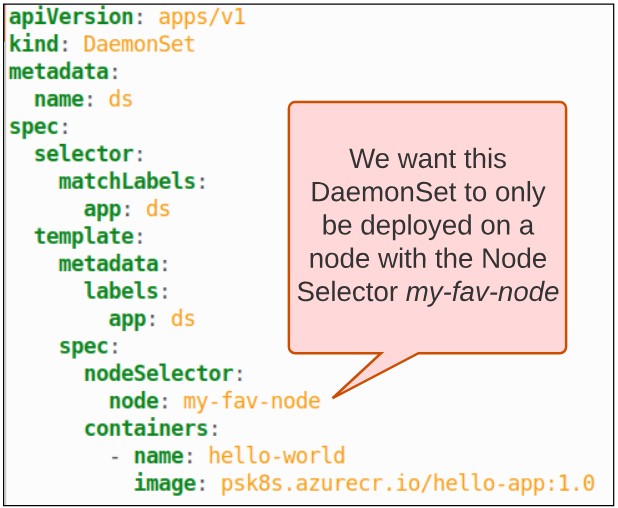
Step 1: Create the manifest for a DaemonSet and set the Node Selector value.
The manifest for this demo looks like the one below:
After using
kubectl create -f DaemonSetWithNodeSelector.yaml
we should be able to see the DaemonSet deployed on each of the 3 Worker Nodes but we will see that...

Why did this happen?
The reason is simple. We declared in the spec we were targetting any Node with the label my-fav-node but none of our current Nodes have that selector applied to them. It therefore makes sense that the DaemonSet was not put on any of them.
Step 2: Apply the label node=my-fav-node to one of the Nodes.
In the case of this demo, the label was applied to the Node ending in 205:
kubectl label node ip-192-168-0-205 node=my-fav-node
Now, without, doing anything else, execute
kubectl get daemonset
and we will witness one of the Nodes getting the DaemonSet placed on it:

How did this happen? We didn't rerun the create command for this DaemonSet?
The DaemonSet controller was successfully created in Step 1, granted it did not have any Node to place the Pod on BUT when the right selector was applied to a Node, the controller was prompted by Kube-API server, and the DaemonSet took the opportunity to update AT LEAST the one Node that was inside the allowed label set.
Step 3: Remove the label node=my-fav-node from the Node with the DaemonSet.
Removing a label on a Node is achieved by:
kubectl label node ip-192-168-0-205 node-
*Replace ip-192-168-0-205 with name of your node.
Step 4: Run the kubectl get daemonset command again.

The DaemonSet controller notices the Node does not have the node=my-fav-node label anymore and as per the specs, no other Node is allowed to have the DaemonSet Pod on it. Therefore, in the spirit of true orchestration, the controller removed the ONLY Pod that was deployed on any Node in the cluster.
We can also do a deeper dive into the metadata for the DaemonSet to see what else was recorded as part of this removal:

I write to remember and if in the process, I can help someone learn about Containers, Orchestration (Docker Compose, Kubernetes), GitOps, DevSecOps, VR/AR, Architecture, and Data Management, that is just icing on the cake.