K8s Deployment Basics.
Orchestration is hard, sometimes restrictive even. So many code bases to maintain, so much effort to ensure containers and pods are developed/deleted/edited to keep the state of the K8s cluster consistent with what we, as infrastructure owners, deem the correct state to be. The term 'many moving pieces' is literally the description of distributed services, with their many code bases and our insistence that these code bases behave all the time, every time.
Kubernetes Principles (or why it exists).
- State of system should be declaratively configured.
- Controllers (or Control Loops) should monitor state of cluster and make sure any deviations from what was expected is eliminated.
- The Kube-API server is the core hub of information on cluster state and should be the 'sounding board' against which Controllers confirm the state of the cluster.
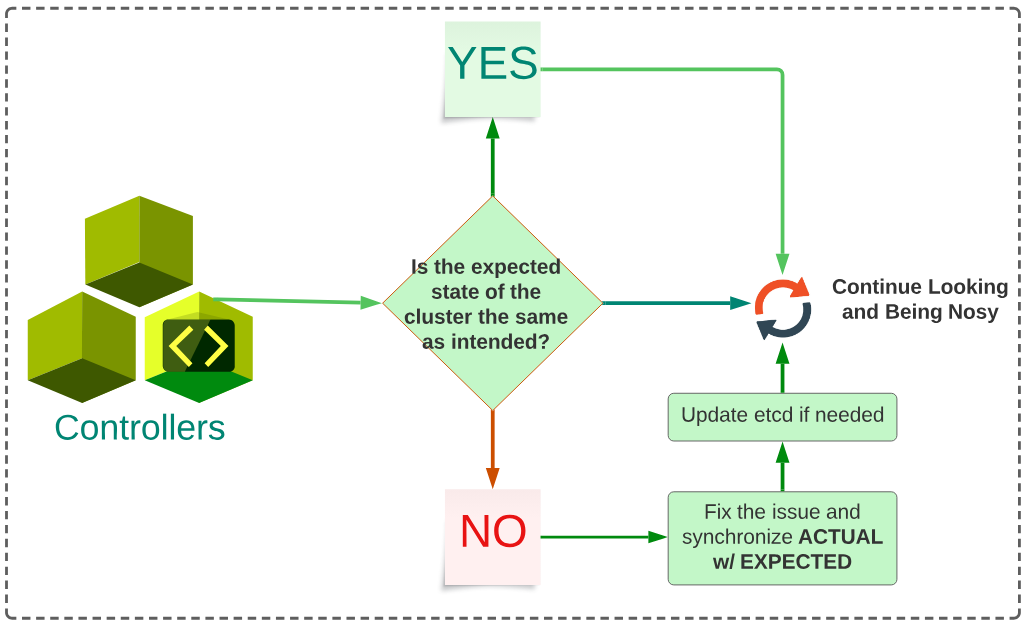
So what are Controllers?
Controllers are 'things', that live in the Control Plane and their reason for existing is to be part of a 'Control Loop'. This loop is like a nosy neighbour (or a concerned friend?) and is always comparing the expected state of the clusters (e.g are there 10 pods of our application in a healthy state?).
Initially, K8s only had a Kube-Controller-Manager which lived on the Control Plane and is the nosy neighbour. This manager is responsible for making the other workload managers (for pods, deployments, replicasets etc) do their job. In its earliest versions, Kube-Controller-Manager also included Cloud-Controller-Managers but currently, these are 2 seperate entities inside K8s.
Over time, seperate Cloud-Controller-Managers have been developed to allow cloud vendors like AWS, Azure, GCP to host K8s clusters on the cloud. These Cloud-Controller-Managers collaborate with cloud provider resources (like Load Balancers, Volumes) and ensure the cluster's state in-cloud is as expected.
Typical Controller Operations
Figure 1 below provides a simplistic 'day-in-the-life-of-Controller' perspective.
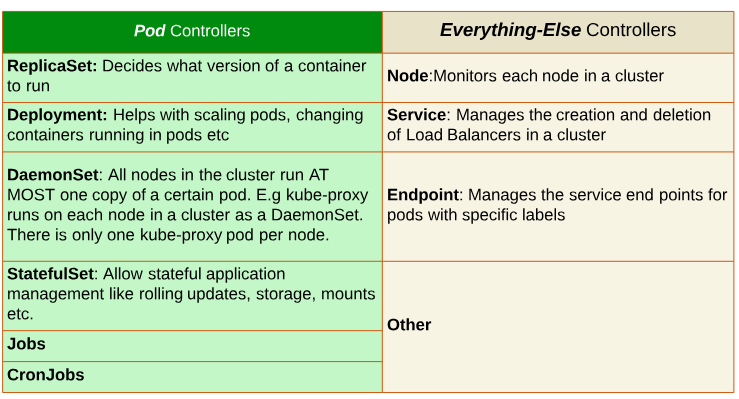
Some specific Controllers in K8s
There are 2 broad categories of Controllers in K8s: one that controls Pods and the other that controls everything else.
An Examination of System Pods and their Controllers.
System pods are found in the kube-system namespace and can be queried using
$ kubectl get all --namespace kube-system
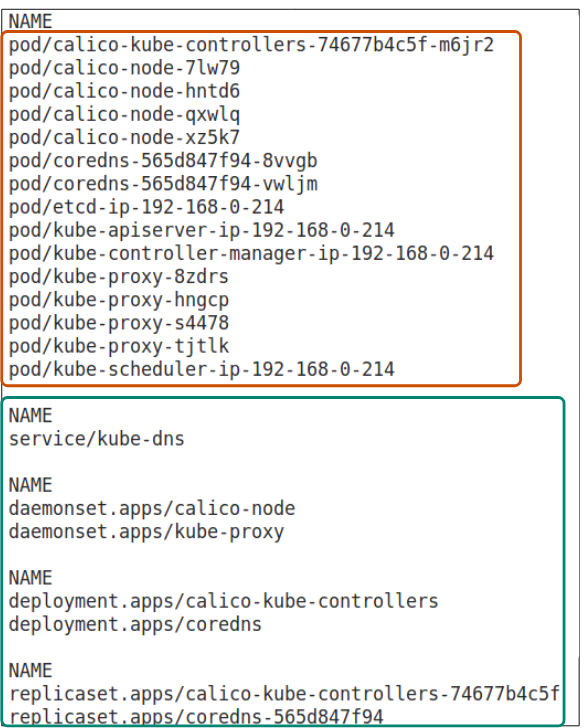
Pod(s) with name:
- calico-kube-controller was deployed by the calico-kube-controllers deployment
- The calico-node were deployed by the calico-node daemonset
- core-dns was deployed by the coredns deployment
- kube-proxy were deployed by the kube-proxy daemonset
- Deployment Controller = the K8s controller; noun.
- deploy = the act of generating pods; verb.
- Deployment = the K8s object that tells Deployment Controller what to do for the pods.
The Deployment Controller...
Is arguably the most important Controller in a cluster.
A Deployment Controller, at its most basic, is responsible for the following steps, all in pursuit of ensuring the ACTUAL state of the cluster is the same as its EXPECTED state:
- Provides declarative updates to a replicaset and its pods
- Orchestrates the creation/deletion/scaling of pods
- Manages the rollout of new pods using a strategy that is defined inside the deployment manifest
For this article, we will look at how a Deployment Controller is used for creating a deployment.
Creating Deployments Imperatively
The simplest, and least recommended, way to invoke a Deployment Controller is through an imperative statement, typed directly into our terminal. The imperative approach is great for quickly aligning the actual state of the cluster with its expected state:

Successful creation of this deployment will display a message:

Using kubectl get all | grep hello-world will show all the K8s workloads that the above deployment created:

Scaling the number of pods imperatively.
Continuing on from our previous example, if we wanted to run 5 pods of the application, using imperative commands, as opposed to the 1 that was deployed, we would do what is shown in Figure 6 below:
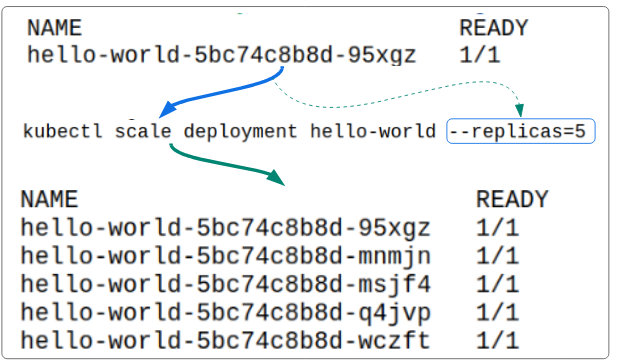
The 'scale' command does the following:
- It tells the Deployment Controller to create 4 additional pods (totalling 5 pods).
- It then sends this new request to the Kube-API server.
- The Kube-API server will update the etcd (saving the new state of the hello-world deployment).
- The Kube-API server will create 4 new pods (notice the original pod with name ending in 95xgz is still a part of the pods list).
- The new pods will become part of the cluster.
$ kubectl create deployment hello-world --image: gcr.io/google-samples/hello-app:1.0 --replicas=5
Creating Deployments Declaratively
The declarative style is based on the use of manifests (YAML files). Compared to imperative, this approach makes it easy to put our deployment manifests into source control, increasing their reusability and maintenance.
The structure of a declarative Deployment manifest
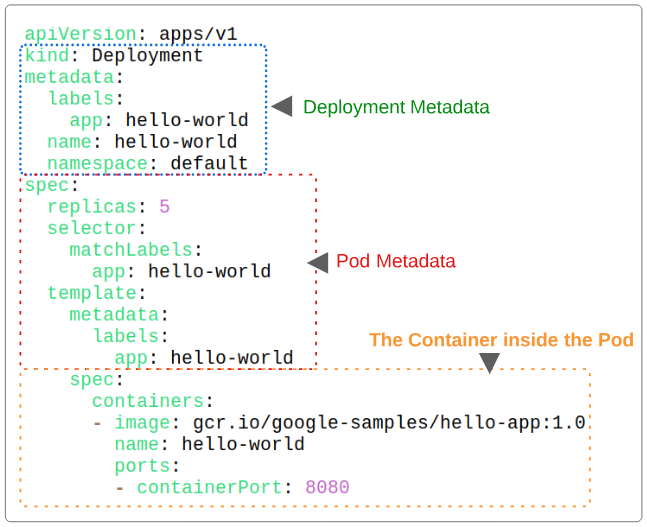
- The Deployment object that will be saved in etcd will have a label (or a tag) of app=hello-world. Labels make searching the etcd for specific workloads easier.
- The Deployment object will be named "hello-world".
The same Label is typically appended to EVERY Pod, Replicaset, DaemonSet, Deployment (that are part of the same application usually) to conceptually organize them under one string (in this case, we are using the string app=hello-world for all the pods that this deployment results it).
- The Deployment object and the pods it generates will be saved in the default namespace.
- replicas is set to 5, indicating 5 pods should be launched
- selector.matchLabel tells us that the deployment is targeted for pods that have the app=hello-world label on them.
- template.metadata.labels tells the Deployment Controller that each new pod that is generated as a part of thie deployment manifest should have the label app=hello-world attached to it.
- The image to launch in each pod is provided in the specs.container.image attribute
- The name of the container is provided in the specs.container.name attribute
- The port which will be opened through which HTTP traffic can make its way to the container is defined in specs.container.ports.containerPort attribute.
To finally use this deployment, use the command:
kubectl create -f <name of deployment manifest>
*The deployment manifest for our example is called hello-world.yaml
*Download the YAML from here:

What did kubectl create do behind the scenes?
To better answer this question, lets display the various workloads that the hello-world deployment created.
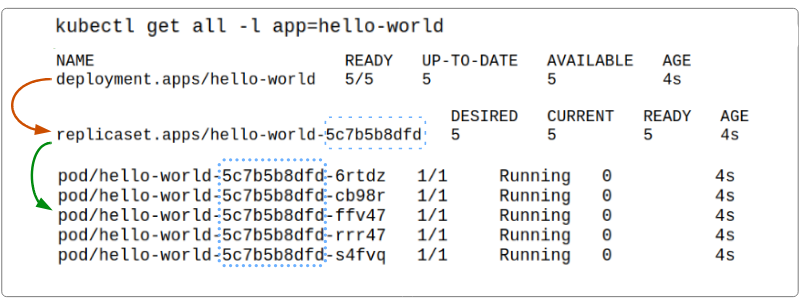
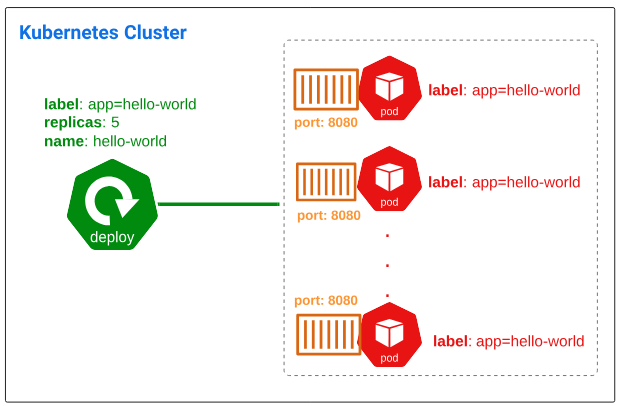
Visualizing the declarative deployment and its outcomes.
The Replicaset Controller
So far, we have spoken about Deployment Controllers generating Replicasets which then generate and manage the Pods. Therefore, it would not be amiss to say that a Deployment Controller is really only the messanger and its the Replicasets that are the life blood of the entire pod deployment process.
So what does a Replicaset actually do?
Replicasets, in a nutshell, are responsible for:
- deploying a number of pods (as provided through the replicas attribute)
- scaling the number of pods when instructed to do so by the Deployment Controller
- de-scaling the number of pods when instructed to do so by the Deployment Controller
As alluded to in Figure 10, a Deployment Controller will provoke a Replicaset object to generate and activate pods.
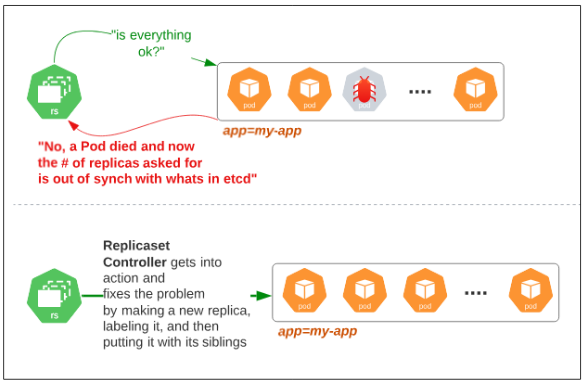
How does Replicaset manage the group of pods its been tasked to manage?
When creating new pods

When a pod dies or is corrupted or deleted accidentally
I write to remember and if in the process, I can help someone learn about Containers, Orchestration (Docker Compose, Kubernetes), GitOps, DevSecOps, VR/AR, Architecture, and Data Management, that is just icing on the cake.