[Deprecated] K8s Installation: The What's and Why's.
![[Deprecated] K8s Installation: The What's and Why's.](/content/images/size/w960/2024/01/Blog---real-2.0-44.png)
The conceptual basis for this article has not changed however the repo's used as part of the installation flow are deprecated and provided scripts may not work.
I am equal parts terrified and positively awed by K8s. Its a beast that can crush your confidence or become your road to tech fame and glory.
I am on a personal journey to tame this beast in anyway I am able to and where else should I start but with its installation process and understand the WHY behind its WHAT.
Requirements.
- 4 nodes (I am using AWS EC2) with Ubuntu 20.04
- Each node should have 2 vCPU and 2 GB RAM
- Each node should have about 20GB of storage space
- Swap needs to be turned off on each of node
Kubernetes installation has 3 distinct stages.

Stage 1: Pre-Bootstrap.
This phase is all about downloading the dependencies that will support different functions in the cluster. Some major steps taken during this phase are:
- Disable swap.
- Downloading, configuring and activating Containerd (our chosen container run time of choice) and its dependencies like Overlay and Br_NetFilter.
- Downloading other helper libraries and modules.
- Downloading Kubectl, Kubeadm and Kubelet.
Stage 2: During Bootstrapping.
The actual bootstrapping of a cluster happens a lot later in the sequence of events. During bootstrapping, the nuts and bolts of a cluster are set up, tuned, fixed, tested and when everything is finished, if you are on the Control Plane, you will be provided a kubeadm join command that can be used for adding Worker Nodes to the cluster.
Stage 3: Post Bootstrapping.
Once the node(s) has/have gone through the bootstrapping, we have some additional steps to perform:
- Downloading and configuring Calico, the CNI Standard based networking interface.
- Configuring and updating Ubuntu system files where needed.
Stage 1: Pre-Bootstrap.
Assume root privileges on all nodes.
Type sudo -i at the console prompt. Your prompt should change colors and/or the text being displayed as the prompts name.
Disable swaps.
Type swapoff -a in each terminal and press enter. Your prompt should return nothing and moves to the next line without any output being printed.

Why: Opinion on this matter is divided. The fine folks who develop Kubernetes have not included the use of Linux swap feature in the way some K8s components (like the Kube-Proxy) behave. Refer to online discussion boards for deeper insight.
In particular, this post has an explanation and a complaint about swap being turned off.
Perform a general system update.
Before downloading any software on Linux, it is advisable to update and upgrade existing libraries. Figure 2 below shows the commands to use:

Download modules/softwares that are needed for different parts of the pre and actual bootstrapping stages.
The various dependencies that need to be downloaded are shown below:

apt install curl apt-transport-https vim git wget gnupg2 ca-certificates software-properties-common -y.
The purpose for some of the downloaded modules is shown below:

Download Pre-requisites for Containerd.
Containerd has a dependency on 2 Linux modules: overlay and br_netfilter. Both of these have to be loaded before any other downloads for Containerd should happen, but what are they and why do we need them?
- overlay allows one, usually read-write, directory tree to be overlaid onto another, read-only directory tree.
- br_netfilter module is required to enable transparent masquerading and to facilitate Virtual Extensible LAN (VxLAN) traffic for communication between Kubernetes pods across the cluster.

Update kernel networking rules to allow traffic forwarding in the cluster.
Containerd requires the ability to forward traffic between containers and, as mentioned, requires the overlay and br_netfilter modules for this purpose. However, we have to explicitly set 3 kernel level system parameters to let the Containerd + overlay + br_netfilter trifecta achieve its purpose.
This done by creating a file called kubernetes.conf in the /etc/sysctl.d/ folder.

Type the commands outlined in red. On pressing enter, the file is created and saved with the flags for kernel networking parameters set to 1 (true).
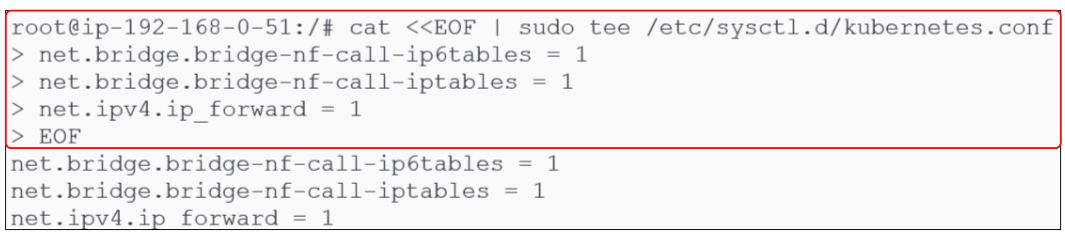
cat <<EOF | sudo tee /etc/sysctl.d/kubernetes.conf
net.bridge.bridge-nf-call-ip6tables = 1
net.bridge.bridge-nf-call-iptables = 1
net.ipv4.ip_forward = 1
EOF
Once the commands, as shown in Figure 4 are completed, go back to the /etc/sysctl.d folder and you should see the brand new kubernetes.conf file there.


Since the changes were made to kernel level variables, it is important to 'soft reboot' the OS (i.e. reload the latest list of variables without having to restart the VM/computer). Typing sysctl --system achieves this purpose.

Let the OS know 'overlay' and 'br_netfilter' need to be loaded on each boot.
To ensure overlay and br_netfilter modules are loaded every time a new boot occurs, let the OS (or the modules-load.d folder) know about them. Before doing this, confirm there is no configuration file for Containerd already present. This can be done by typing the commands shown in Figure 8 below:

To create this configuration file for Containerd, type the commands in Figure 9 below:

cat <<EOF | sudo tee /etc/modules-load.d/containerd.conf
overlay
br_netfilter
EOF
For sake of caution, its always advisable to confirm that dynamic configuration files (like containerd.conf or kubernetes.conf) were actually created where they were supposed to be:

Soft-reboot the kernel again. Refer to Figure 7 to see how.
Download and install Containerd.
Containerd installation is a multi-step activity.
1st: Download a PGP key for the repo from where the binary will be taken and save it into /etc/apt/keyrings folder.
There is no folder called /etc/apt/keyrings and therefore has to be created as shown in Figure 14 below:

curl -fsSL https://download.docker.com/linux/ubuntu/gpg \
| sudo gpg --dearmor -o /etc/apt/keyrings/docker.gpg
Once the folder has been made, download the authentication key for the repo we are using to download Containerd from. This authentication key will be used by the OS and the repo to authenticate each other and reduce risk of malicious men-in-the-middle.
2nd: Add the URL for the actual repo from where Containerd will be downloaded to a source list.
Download of software/binaries in Linux can happen in 2 ways:
- Direct download using wget
- Adding the location URL for a Debian packages repo to a sources list and then using apt or apt-get to download the packages from ONE of the sources in the list
For Containerd, we have to get it from an online repo that contains Debian packages. The way to proceed is to either use an existing source list or create a new one specifically for Containerd - I will create a file called docker.list in /etc/apt/sources.list.d.
Before going on, lets quickly confirm that there is no docker.list in the /etc/apt/sources.list.d.

Figure 16 shows the commands that need to be entered at the terminal to (a) create a source list file (docker.list) and (b) save the URL for Containerd in docker.list.

echo \
"deb [arch=$(dpkg --print-architecture) \
signed-by=/etc/apt/keyrings/docker.gpg] \ https://download.docker.com/linux/ubuntu \
$(lsb_release -cs) stable" | sudo tee /etc/apt/sources.list.d/docker.list
Confirm that docker.list was indeed created and a URL was saved inside it:

3rd: Download Containerd using apt-get.

Configure Containerd.

$ containerd config default | tee /etc/containerd/config.toml
Update config.toml file by setting SystemdCgroup flag to 'True'.
Being a container run time, Containerd will need to create process control groups for each container launched. In Debian systems like Ubuntu, the control groups are controlled by Systemd and in default Containerd configuration, SystemdCgroup is set to false (see Figure 20 below):
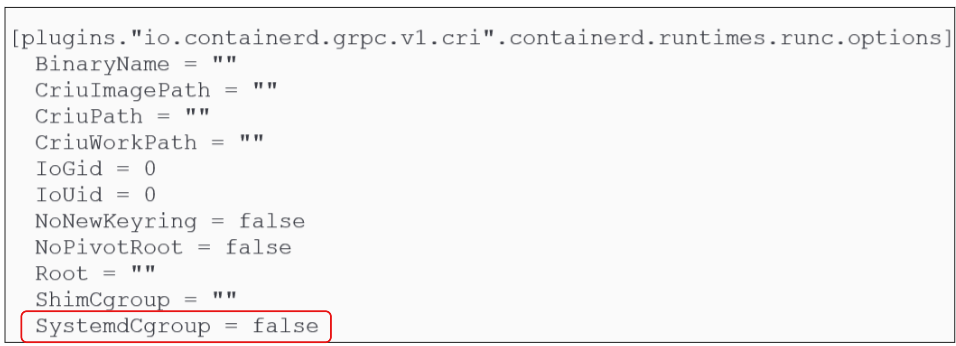
Use the sed command to replace the 'false' with 'true':

sed -e 's/SystemdCgroup = false/SystemdCgroup = true/g' \
-i /etc/containerd/config.toml
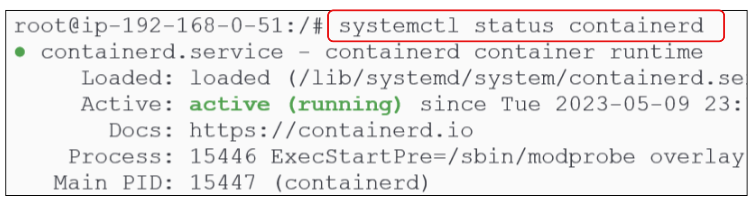
Finally, 'soft-reboot' the kernel.

You can also confirm the Containerd service is active by finding its status.
Download and install Kubernetes binaries.
As was the case with Containerd, downloading and installing kubernetes binaries is a multi-step activity.
1st: Create a kubernetes.list file and save the URL from where to download binaries.
As was done for Containerd, make a kubernetes.list file and save the URL for a Kubernetes repo in it. We can use the existing /etc/apt/sources.list.d folder (which already containes the docker.list file for our Containerd repo).

Make a file (kubernetes.list) inside the /etc/apt/sources.list.d folder:

Type the URL for the repo from where binaries will be downloaded:
2nd: Add a GPG key for the repo.
This is an important step for ensuring authenticity of the binaries being downloaded (and was also done for the Containerd repo earlier).

curl -s https://packages.cloud.google.com/apt/doc/apt-key.gpg | apt-key add -

3rd: Install Kubernetes.

apt-get install -y kubeadm=1.25.1-00 kubelet=1.25.1-00 kubectl=1.25.1-00
4th: Freeze the version of kubeadm, kubelet and kubectl.
Every time the nodes housing kubernetes are rebooted for security updates or other reasons, updates for installed softwares may be installed. Since we want to make sure this does not happen to Kubernetes components like Kubeadm, Kubelet and Kubectl, we have to explicitly let the OS know this.
By using the apt-mark hold module, we can do this easily:

Downloads Calico for the clusters pod network.
A Pod network should allow:
- Container-to-Container
- Pod-to-Pod
- Pod-to-Service, and
- External-to-Service communications.
Calico is one such networking interface, and we will download it's yaml manifest and deploy it:

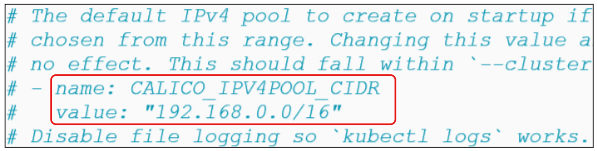
On a tangent: The CIDR for Pods that will be launched in the cluster can be found inside the calico.yaml file.
Add a DNS entry for the Control Plane Node into the /etc/hosts file.
Ubuntu has a file called /etc/hosts where IP addresses and an alias to refer to them by is documented.
There are 2 ways of finding out the IP address for the node you are in:

Once you have the IP address, note in the /etc/hosts file as shown:


We installed kubelet as a service and we can check its health like we can for any Ubuntu service:
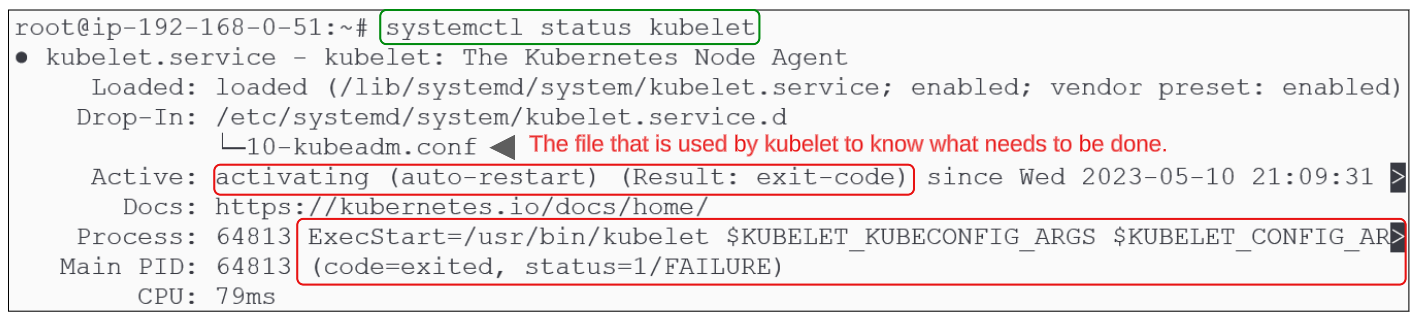
Kubelet is failing to remain active. This does not mean the kubelet service is not functioning but rather it is trying to perform its role but doesn't know what to do.
On deeper investigation, notice that the kubelet.service reads its instructions from the 10-kubeadm.conf file in /etc/systemd/system/kubelet.service.d folder:

The first variable "KUBELET_KUBECONFIG_ARGS" points towards a file called bootstrap-kubelet.conf and kubelet.conf in /etc/kubernetes folder.
The second variable "KUBELET_CONFIG_ARGS" points towards a directory & file (/kubelet/config.yaml) in /var/lib location:

Since kubelet does not have what it needs to continue functioning, it is stuck in a Crash Loop. The bootstrap process will generate and save these missing files in their respective locations and that will make the kubelet come out of the crash loop.
Stage 3: Bootstrapping
The moment of truth. We spent a lot of time getting ready for this stage.
Create a Cluster Configuration file for initiating the bootstrapping journey.
Using a text editor (vim or nano), create a file titled kubeadm-config.yaml.
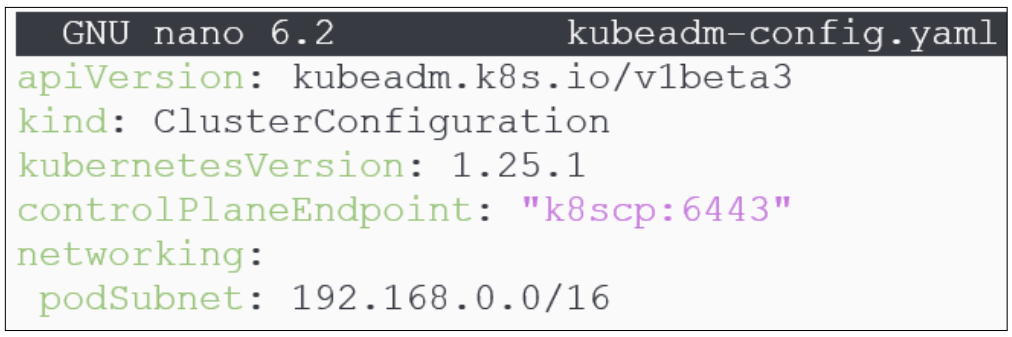
In Figure 39 above, note the values used for kubernetesVersion (=1.25.1), the controlPlaneEndpoint (the alias for the Control Plane and the default port kube-api server listens on) and the podSubnet (which has the same CIDR as we saw earleir inside Calico.yaml).
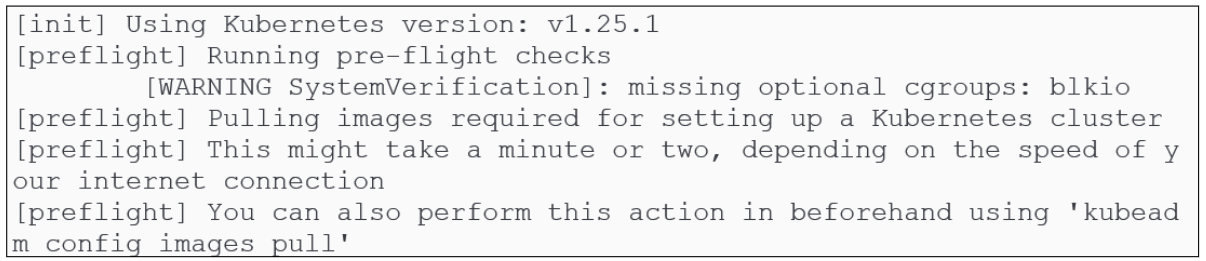
Kick off the bootstrapping process.

kubeadm init --config=kubeadm-config.yaml --upload-certs | tee kubeadm-init.out
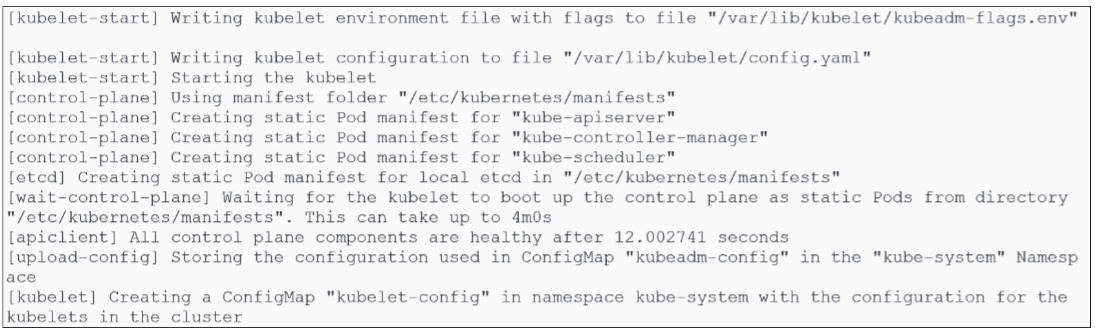
What happens during the bootstrapping process?
As bootstrapping starts and continues, there are a number of phases that the cluster creation goes through:
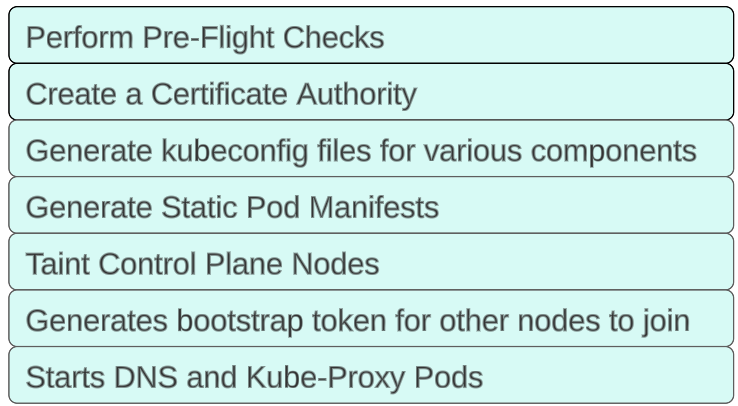
Performing Pre-Flight Checks.
Create a Certificate Authority.
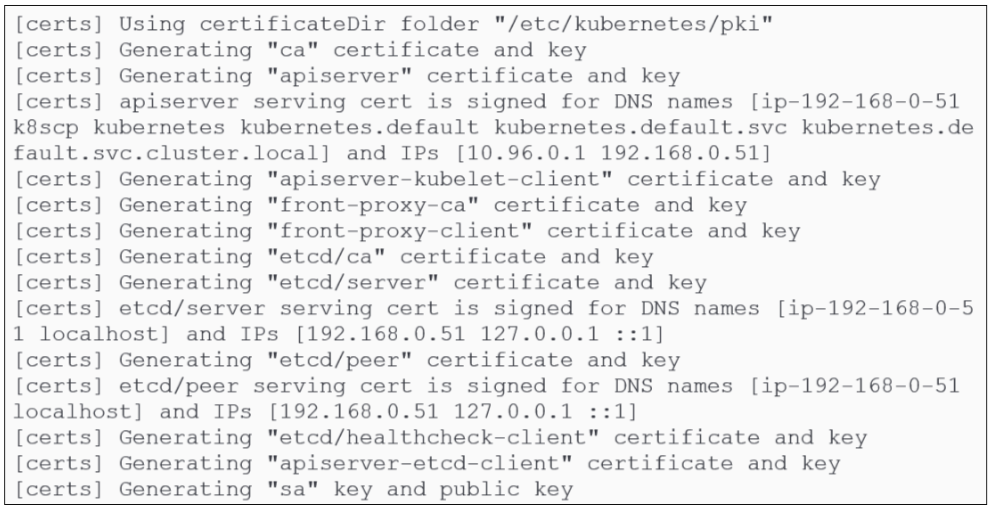
Kubeadm creates a self-signed certificate authority. This is used for:
- Securing cluster communications: The CA will generate certificates that will be used by the kube-api server to encrypt its HTTP messages with the rest of the cluster. Because of the use of a certificate, all HTTP messages get encrypted (TLS) and are sent as HTTPS streams.
- Authentication of users and cluster components: Various components like kubelets, kube-schedulers etc will have to provide some sort of "its me, really" comfort to the kube-api server, and this is achieved through certificates issued by the CA (which is not to say that we can't use an external PKI to do this job if that is needed).
All certificates in use are kept in the /etc/kubernetes/pki folder and will be distributed to each node that joins the cluster.
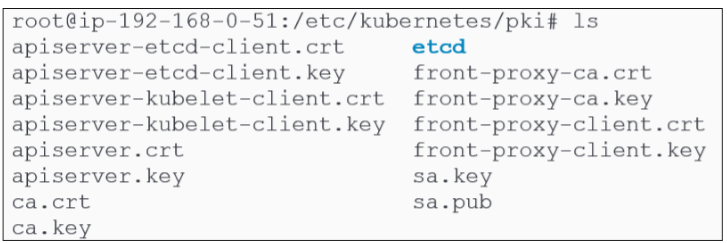
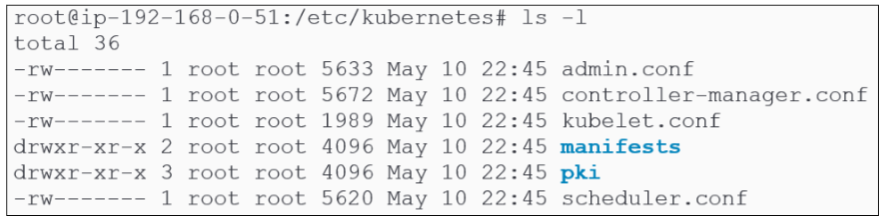
Generate kubeconfig files for various kubernetes components.

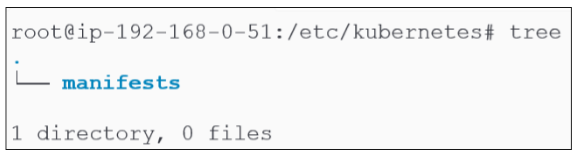
In Figure 37, we noted only one directory inside /etc/kubernetes. However, now we can confirm that the directory has been used to store a number of directories and files.
We can check the health of the kubelet service again:

Generate static pod manifests.
Taint Control Plane Node.

Generate bootstrap tokens for other nodes to join.
For other nodes to join the cluster, they must present authentication and authorization tokens. During the bootstrapping, these tokens are generated and mapped to the various roles and permissions that will be invoked as more nodes are added to the cluster:

Start DNS and Kube-Proxy pods.
These are add-ons that get deployed as part of bootstrapping:

Stage 3: Post Bootstrapping.
Get out of root mode
Type logout or exit at the prompt.
Move the admin.conf file to the /.kube/config folder.

Install the Calico Pod Networking Interface that was downloaded earlier.

Use kubectl to confirm the Control Plane is ready.

We can now add additional nodes (Worker Node) to the cluster.
The instructions are the same as for setting up the Control Node.
Steps:
$ sudo -i
$ sudo -i$ apt-get update && apt-get upgrade -y
$ sudo apt install curl apt-transport-https vim git wget gnupg2 \
software-properties-common lsb-release ca-certificates uidmap -y
$ sudo swapoff -a
$ sudo modprobe overlay
$ sudo modprobe br_netfilter
$ cat >>EOF | tee /etc/sysctl.d/kubernetes.conf
net.bridge.bridge-nf-call-ip6tables = 1
net.bridge.bridge-nf-call-iptables = 1
net.ipv4.ip_forward = 1
EOF
$ sudo sysctl --system
$ sudo sysctl --system
$ sudo mkdir -p /etc/apt/keyrings
$ curl -fsSL https://download.docker.com/linux/ubuntu/gpg \
| sudo gpg --dearmor -o /etc/apt/keyrings/docker.gpg
$ echo "deb [arch=$(dpkg --print-architecture) \
signed-by=/etc/apt/keyrings/docker.gpg] https://download.docker.com/linux/ubuntu \
$(lsb_release -cs) stable" | sudo tee /etc/apt/sources.list.d/docker.list > /dev/null
$ apt-get update && apt-get install containerd.io -y
$ containerd config default | tee /etc/containerd/config.toml
$ sed -e 's/SystemdCgroup = false/SystemdCgroup = true/g'
-i /etc/containerd/config.toml
$ systemctl restart containerd
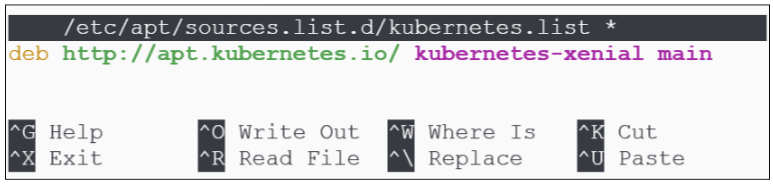
$ nano /etc/apt/sources.list.d/kubernetes.list
Inside the file editor, type: deb http://apt.kubernetes.io/ kubernetes-xenial main
$ curl -s https://packages.cloud.google.com/apt/doc/apt-key.gpg | apt-key add -
$ apt-get update
$ apt-get install -y kubeadm=1.25.1-00 kubectl=1.25.1-00 kubelet=1.25.1-00
$ apt-mark hold kubeadm kubectl kubelet
Go back to the Control Node and using hostname -i and find its private IP address
Note: the output from the next 2 steps should be copied for future use.
$ sudo kubeadm token create$ openssl x509 -pubkey -in /etc/kubernetes/pki/ca.crt | openssl rsa \
-pubin -outform der 2</dev/null | openssl dgst -sha256 -hex | sed 's/^.* //'
$ nano /etc/hosts
Enter the private IP address for the Control Plane and alias it as k8scp.
$ kubeadm join --token <the value from sudo kubeadm token create> k8scp:6443
--discovery-token-ca-crt-hash sha256:<value from the openssl command above>
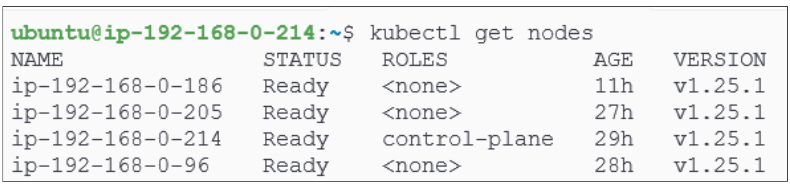
Confirm the cluster is set up and has 4 nodes.
I write to remember and if in the process, I can help someone learn about Containers, Orchestration (Docker Compose, Kubernetes), GitOps, DevSecOps, VR/AR, Architecture, and Data Management, that is just icing on the cake.