GitOps w/ FluxCD: A Little More Than a Simple Introduction.
Technologists LOVE acronyms (and jargons). In fact, I have a feeling they revel in creating new ones every opportunity they get. Case in point: DevOps morphed into DevSecOps, which then became BizDevSecOps. There was perhaps a lull in acronym-making for a few weeks (or hours?) before the term GitOps made its debut (and what an introduction it was).
A Definition
Our friends at GitLab define GitOps as
an operational framework that takes DevOps best practices used for application development such as version control, collaboration, compliance, and CI/CD, and applies them to infrastructure automation.
GitOps has 4 Principles
Principle # 1
We must use declarative code using YAML manifests to manage our infrastructure. Since Kubernetes uses declarative codes for pretty much all of its operations, using GitOps tools for managing Kubernetes-based infrastructure makes a lot of sense (and not surprisingly, any GitOps tool we choose has a lot of support for Kubernetes).
Principle # 2
Every bit of declarative code should be saved in a git repository. In case a complete rebuild of the infrastructure is needed, our git repositories should be the FIRST place we visit because they have all the state information.
Of course, using git also allows us to use familiar git-based workflows.
Principle # 3
Infrastructure changes should be committed to GitHub and approved automatically.
Principle # 4
Use an agent (like a GitOps tool, e.g. FluxCD) to keep an active eye on our git repo, and any infrastructural changes saved to the repo should be auto-detected, auto-compared with the existing infrastructure state and automatically patched.
FluxCD: A GitOps Tool Living inside K8s
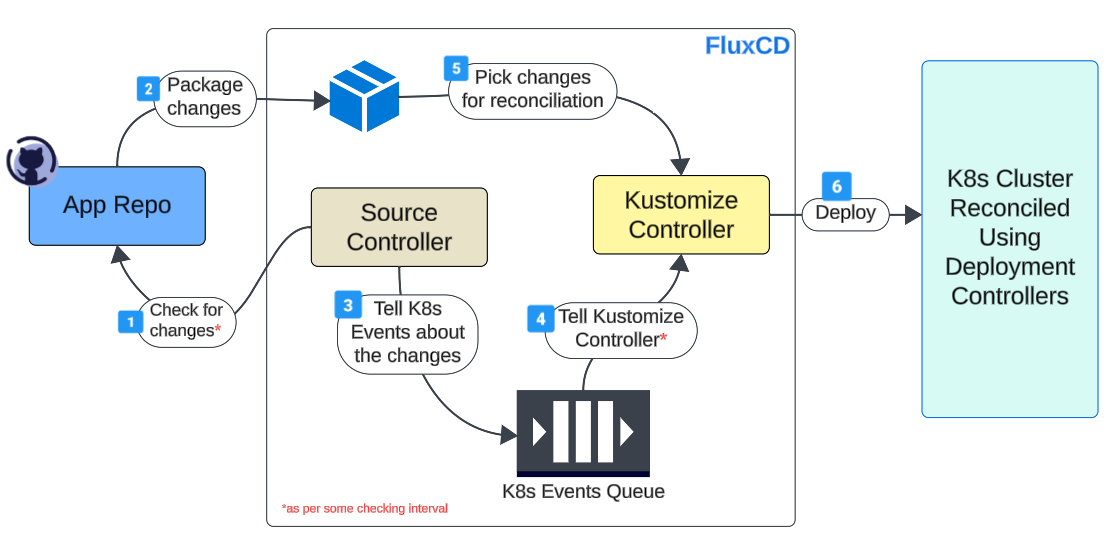
FluxCD is a CI/CD tool for managing K8s infrastructure. It lives inside the cluster as a group of Controllers, Pods, and other native objects.
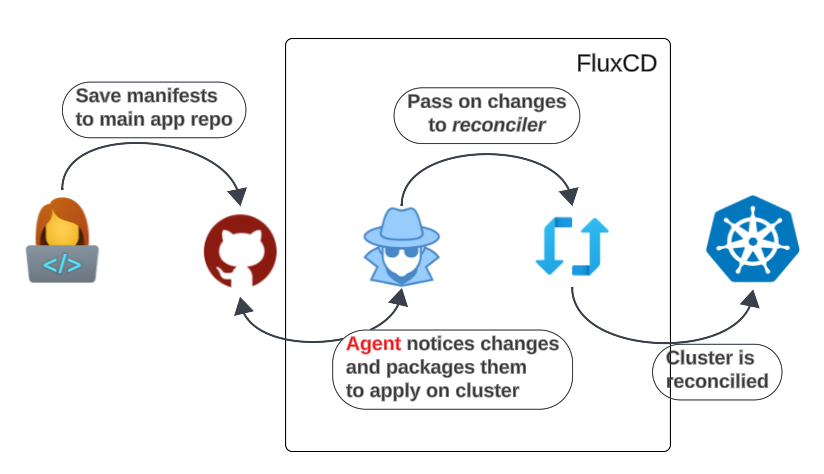
- 1: The engineer saves a YAML file to the git repo.
- The YAML file has all the intended infrastructure state changes declared
- 2: The always-on FluxCD agent will notice a new addition to the repo and pass that information to the reconciler installed in the K8s cluster.
- We will come across the agent and reconciler again.
- 3: Controllers will continue to pass information to the Kube-API Server.
- 4: The cluster's infrastructure is modified to satisfy asked-for changes.
Resources for Upcoming Demo
- OS: Ubuntu 22.04
- VM: AWS EC2 (t2.medium: 4 vCPU, 8GB storage)
- Install Docker version 24.0.7, build afdd53b
- Install kubectl 1.27
- Install KinD 0.21.0
- Install FluxCD 2.2.3
- Install GitHub on Linux
- Fork the repo at https://github.com/lfs269/instavote
Once KinD is installed, create a 3-node cluster using the code provided below:
# three node (two workers) cluster config
kind: Cluster
apiVersion: kind.x-k8s.io/v1alpha4
nodes:
- role: control-plane
  extraPortMappings:
  - containerPort: 32000
    hostPort: 32000
    listenAddress: "0.0.0.0"
    protocol: tcp
  - containerPort: 30300
    hostPort: 30300
    listenAddress: "0.0.0.0"
    protocol: tcp
  - containerPort: 30400
    hostPort: 30400
    listenAddress: "0.0.0.0"
    protocol: tcp
  - containerPort: 30000
    hostPort: 30000
    listenAddress: "0.0.0.0"
    protocol: tcp
- role: worker
  extraPortMappings:
  - containerPort: 80
    hostPort: 80
    listenAddress: "0.0.0.0"
    protocol: tcp
  - containerPort: 8000
    hostPort: 8000
    listenAddress: "0.0.0.0"
    protocol: tcp
  - containerPort: 8080
    hostPort: 8001
    listenAddress: "0.0.0.0"
    protocol: tcp

- role: worker
You can also download the YAML for the code above here.
The command to create the KinD cluster is:
kind create cluster --config 3-node-kind-cluster.yaml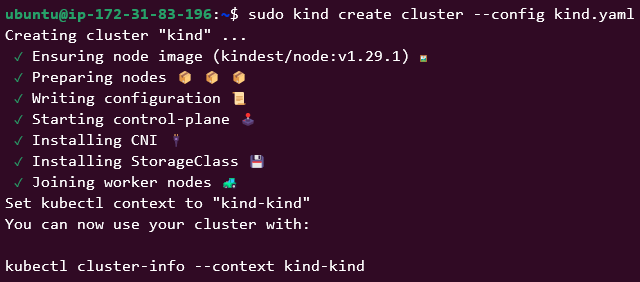
Confirm the cluster was created using
kubectl get nodes
As was declared in our cluster manifest, we have 2 Worker Nodes and 1 Control Plane Node.
Installing FluxCD
Any application that wants to integrate with our Git repo has to be able to authenticate itself. FluxCD is no different. It requires some form of authentication, which can be a Personal Access Token from our repo.
A fresh installation of FluxCD requires:
- Access to our GitHub repository
- Download and configuration of the FluxCD CLI
- Bootstrapping FluxCD on a K8s cluster
Access to our GitHub repository
- Generate a Personal Access Token in Git to use for FluxCD authentication.
- Login to your git repo.
- Go to Settings —> Developer Settings —> Personal Access Tokens
- Select whichever style for generating the token is preferred. For this article, the classic approach was used.

Select the options shown in the image above and generate the token.
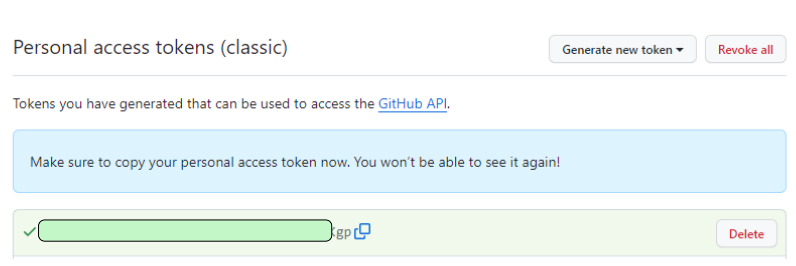
Copy the token into a text editor for reuse later.
Save GitHub Token and GitHub User Name into Environmental Variables.
echo "export GIT_PAT=<enter PAT>" >> ~/.bashrc
echo "export GIT_USER=<enter user name>" >> ~/.bashrc
To confirm the environment variables added were indeed saved, use
cat ~/.bashrcThe contents of the bashrc file will be shown on the terminal. Scroll to the bottom to confirm the two variables were added.

Download and configuration of the FluxCD CLI.
curl -s https://fluxcd.io/install.sh | sudo bash
Confirm FluxCD CLI was installed.
flux --versionBootstrapping FluxCD on a K8s cluster
At this point, we have the basic ingredients for bootstrapping our FluxCD installation.
Deploys the Flux controllers on Kubernetes cluster(s) and configures the controllers to sync the cluster(s) state from a Git repository. Besides installing the controllers, the bootstrap command pushes the Flux manifests to the Git repository and configures Flux to update itself from Git.
Before boot-straping FluxCD for our repo, list all the git/code hubs FluxCD can work with.
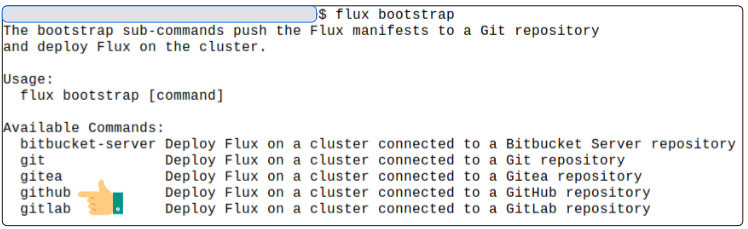
*Our repo is GitHub.
Optionally, we can run a system check command to confirm the versions of the various tools (kubectl, K8s cluster) that are a pre-requisite for FluxCD.

Now comes the part we have all been waiting for.
flux bootstrap github \
--owner=$GIT_USER \
--repository=flux-infra \
--branch=main \
--path=./cluster/dev \
--personal \
--network-policy=false \
--components=source-controller,kustomize-controller \
--token-authA brief description of each flag listed in the bootstrap command follows.
- --owner=$GIT_USER: Your GitHub UserId.
- --repository=flux-infra: FluxCD will dynamically put a repo (flux-infra) in your GitHub account.
- More details are forthcoming.
- --branch=main: FluxCD will commit its own manifests/code files in the main branch for repo flux-infra.
- --path=./cluster/dev: The folder structure inside flux-infra where FluxCD's own manifests/code files are saved.
- --personal: Indicates to FluxCD this is a personal repo.
- For organization repos, the setup is different. Refer to FluxCD documentation for details.
- --network-policy=false: In certain cases, already present Network Policies may interfere with the bootstrapping flow, and therefore, setting them to false removes any impact they may have.
- This flag is set as a workaround, and recent versions of FluxCD might have overcome this obstacle.
- --components: The core FluxCD components are the keepers of the cluster's state.
- --token-auth: The PAT that allows FluxCD to get authenticated with your GitHub account.
As FluxCD gets installed successfully, there are updates shown on the terminal confirming FluxCD:

Visually speaking, the bootstrapping flow has the following conceptual design.
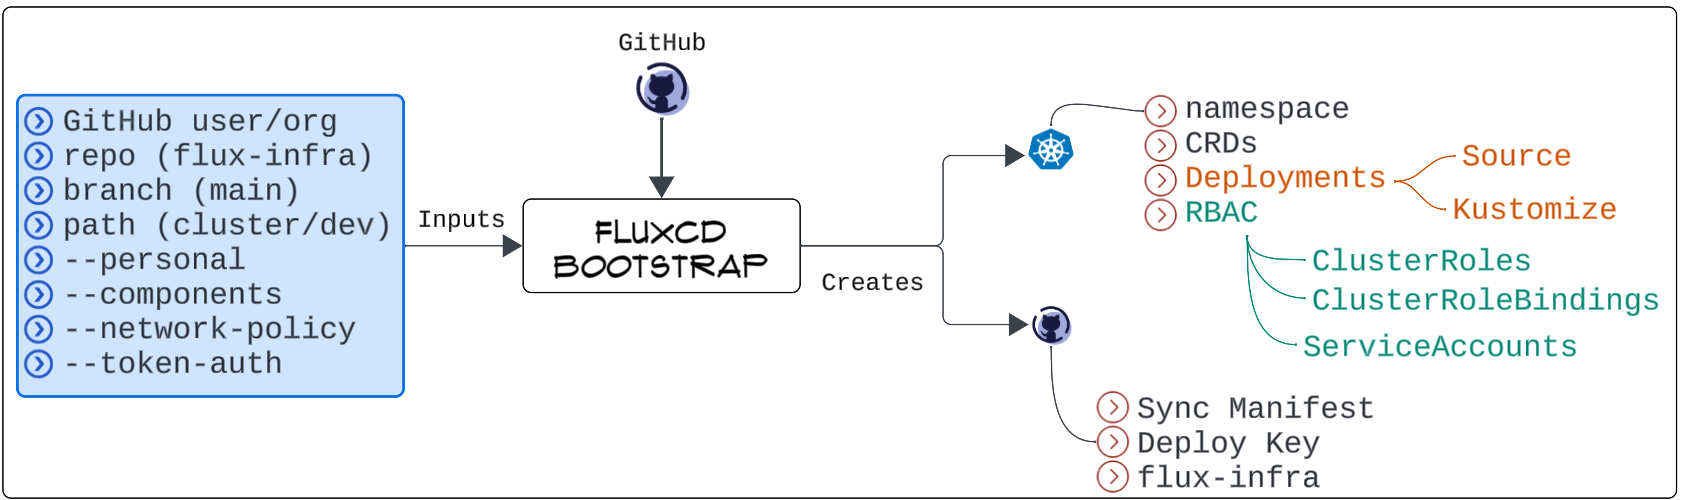
So what's going on here, you ask?
The salient steps occurring during bootstrapping are discussed below.
#1: Connect to our GitHub account and dynamically generate a repo that FluxCD will use to monitor our actual application code repo.

Remember the agent mentioned earlier? This is ONE of FluxCD's steps to bring that agent to life.
- FluxCD connects to GitHub using our provided credentials (through the use of $GIT_USER and $GIT_PAT variables) to create a repo called flux-infra.
- flux-infra will be used to save manifests for the required FluxCD component that will be the agent.
#2: Generate and save YAML manifests that will be used for FluxCD components.

The bootstrapping includes generating a set of K8s controllers (Source-Controller and Kustomize-Controller) using YAML manifests. These controller manifests are then saved to the main branch in the dynamically created flux-infra repo.
#3: Make a namespace in our K8s cluster and install Source-Controller and Kustomize-Controller.

We can use our tried and tested kubectl commands to peek inside the namespace flux-system.
kubectl get all -n flux-system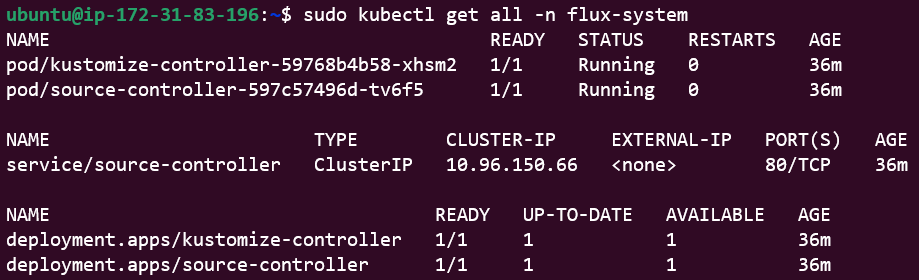
#4: Our GitHub credentials are saved to a Secret (for authentication in future)

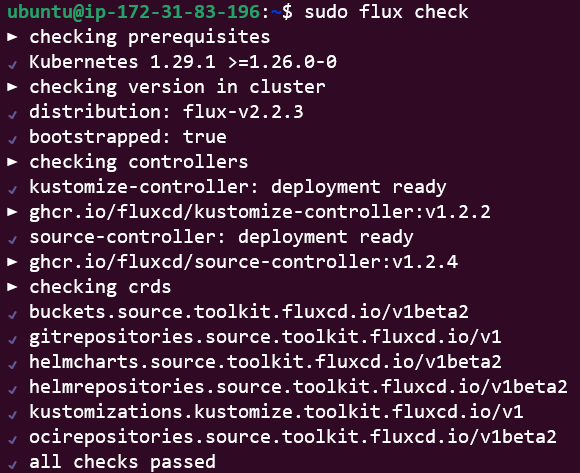
Finally, we can run a flux check again, which should pick up on installed controllers and other components.
What's the deal with Source and Kustomization-Controllers?
Bootstrapping will install, generate and deploy several moving pieces (all critical, of course). However, two components need more light shone on them - the Source Controller ('agent') and the Kustomization Controller ('reconciler').
#1: They are both CRD's
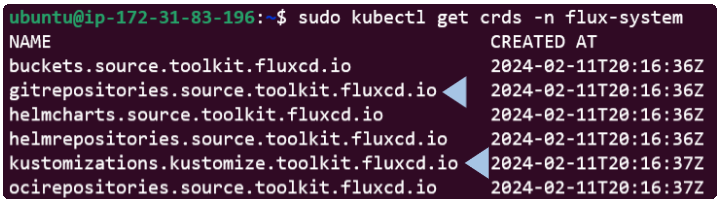
*Alternatively, use the code below to list the exact CRDs
kubectl get kustomizations,gitrepositories -n flux-system
#2: They are both running as Pods
kubectl get pods -n flux-system
For Kustomization-Controller: sudo flux get kustomizations -n flux-system
For Source-Controller: sudo flux get source git -n flux-system
Why are the Source and Kustomization Controller Important?
Because both play a central role in an automated CI/CD flow. In fact, it would not be amiss to say that the Source Controller is responsible for CI, and Kustomization Controller is the engine behind CD.
Both these controllers work in cahoots to keep our K8s cluster aligned with our application architecture.
Demo: GitOps w/ FluxCD for a Voting App
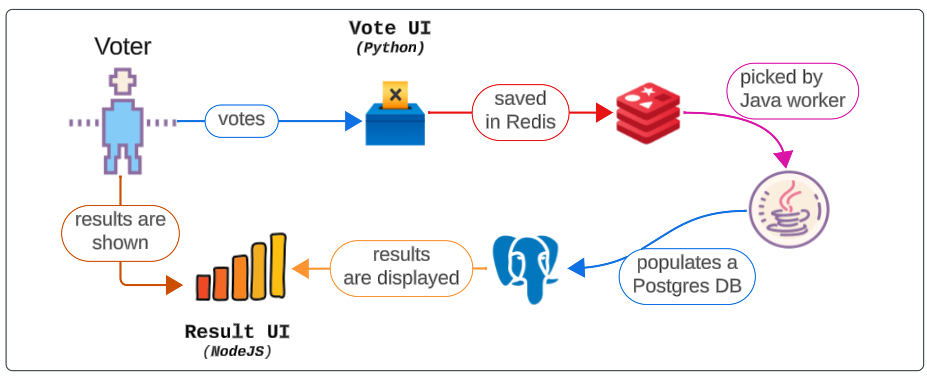
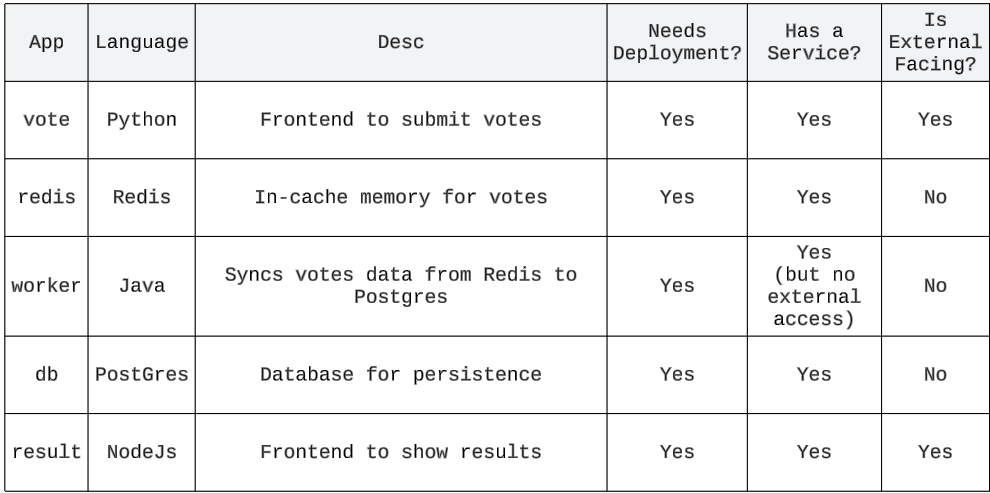
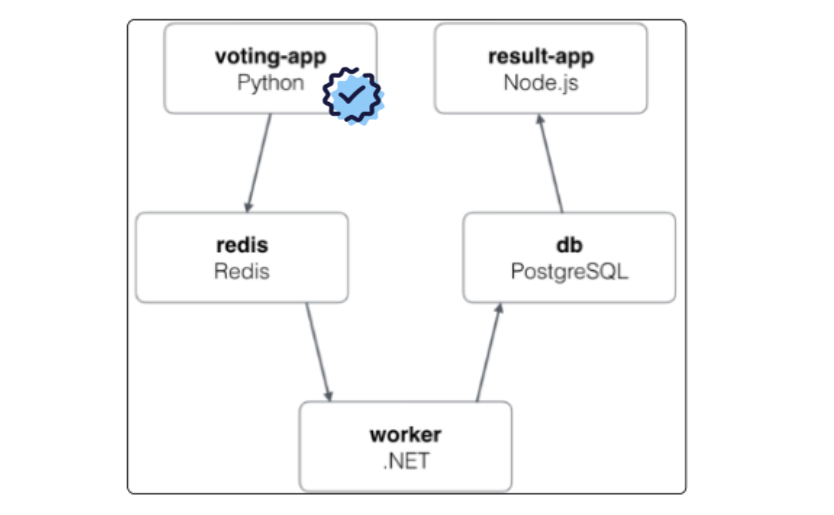
Here is where the forked git repo (instavote) will start to be useful. It is a polyglot voting application and is a great example showing how differing tools can be bound together in a unified whole.
Setting up the instavote application for demo
- #1: Fork the repo if not done so far
- #2: Clone the repo to your development environment
git clone https://github.com/<GitHub user name>/instavote.git- List the directories inside the cloned repo folder using
tree -d -L 2 The output will show the main folders comprising the application
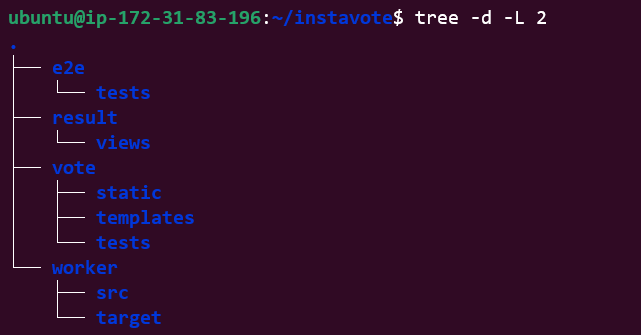
Installation is simple. Use sudo apt install tree.
Browsing through the various virgin directories, you will notice there are Dockerfiles and other configuration files but no YAML manifests for deploying the app to a K8s cluster. We will remedy this soon.
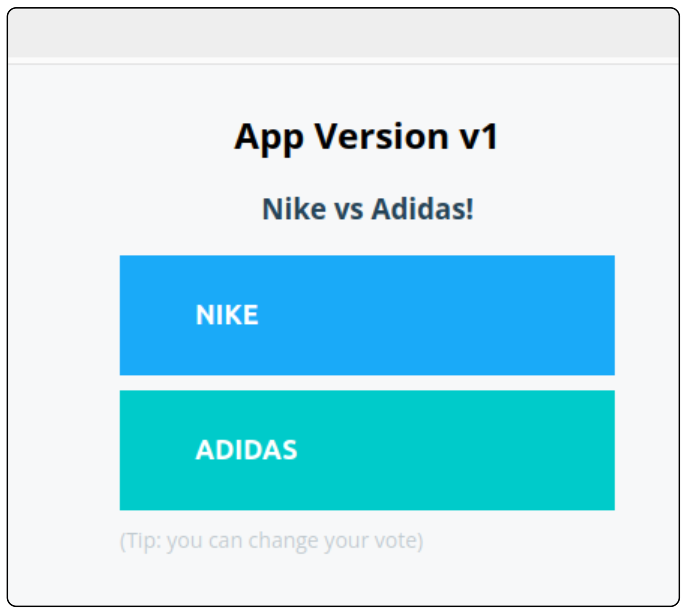
The use case under consideration
A voter will vote between options, and their selected option will be saved to a Redis cache, which is eventually picked up and shown via a NodeJS front end.
Let's deploy the application to our cluster
Follow the steps and provided commands (below) to create simple deployment/service combinations for instavote.
Configure essential configuration for the active GitHub user
git config --global user.name "usmanlakhani"
git config --global user.email "usmanlakhani@hotmail.com"
Create additional directories inside instavote
cd instavote
mkdir deploy && cd deploy
mkdir vote redis && cd vote
Generate a basic Deployment and Service manifest for the vote and redis app
For votes Pod and Service
# For vote Pods
kubectl create deployment vote --image=schoolofdevops/vote:v1 --replicas 2 --dry-run=client -o yaml > vote-deployment.yaml

# For vote Service
kubectl create service nodeport vote --tcp=80 --node-port=30000 --dry-run=client -o yaml > vote-service.yaml
For redis Pod and Service
cd ..
cd redis

# For Pods
kubectl create deployment redis --image=redis:alpine --dry-run=client -o yaml > redis-deployment.yaml

# For Services
kubectl create service clusterip redis --tcp=6379 --dry-run=client -o yaml > redis-service.yaml
Stage code to check into instavote
# Check in the 4 new manifests files
cd $HOME/instavote

# List files that are new/edited and should be in source control
git status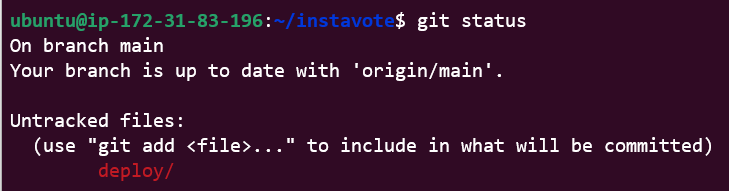
We did indeed add a new folder (deploy) with 2 sub folders (vote and redis). We also added a Deployment and Service manifest to each vote and redis folders.
Add staged code to a commit
git add *

# View list of committed code files/directory
git status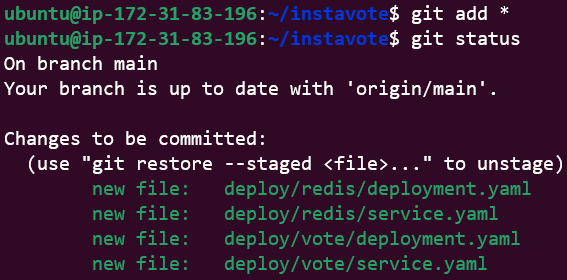
Finally, commit the code to instavote
git commit -m "Plain Deployment, Service manifests"
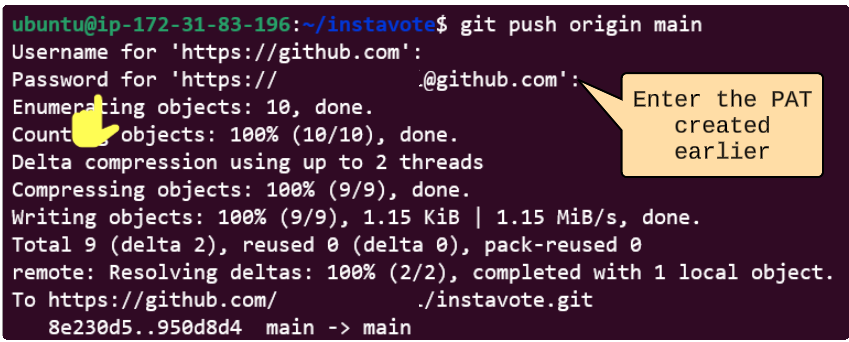
Push code to instavote
Create a manifest for configuring Source-Controller
Now it's time to make the Source Controller useful*.
Not at all. We have successfully implemented a GitOps flow using FluxCD, which involved setting up the Source and Kustomize Controllers. As with any Controllers, they need to be connected to something to perform their function. Now, we have reached a point where we can take action based on the controllers we have set up.
We already created a GitRepository Source-Controller (and at the cost of sounding like a broken record, this is the agent that keeps an eye on changes being introduced into the cluster's infrastructure).
Get the name of the Source-Controller
flux get sources git -n flux-system... and then use it to get more metadata details related to it
kubectl describe gitrepository flux-system -n flux-system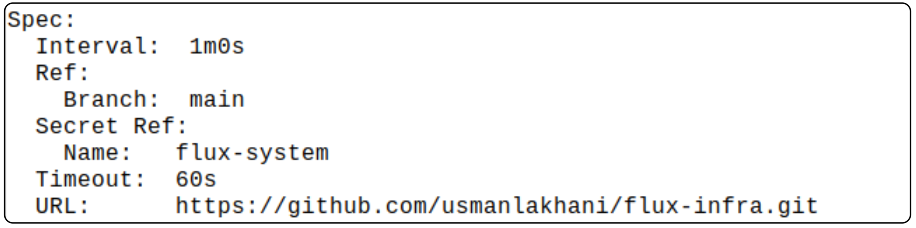
Some default values that are important to keep in sight are:
- Spec.Interval: Check for updates in main application repo after 1 minute
- Spec.Ref.Branch: The branch under investigation is main
- Spec.Secret_Ref.Name: The secret where GitHub credentials are saved
- Spec.Timeout: When looking for sync-able changes every 1 min, if the sync fails, only retry for 60 seconds. After 60 seconds are over, abort any efforts
- Spec.URL: The URL of repo where Source-Controller manifest is saved
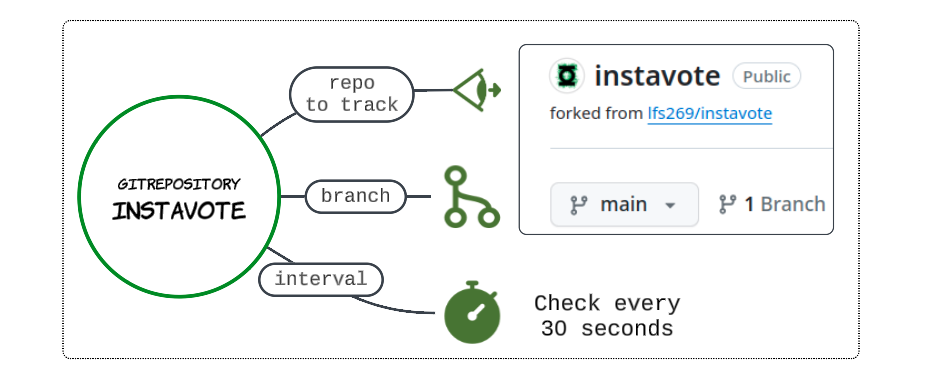
We will now create a Source object
flux create source git instavote \
--url https://github.com/usmanlakhani/instavote.git \
--branch main \
--interval 30s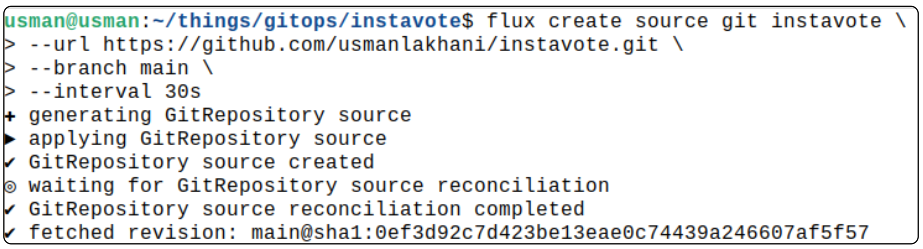
We can confirm the Source object was successfully created.
kubectl get gitrepositories -n flux-system
Create a Kustomization object to receive alerts about changes to K8s infra from the Source Controller.
Before proceeding, check the existence of the Kustomization that was installed as part of FluxCD's installation process.
flux get kustomizations 
# Create instavote namespace
kubectl create ns instavote
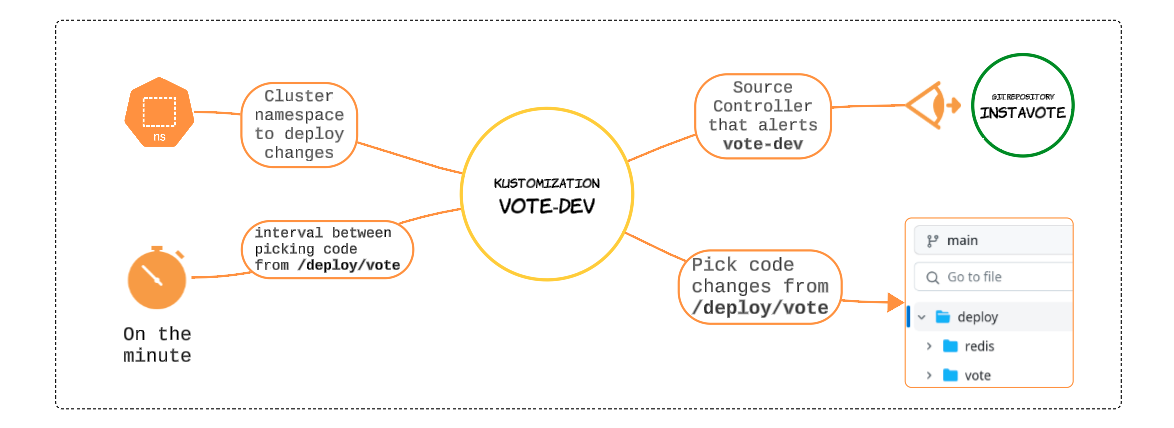
flux create kustomization vote-dev \
--source=instavote \
--path="./deploy/vote" \
--prune=true \
--interval=1m \
--target-namespace=instavote
Check the kustomization was indeed created.
flux get kustomizations
For kustomization vote-dev, this is a first-time reconciliation between the instavote Source object and itself. If everything has gone right, we should be able to list Pods and Services related to the instavote application.

Architecturally Speaking
List the Pods, Services, and Controllers using the commands below.
kubectl get all -n instavote
kubectl get gitrepositories -n flux-system
kubectl get customizations -n flux-system

# With FluxCD
flux get customizations
flux get sources git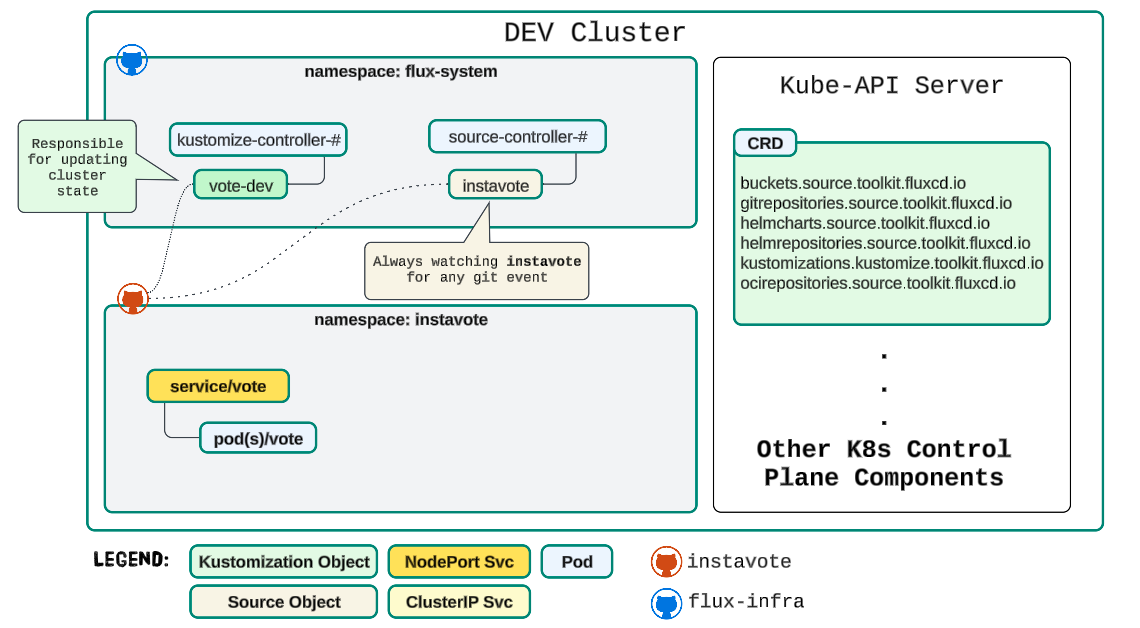
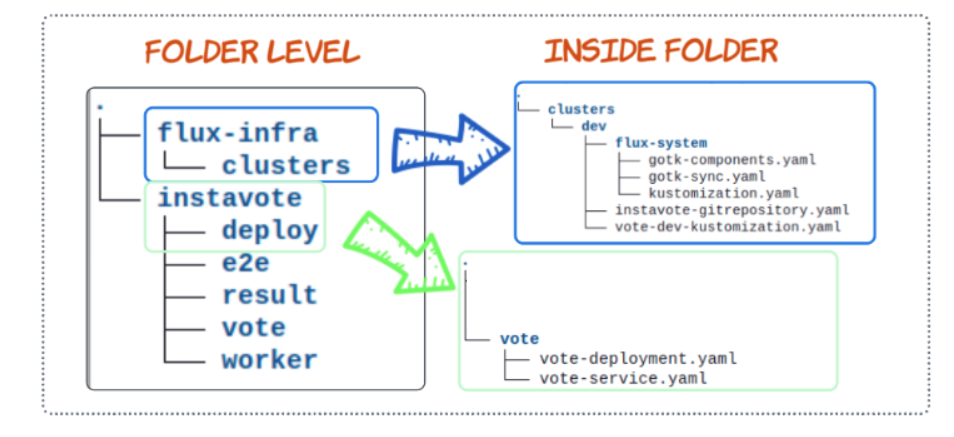
- All FluxCD Controllers and their associated manifests (like the instavote GitRepository Source Object and vote-dev Kustomization Object) will be saved in the flux-infra GitHub repo
- Core application code and manifests will be saved in instavote GitHub repo
Step 1: Get the Port being exposed using kubectl get svc -n instavote
Step 2: If using a Cloud Providers VM
- use curl ifconfig.io to get the VM public IP
else assume the IP address is localhost
Step 3: Finally, type the http://<Public IP>:<NodePort>
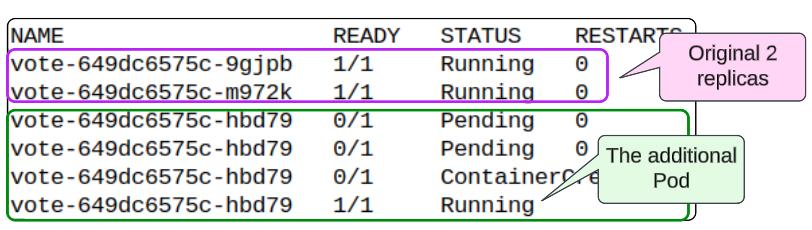
Let's make a minor change to instavote's infrastructure
We can run a simple yet incredibly powerful example to witness GitOps capabilities. We will increase the replicas from 2 to 3 and check in the edited vote-deployment.yaml file to instavote repo.
Get a listing of labels that are currently applied to Pods.
kubectl get pods -n instavote
In the deploy/vote/vote-deployment.yaml file, change the number of replicas from 2 to 3 and check the file into the instavote repo.
Check in the changed file to instavote repo. Simultaneously, execute
kubectl get pods -n instavote -watchYou should see a third Pod created after our prescribed intervals are over. This was the result of us making a change to the vote-deployment.yaml file, checking it into the instavote repo and then twiddling our thumbs while FluxCD's agent and reconciler do what they are supposed to, i.e. keep our K8s cluster infrastructure aligned with our needs.
One more thing before you leave.
Remember the Source (instavote) and Kustomization (vote-dev) that we implicity configured using FluxCD CLI? Like all responsible system engineers, we should make sure to generate YAMLs for both and save them to the flux-infra repo.
Step 1: Clone the flux-infra repo
*Ideally you should clone it into a folder that is at the same level as the instavote folder.
Step 2: Use the flux export module to extract a manifest from instavote source object
# 1. Ensure you are at the same level as the app folder (i.e. instavote)
# 2. Extract the YAML from both instavote and vote-dev
# 3. Navigate to the /cluster/dev folder

flux export source git instavote >> instavote-gitrepository.yaml
Load the manifest on your terminal to ensure it passes the smell test (using your eyes?).

Step 3: Repeat to extract a manifest from vote-dev kustomize object
flux export kustomization vote-dev >> vote-dev-kustomization.yaml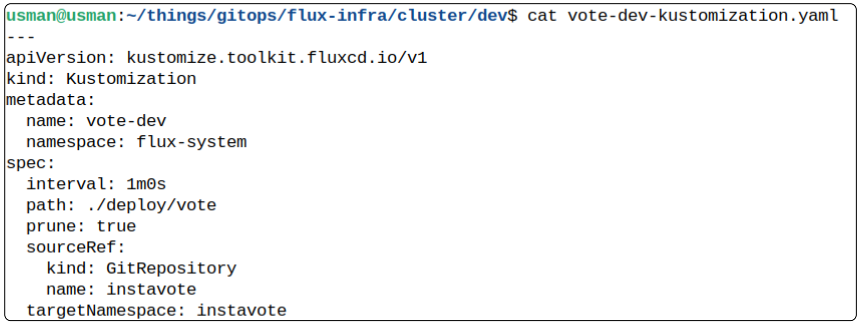
Step 4: Push both manifests to the flux-infra repo
git add *
git commit -m "add your comment"
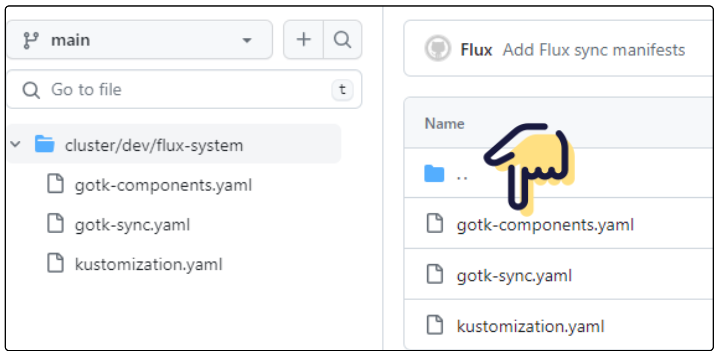
git push origin mainOnce the code is checked in, visually confirm their existence in flux-infra.
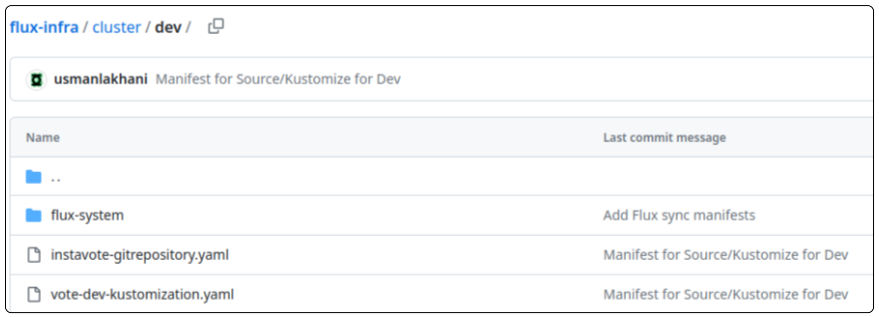
Summary: What and Why?
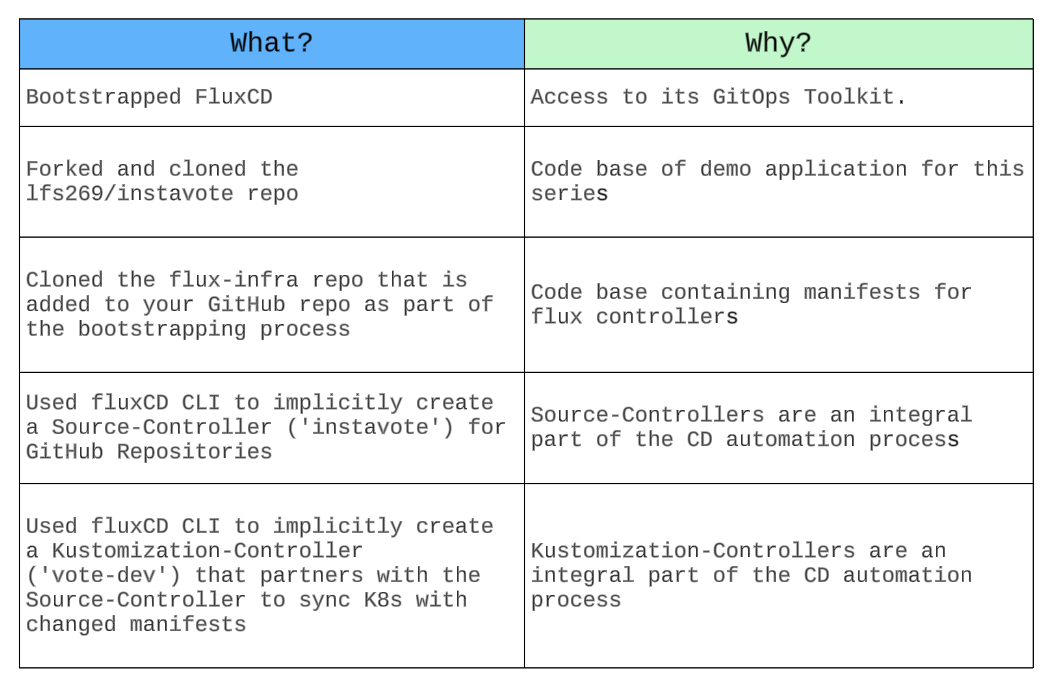
Instavote Application Components Deployed So Far
GitHub Folder Structure So Far
Good Night and Good Luck.
I write to remember, and if, in the process, I can help someone learn about Containers, Orchestration (Docker Compose, Kubernetes), GitOps, DevSecOps, VR/AR, Architecture, and Data Management, that is just icing on the cake.