Autoscaling AWS EC2.
"I am a soothsayer", he said !
"You know your fate then?", he was asked.
"I know that you know", the soothsayer replied.
Scaling resources in response to increasing needs can end up being a guessing game. Additionally, in days of yore, a human hand was consistently present, either wiring up new servers or turning on standby-units. Fortunately, AWS resources can be auto-scaled and in this article, we will look at how workloads on common AWS resources like EC2 instances, containers, and databases are scaled through out of the box automations.
Table of Contents
- Autoscaling 101
- Demo: EC2 Autoscaling
- Elastic Load Balancer in AWS
- Demo: Setting up an AWS Elastic Load Balancer
Autoscaling 101
Autoscaling is the process of dynamically allocating resources (adding or removing) as per the need of the system.
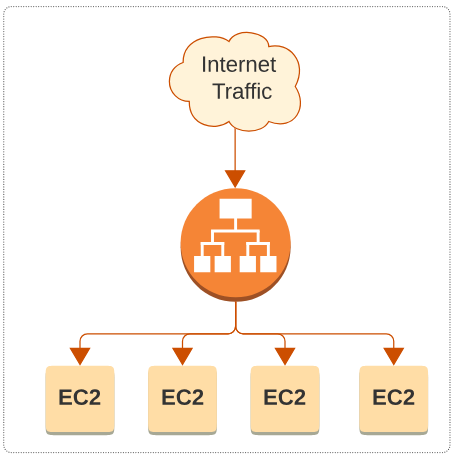
Figure 1 gives examples of a situation where autoscaling is critically important.
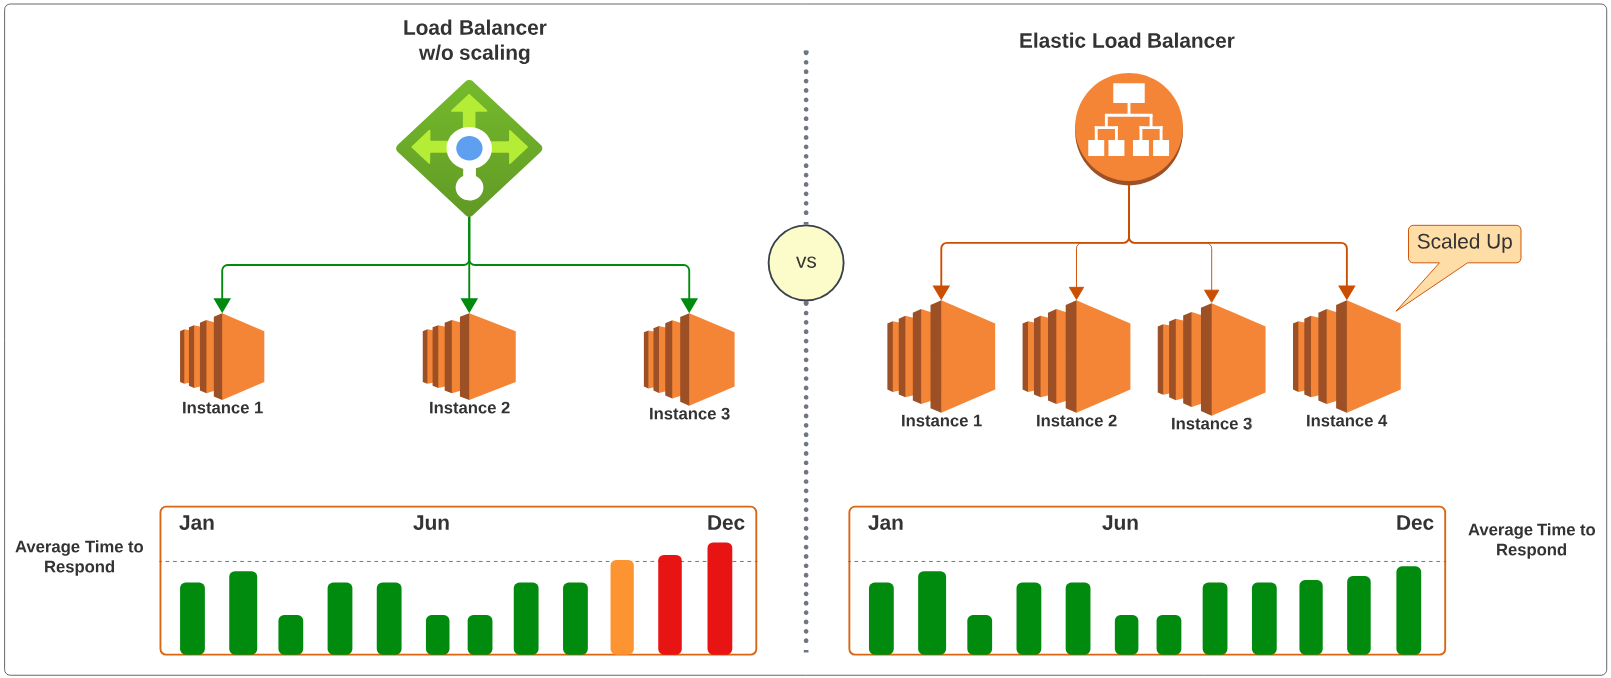
On the left in Figure 1, the retailer has a Load Balancer which is divying up the traffic across different EC2 instances but eventually, around the Christmas break, traffic spikes to a point where static Load Balancing is not working as hoped. In cases like these, IT Ops are usually spending their Christmas weekends wiring up additional server boxes.
On the right in Figure 1, the retailer decided to use Elastic Load Balancers for auto-scaling their EC2 instances as needed (and also remove the additional EC2 instances when the December madness comes to an end).
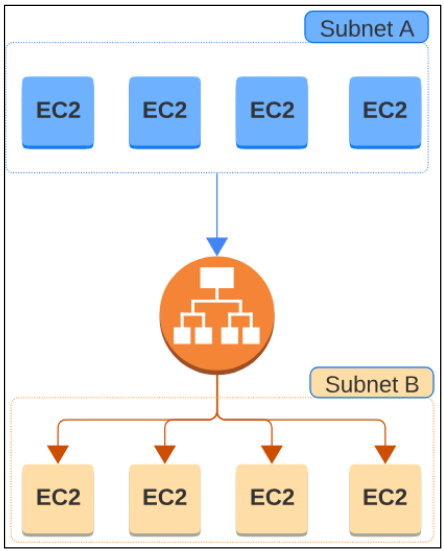
Figure 2 provides another use case for autoscaling.
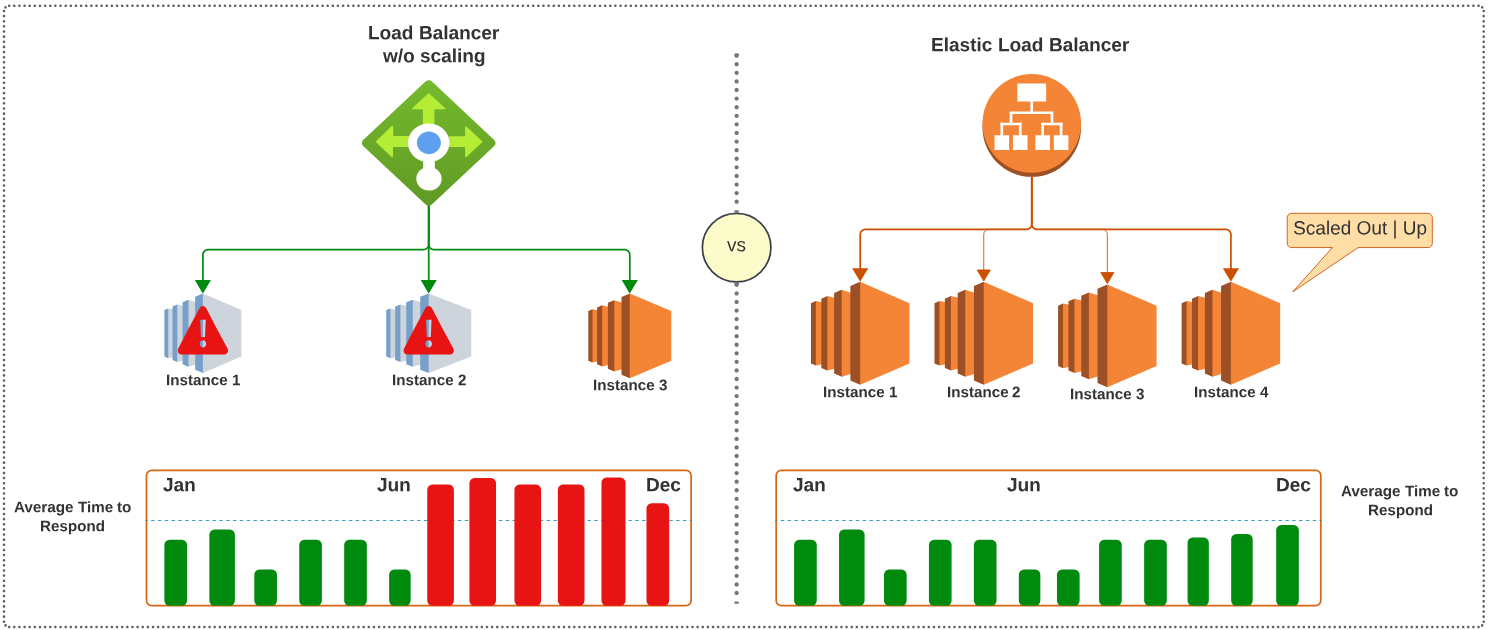
On the left in Figure 2, the retailer has a Load Balancer which believes it has 3 EC2 instances running in the back ground but if 2 of the 3 instances are down, the Load Balancer is now forced to send all the traffic to the only active EC2 instance.
On the right in Figure 2, the retailer decided to use Elastic Load Balancers for auto-scaling their EC2 instances as needed, without having to spend human resources on fixing this problem.
1- For EC2 instances, the autoscaling is called EC2 Autoscaling.
2- For other AWS services, like EMR, ECS, Databases, the autoscaling service is called Application Autoscaling.
Demo: EC2 Autoscaling
They say the proof of the pie is in the eating, and nothing gets more 'roll up our sleeves and dig in' then a demo.
For our demo, we will provision the following AWS resources:
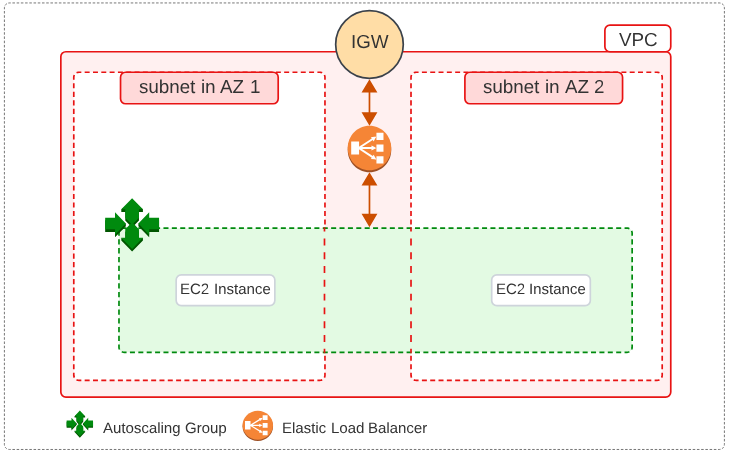
We will be using:
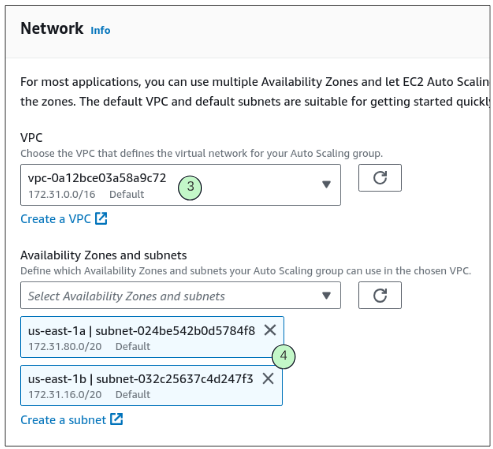
- 2 EC2 instances, both in different Availability Zones and different subnets.
- An AutoScaling Group for the 2 EC2 instances.
- A VPC.
- An Internet Gateway.
- An Elastic Load Balancer
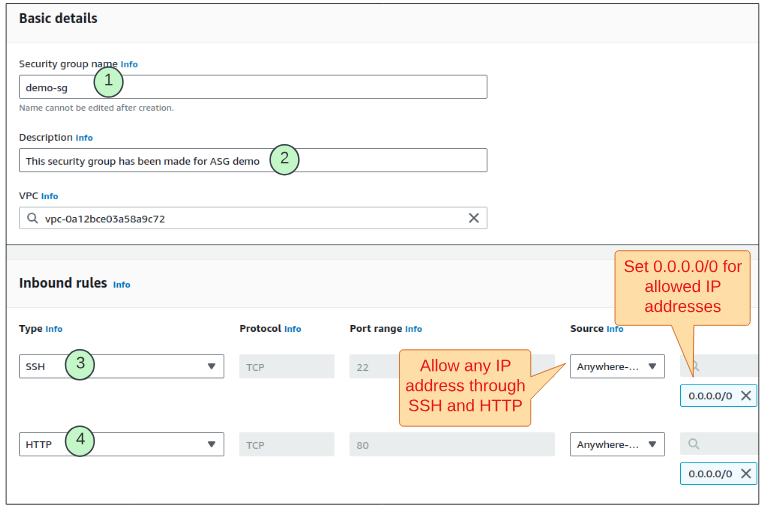
- A Security Group, which allows SSH and HTTP, applied to both EC2 instances.
Step 1: Configuring the Security Group
- Open the AWS EC2 Console and look for Security Groups in the left hand menu.
- Click the Create security group button.
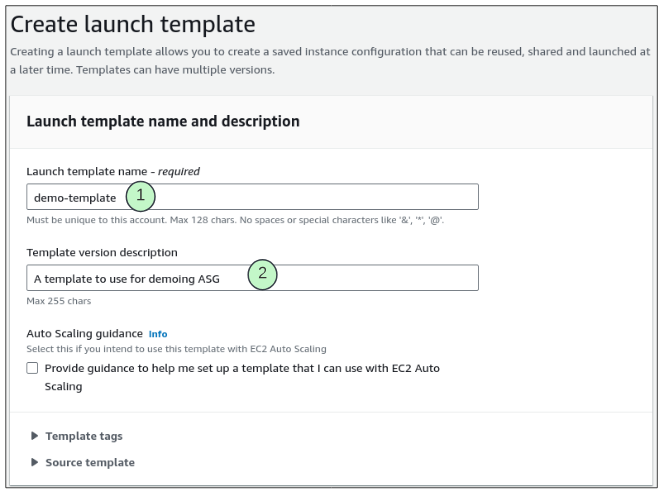
Step 2: Launching a Template
- In the left hand list on the AWS EC2 Console, select the Launch Templates option.
- Click the Create launch template button.
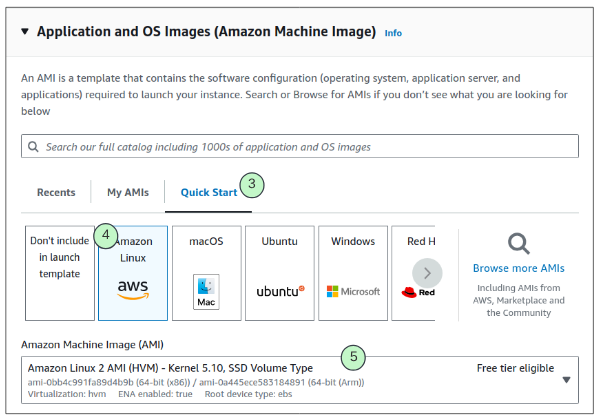
- Select an AMI from any of those available through AWS. For this demo, we used the Quick Start list for our AMI.
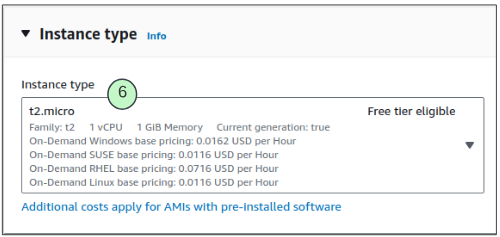
- Choose t2.micro Instance type from the list of instance types.
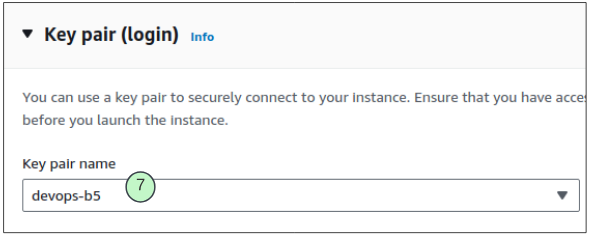
- Pick the SSH key to use from your list of available SSH keys.
- Create a new network interface and attach the Security Group made in Step 1 to it.
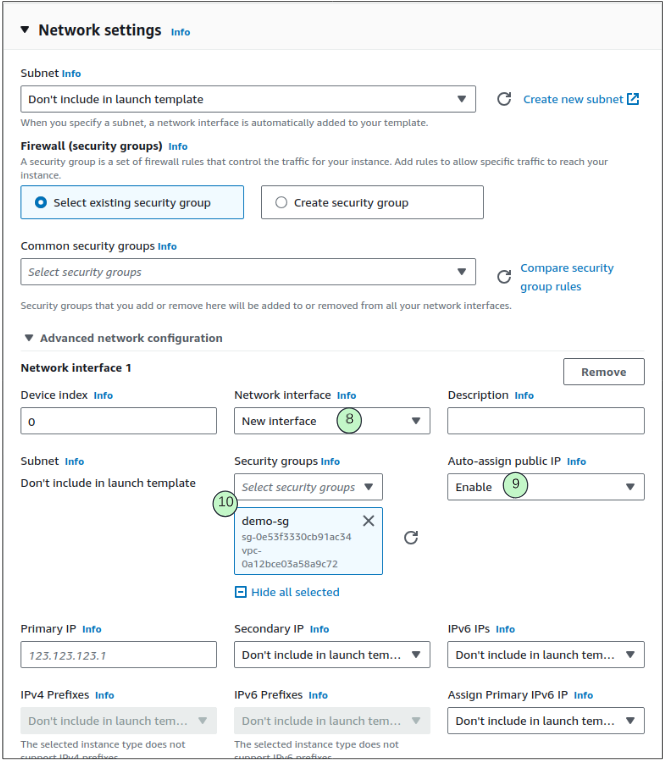
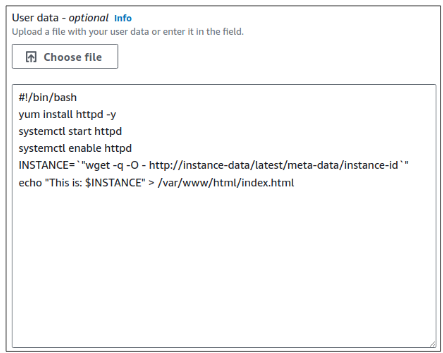
- Scroll all the way down to the User Data text box and enter the following script in it.
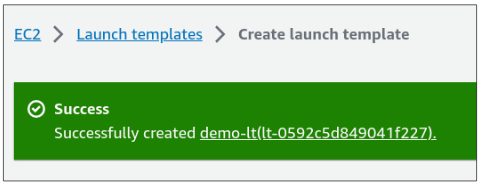
- Launch the template.
Step 3: Creating Auto Scaling Group.
- Navigate back to the EC2 console.
- Find the Auto Scaling Groups option in the left hand menu and click it.
- The main console for Auto Scaling Groups will be displayed

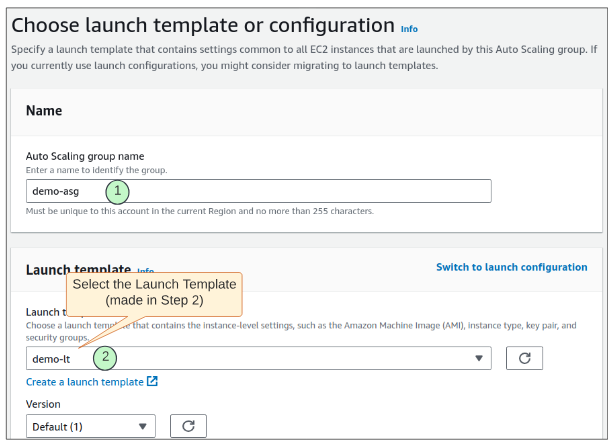
- Provide a name for this Auto Scaling Group and also select the Launch Template created in Step 2.
- On the Choose Instance Launch Options page
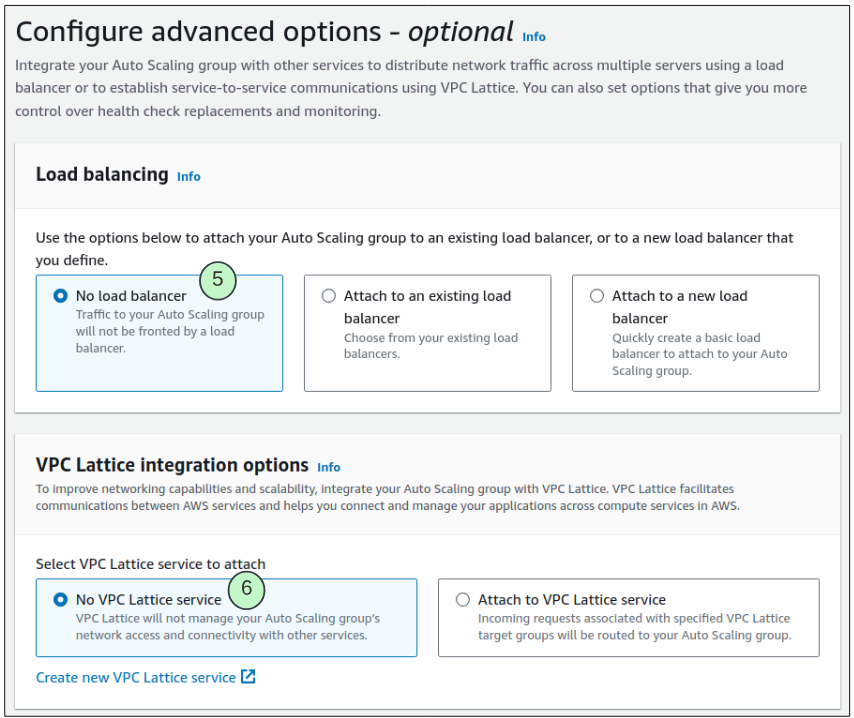
- On the Configure advanced options page, select No load balancer and No VPC Lattice Service.
- For Health Checks, reduce the number of seconds between checks from 300 to 120.
- On the next page (the Configure group size and scaling policies page), set Group size values.

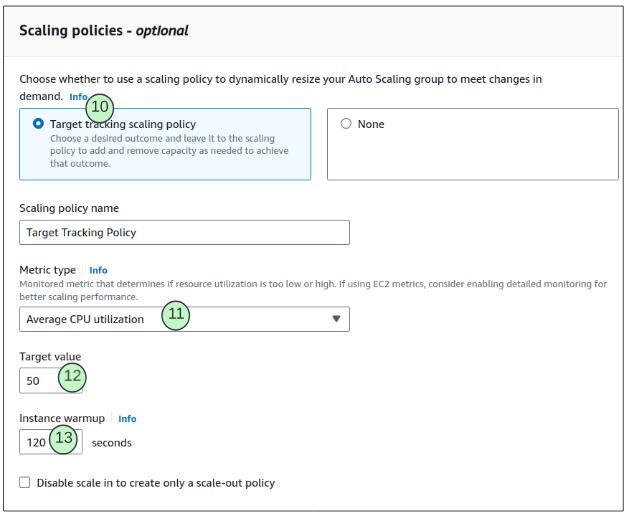
- The Scaling Policies section is an important part of the set up.
Any scaling policy requires (1) a metric to track and (2) a target quantity which if reached triggers auto scaling. For our demo, we will choose Average CPU utilization and as soon as the CPU is 50% busy, we will initiate an auto scale.
- The pages that follow are optional and you can either enter values in them or not.
- Finally on the review page, browse through the intended configuration before finally presing Create Auto Scaling Group.

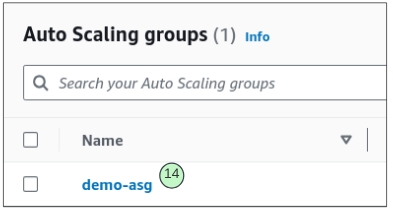
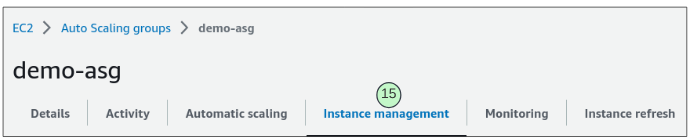
- Click on the demo-asg name.
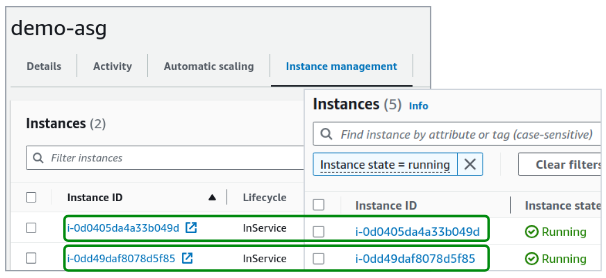
- The details page shows 6 tabs. Click the one titled Instance management.
- Note the instance Ids shown and then browse over to the EC2 console. The same EC2 instances will be shown there as well.
Step 4: Confirm EC2 Instances Initialized Properly.
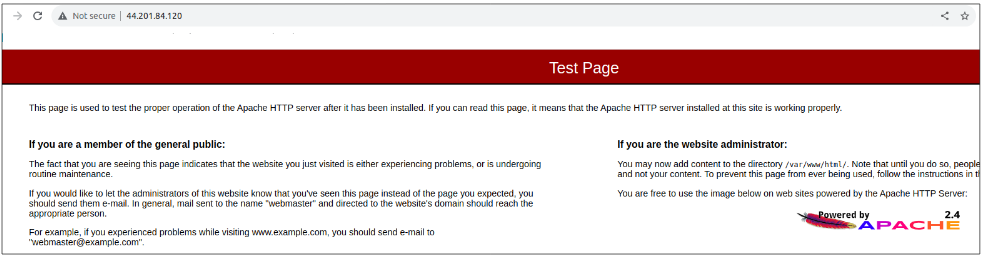
Since we used the User Data block to pass in post initialization commands (e.g. install httpd module and enable it), our EC2 instances should be able to serve an HTML page and thus confirm the web server was correctly installed.
- For one of the instances, copy the public IP address and paste into a browser. You should see a page confirming the web server is working.
Step 5: Testing Auto Scaling Group.
When setting up the scaling policy, we had:
- Desired capacity (or EC2 instances running at any time): 2
- Minimum capacity: 2
- Maximum capacity: 4
At the moment, our desired capacity is being satisfied.

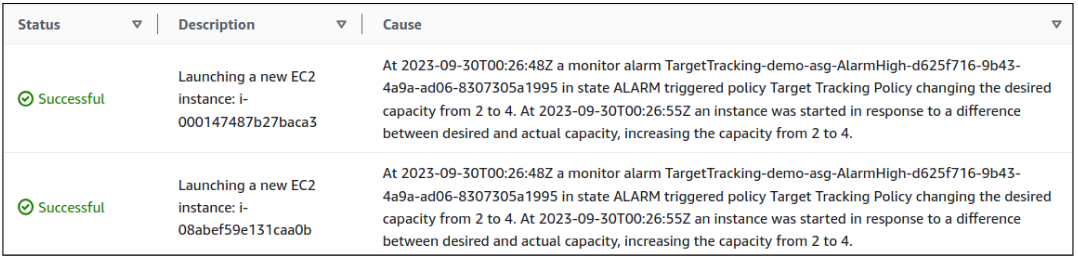
Test Case 1: Remove one of the instances.
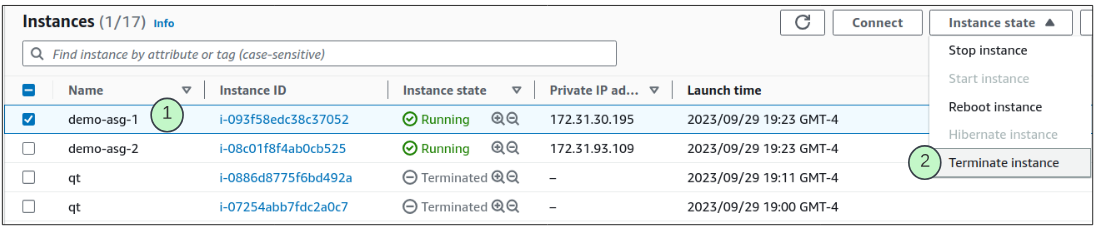
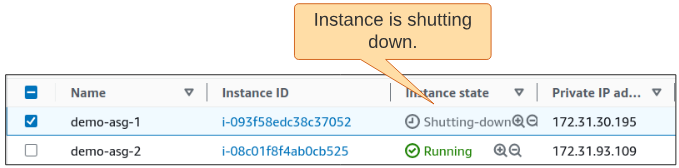
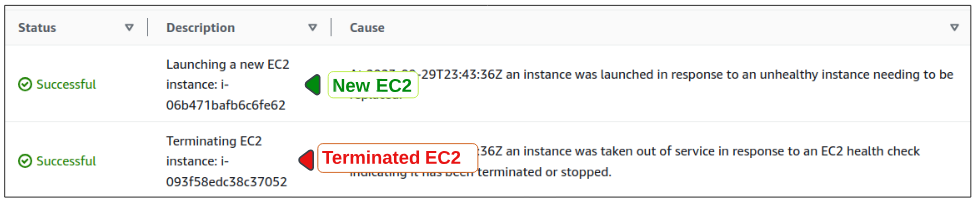
This is where the magic of auto scaling comes in. Even though we deleted an instance, the Auto Scaling Group (of which the deleted instance is a part) has clear instructions to always keep at least 2 EC2 instances running at all times, and we are not disappointed.

We can also confirm these events took place by visiting the Auto Scaling Group page and looking at the event log for demo-asg (under the Activity tab).
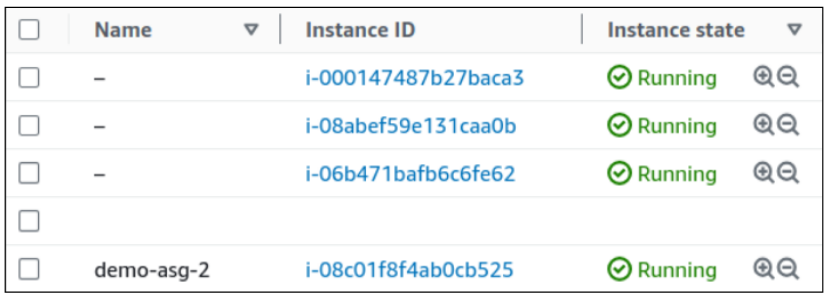
Test Case 2: Increase load on the EC2 instances.
For this test case, we will ssh into one of the running EC2 instances and install a stress module. This module is used to mimic web traffic and will put pressure on the Auto Scale Group, resulting in the spinning up of 2 more EC2 instances (as directed by us when setting Maximum capacity) for a total of 4 running EC2's.
- SSH into any one of the instances
- Install the stress module using the commands below
sudo amazon-linux-extras install epel -y
sudo yum install stress -y
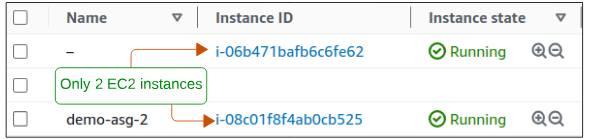
Before proceeding to stress the EC2 instance, confirm there are only 2 EC2 instances running.
- Initiate the stress test by using the following command
stress --cpu 8
This command will spawn 8 processes that will tax the CPU on this instance (and remember, we used the CPU utilization as our indicator for scaling).

After a while (it may take up to 10 mins, depending upon the AMI selected), additional EC2 instances will also spin up to push back on the stress being applied on one of its partners.
We can also check the Activity tab on the Auto Scaling Groups console and will see events confirming scaling policy was applied.
Elastic Load Balancer in AWS.
A Load Balancer, in general, distributes incoming traffic to registered targets such as
- EC2 Instances
- Containers
- Lambda Functions and others
The Elastic Load Balancer can have one of two orientations in AWS: Internet Facing OR Internal Facing.
Things to consider when determining type of Load Balancer to use.
| Type of Load Balancer | Application Load Balancer, Network Load Balancer or Gateway Load Balancer |
| Orientation | Internet facing or Internal facing |
| Security Group Configuration | Prevents unwanted protocol/IPs to access backend |
| Health Checks | Rules out targets that are unhealthy |
| Target Group | The Auto Scaling Group holding the EC2 targets (and where the Load Balancer sends traffic) |
Demo: Setting up an AWS Elastic Load Balancer.
Let's put our hard money, inflation impacted money where our mouths are and set up an Elastic Load Balancer (ELB) for our existing Auto Scaling Group.
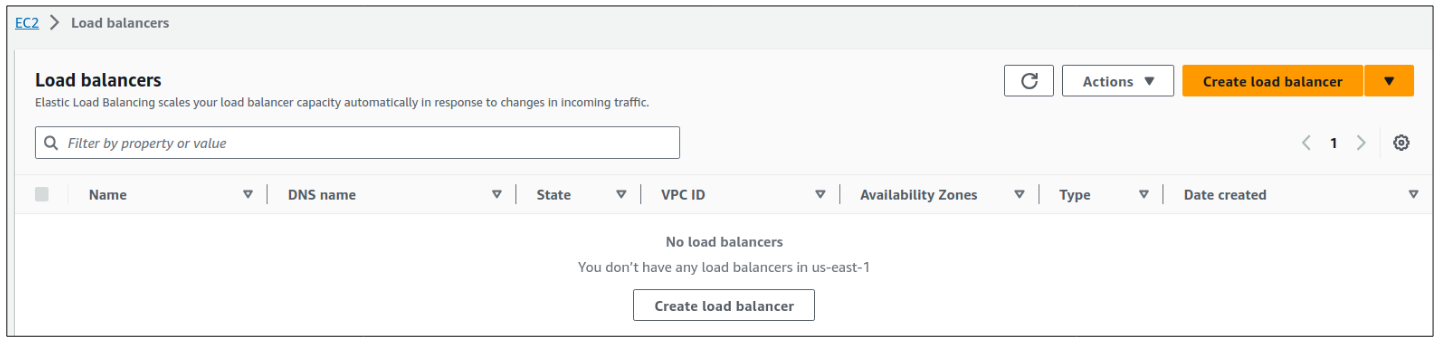
Step 1: Go to the Load Balancer Console.
Load Balancers are an option on the left hand side of the EC2 console.
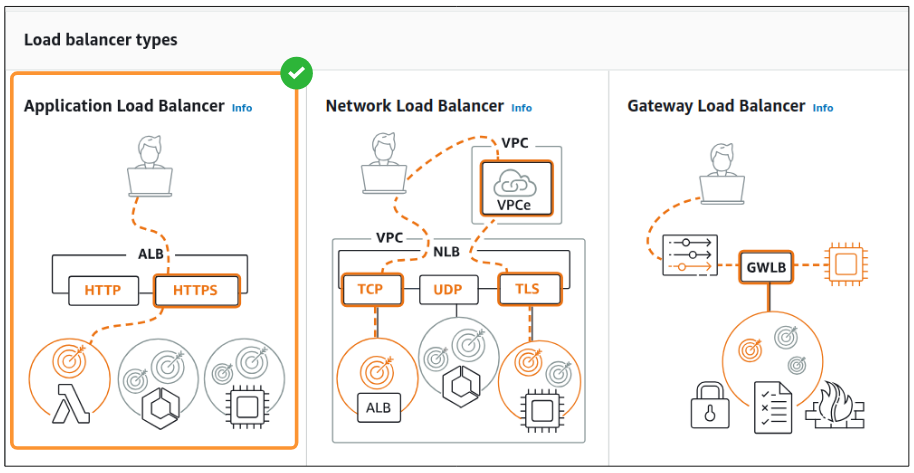
Step 2: Select the Application Load Balancer.
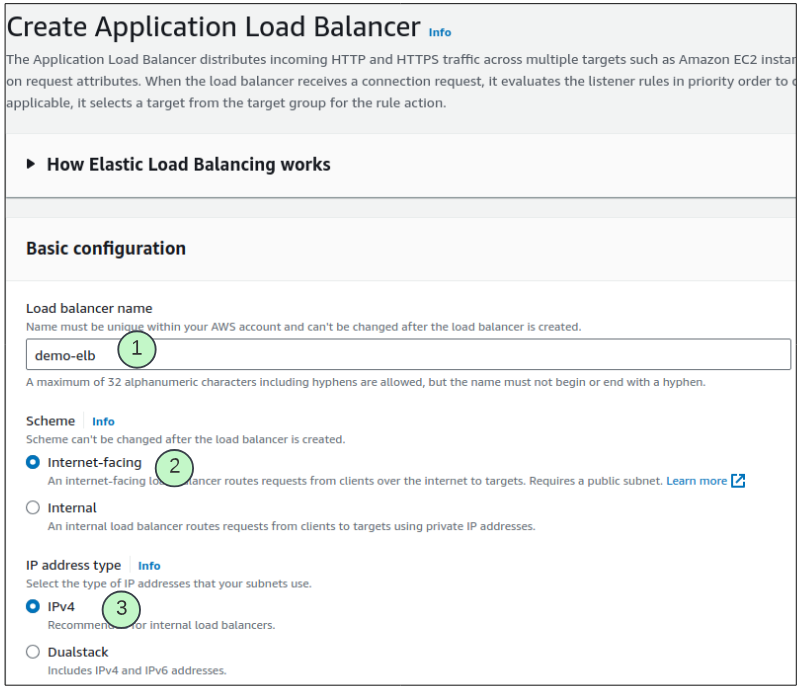
Step 3: Name the Load Balancer, choose its orientation and make it IPv4-ready.
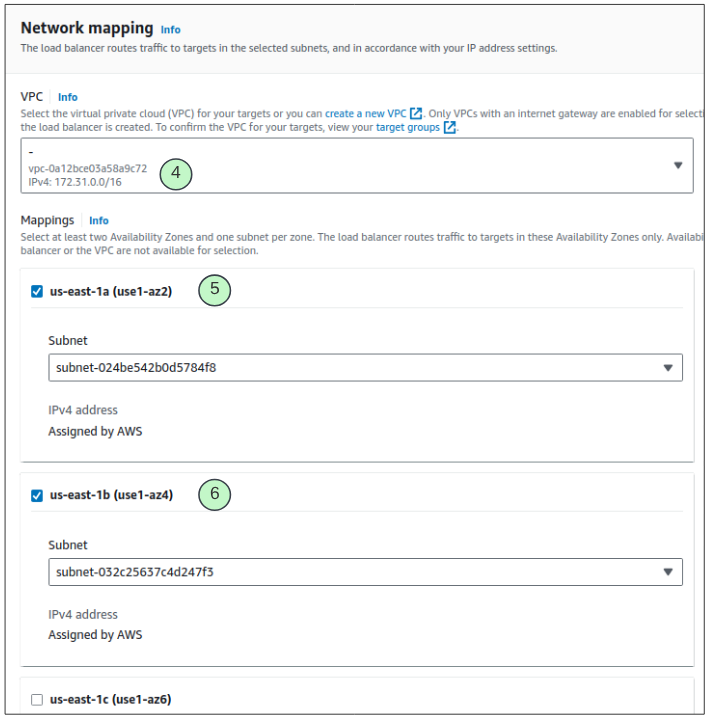
Step 4: Configure Networking.
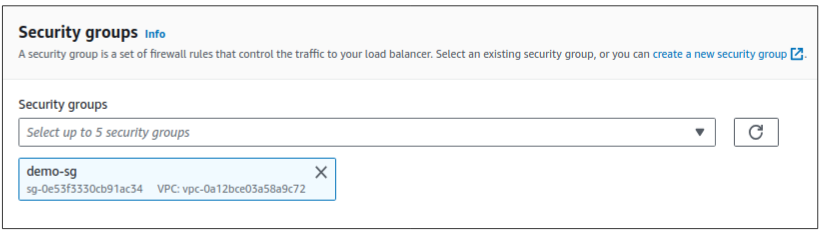
Step 5: Attach a Security Group.
The same group used for individual EC2 instances earlier can be reused here.
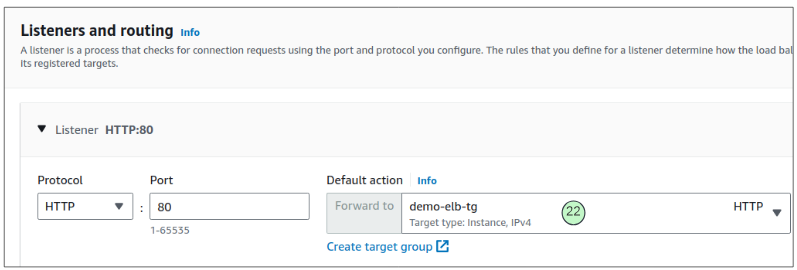
Step 6: Configure Routing.
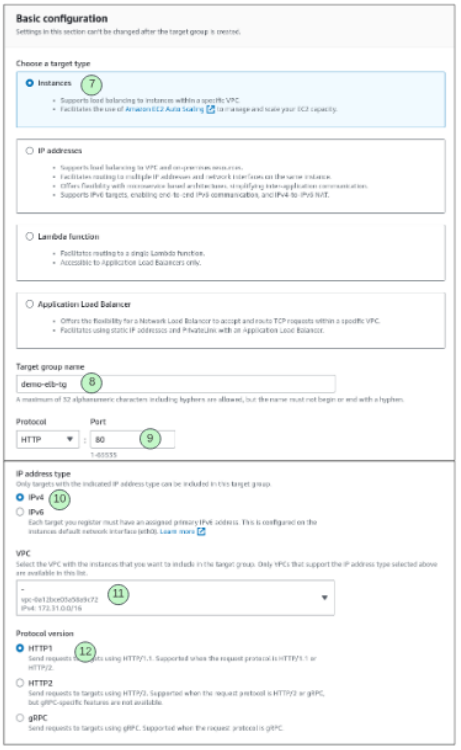
Select the target group for the ELB. Unless one exists, a new one has to be created.
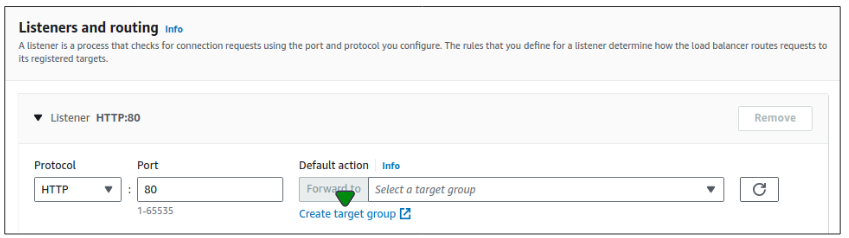
A new page (likely in a new tab) will open and list all the settings that need our attention.
Basic Configuration
Health Checks
Any Load Balancer needs to know if a server in its target group is working fine. Using the Health Checks, such types of inspection are configured for an ELB.
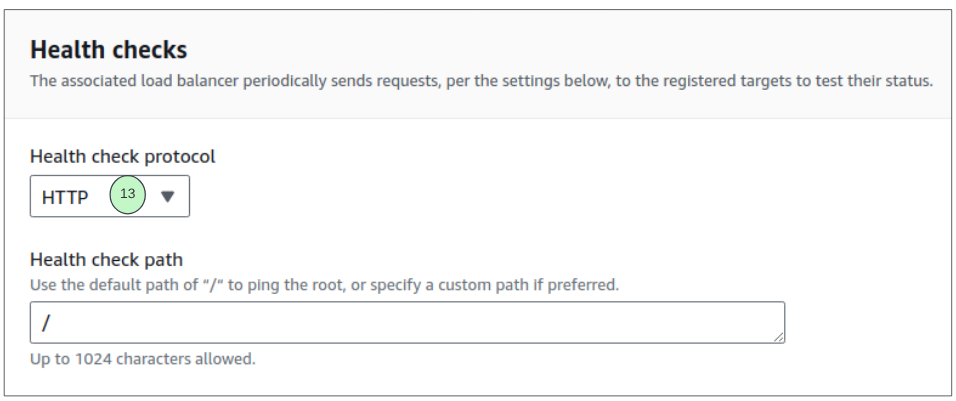
Advanced Health Check Settings

(14) Traffic port: The port over which HTTP protocol will be checked and distributed.
(15) Healthy threshold: After an EC2 instance becomes unhealthy, it MUST have 5 consecutive successful health checks before it will be considered healthy.
(16) Unhealthy threshold: If a healthy instance has 2 consecutive health check failures, it will be considered unhealthy.
(17) Timeout: When the ELB sends a health check signal to an instance and does not receive a positive response in 5 seconds, it will mark the instance as being unhealthy.
(18) Interval: Once checked for health status, the ELB will wait for 30 seconds before sending another probe.
(19) Success codes: For a health check to be considered successful, ELB will look for the 200 OK status code.
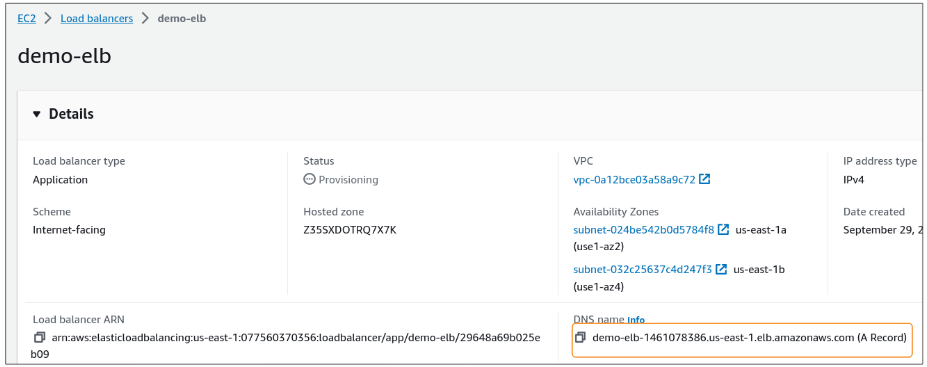
Step 7: Create the ELB.
Press the Create Elastic Load Balancer button.
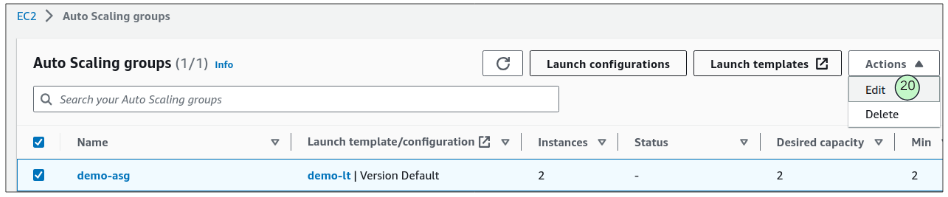
We will now connect the ELB with our Auto Scaling Group (demo-asg).
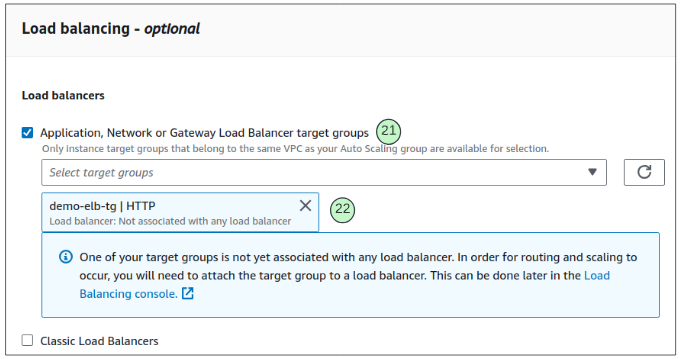
Step 8: Attach the ELB to demo-asg.
Go to the Auto Scaling Group console, select demo-asg and from the drop down list on the top right of the screen, select Edit.
Step 9: Attach the ELB to demo-asg.
Scroll to the Load Balancer section and select the Load Balancer Type and the target group.
Step 10: Complete the process by going back to the page from Step 6.
Remember how we went to a different page to set up target groups? That page was completed in Step 9 but we still have to complete the Load Balancer set up.
Go back to the Load Balancer page and add the target group.
Press the Create Load Balancer button.
Step 11: Test Load Balancer
Copy the DNS name value and paste in a browser. The page load should show the name of the instance that is serving the response to our request.
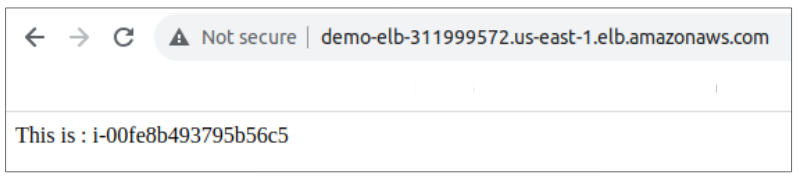
Refresh the page and the name of the EC2 instance should change to the other instance's name.
I write to remember and if in the process, I can help someone learn about Containers, Orchestration (Docker Compose, Kubernetes), GitOps, DevSecOps, VR/AR, Architecture, and Data Management, that is just icing on the cake.