Storing Docker Images.
Creating a Docker image is typically followed by storing it somewhere so others who may want to use our work can get a chance to download it. From personal experience, Docker images that were created by development teams, were tested and saved in a private registry (private since one had to be a member of the organization or have authorization to act as one), and deployed to production environments. Typically, deployment is the process of pulling an image from a repository and running it on one or more Linux servers. In this article, we will investigate image registries (public and private) and how to use them for distributing our images.
Table of Contents
- Public and Private Registries
- Logging into Docker Hub
- Pushing images to a public repository
- Pushing images to a private repository
Public and Private Registries
Public Registries, as the name suggests, are open to anyone who may want to download an image for an application. For example, Docker provides an image registry for public images, containing images that organizations and individual users want to share with others. The Docker public registry has official images for Linux distributions, IaC tools and other applications that can be downloaded and converted into running containers.
Private Registries are closed off to the public. Usually these Private Registries are hosted internally by organizations and, barring the fact they are inaccessible to unauthorized personas, support the same kinds of image management functions (like allowing images to be pushed into them OR allowing images to be pulled by authorized roles) that a Public Registry would.
Logging into Docker Hub
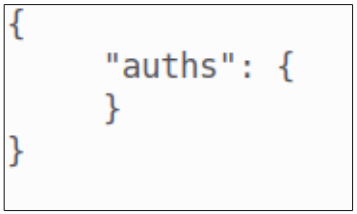
Logging into Docker Hub results in the creation of a file called /.docker/config.json. This file will cache credentials for accessing the Docker Hub (and other image repositories).
By typing
docker login
and entering the required username and password, Docker daemon will update the config.json file with provided credentials.
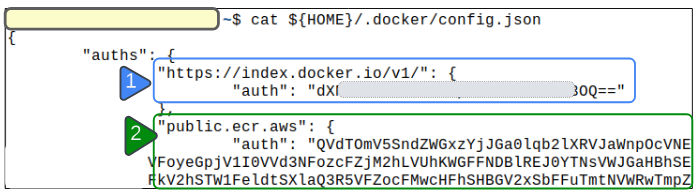
In Figure 2, we notice the presence of 2 authentication credentials:
- 1: The credentials used for logging into Docker Hub
- 2: The credential used for logging into an Elastic Container Registry on AWS
Having these credentials cached in this manner ensures frictionless pulling and pushing of images to a registry.
Pushing images to a public repository
(Docker Hub)
For this demo, we assume a Docker image is already available.
Step 1: Confirm an image is available for use.

Step 2: Push this image to a Docker Hub account.
Before pushing the image, you can choose to either keep the repo and image name the same OR you can change them both using the
docker image tag <repo and image name to change> <repo and image name to change to>

Step 3: List the images once again.

Step 4: Push the image with the new tag to Docker Hub.
Pushing an image to Docker Hub is simply a matter of using the docker image push command.

Pushing images to a private repository
There are times when a public registry is not appropriate for our images due a host of reasons (commercial, legal, reliability, IP etc). In these cases, it makes sense to host an internal private registry. Cloud Service Providers like AWS have Elastic Container Registry that can be used as a private repository for our images. In this article though, we will create a simple secure registry using SSL and HTTP basic authentication.
Step 1: Clone a Git repo containing the basic files required for setting up a simple authenticated Docker registry.
The git repo can be cloned using
git clone https://github.com/spkane/basic-registry
--config core.autocrlf=input
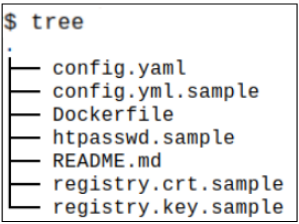
Once downloaded, change your working directory to basic-registry.
Listing the contents of the directory show us a number of YAML file, a Dockerfile and some certificate files.
Whats inside the config.yml.sample file?
As the name of the file suggests, config.yml.sample includes the various configuration values needed for setting up the simple private registry.
The most important area in this file is shown in Figure 8.
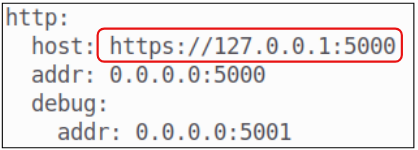
For this article, the Docker server is being run on local host and therefore the host key will continue to have https://127.0.0.1 IP address. If your Docker server is somewhere else, don't forget to change the host attribute to the right IP and Port.
Once the relevant changes to the config.yml.sample file have been done, copy its content to the other config.yaml file in the directory. The config.yaml is empty as you initiate the copying. The command to copy the contents between files is provided below
cp config.yml.sample config.yaml
Whats inside the htpasswd.sample file?
This file contains a password that will be used for authentication purposes. You can create your own username and password OR use the included ones.
To use the provided password and username, copy the contents of htpasswd.sample to a file called htpasswd.
cp htpasswd.sample htpasswd
To generate your own password and username, use the provided command.
docker container run --rm --entrypoint htpasswd g -Bbn ${<some user name>} ${<some password>} > htpasswd
Step 2: Create an SSL keypair for your registry's IP address.

Step 3: Finally create the registry.
The registry can now be created using docker commands
$ docker image build -t my-private-registry .
$ docker container run --rm -d -p 5000:5000 --name registry my-private-registry
$ docker container logs registry
The last command will display logs from the my-private-registry container.
Step 4: Push an image to the private registry.
To push an image to the registry, we of course have to log in to it.
$ docker login 127.0.0.1:5000
Username: <get from htpasswd>
Password: <get from htpasswd>
Once login has succeeded, we can follow the same Docker commands we used in the past to push an image to the private registry.
$ docker image tag my-private-registry 127.0.0.1:5000/our-pri-reg
$ docker image push 127.0.0.1:5000/our-pri-reg
Step 5: Pull the image just pushed.
$ docker image pull 127.0.0.1:5000/our-pri-reg
I write to remember and if in the process, I can help someone learn about Containers, Orchestration (Docker Compose, Kubernetes), GitOps, DevSecOps, VR/AR, Architecture, and Data Management, that is just icing on the cake.