Creating Docker Containers.
As per the README file for libcontainer,
A container is a self-contained execution environment that shares the kernel of the host system and is (optionally) isolated from other containers in the system.
All the effort we put into turning our code base into images (through Dockerfiles) is geared for the purpose of creating Containers of our code. Suddenly, with Containers, we don't have to worry about the programming framework for our code but be sure in the knowledge that the Containers runtime will make that a non-issue.
In this article, we look at Docker Containers and how they are created.
Table of Contents
Creating a Container
The Docker Daemon makes turning an image to a container straight forward. We can tell it how we want the container to be configured for us and it will do the rest.
Some configuration details we can pass to Docker Daemon are:
Naming a Container
By default, Docker Daemon will assign a random name to a container UNLESS of course you ask it to use something you want. The --name switch tells Docker Daemon to take our provided name and not use its own creation.
Lets create and start an nginx container for the purpose of demonstrating Docker Daemon's naming logic.
docker container run nginx
*Note: RUN is a combination of CREATE and START !

We can provide a more operationally appropriate name to our nginx container by either
a. Stopping the container and re-starting it again OR
b. Using the docker container rename command
(a) Stopping and re-starting to rename a container
First we stop the running container
$ docker container stop elegant_greider
*The name Docker gives your container will be different. Please use that.
Restart it using
$ docker container run --name my-nginx-container nginx

(b) Using docker container rename
$ docker container rename my-nginx-container your-nginx-container

Labeling a Container
Labels are key-value pairs that are applied to Docker images and become part of a containers metadata.
Labeling a container is achieved using Docker Daemon as shown below
$ docker container run --rm -d --name labeled-container -l deployer=john -l owner=jack nginx
The command above will apply 2 labels to the nginx container we are launching: deployer=john and owner=jack.
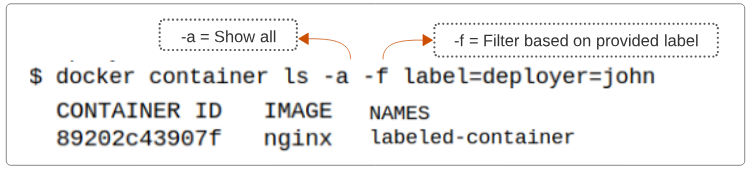
We can now use applied labels to filter out any container which has labels deployer=john and owner=jack.
$ docker container ls -a -f label=deployer=john
Use docker container inspect to check the labels in a containers metadata.
$ docker container inspect labeled-container
will display the metadata for the container labeled-container as shown below.

Storage Volume
There are many moments when we, as users of a container, want to save data generated inside the container for future use BUT since containers can have limited storage space and are ephemeral, additional steps have to be taken to set up any storage capabilities.
$ docker container run --rm -ti -v /mnt/session_data:/data ubuntu:latest /bin/bash
The command provided above has the -v switch used for mounting a folder on the host to a folder inside the running ubuntu container:
- '-v' tells Docker Daemon to map...
- /mnt/session_data folder inside the host to ...
- /data folder inside the running container
I write to remember and if in the process, I can help someone learn about Containers, Orchestration (Docker Compose, Kubernetes), GitOps, DevSecOps, VR/AR, Architecture, and Data Management, that is just icing on the cake.